728x90

들어가며

Proxy에서 처음 접하게 된 것은 제로초님의 쇼츠였습니다.  객체를 가공해서 사용할 수 있게 하는 일종어가며

Proxy에서 처음 접하게 된 것은 제로초님의 쇼츠였습니다. 객체를 가공해서 사용할 수 있게 하는  미들웨어 느낌의 객체입니다. 해당 쇼츠에서는 객체가 에러를 뱉도록 가공하는 예시를 보여줬었습니다.


리액트 훅을 활용한 마이크로 상태관리에서 Valtio가  Proxy 기반으로 상태관리를 한다는 사실을 접하게 되고, proxy란 무엇이고 Valtio에서는 어떻게 사용하는지 자세히 알아볼겸 포스팅하게 되었습니다.


프록시란?

mdn에서 나타낸 프록시의 정의는 아래와 같습니다.

Proxy 객체를 사용하면 원래 Object 대신 사용할 수 있는 객체를 만들지만, 이 객체의 속성 가져오기, 설정 및 정의와 같은 기본 객체 작업을 재정의할 수 있습니다. 프록시 객체는 일반적으로 속성 액세스를 기록하고, 입력의 유효성을 검사하고, 형식을 지정하거나, 삭제하는 데 사용됩니다.


let proxy = new Proxy(target, handler)
  • target – 감싸게 될 객체로, 함수를 포함한 모든 객체가 가능함
  • handler – 동작을 가로채는 메서드인 '트랩(trap)'이 담긴 객체로, 여기서 프락시를 설정함

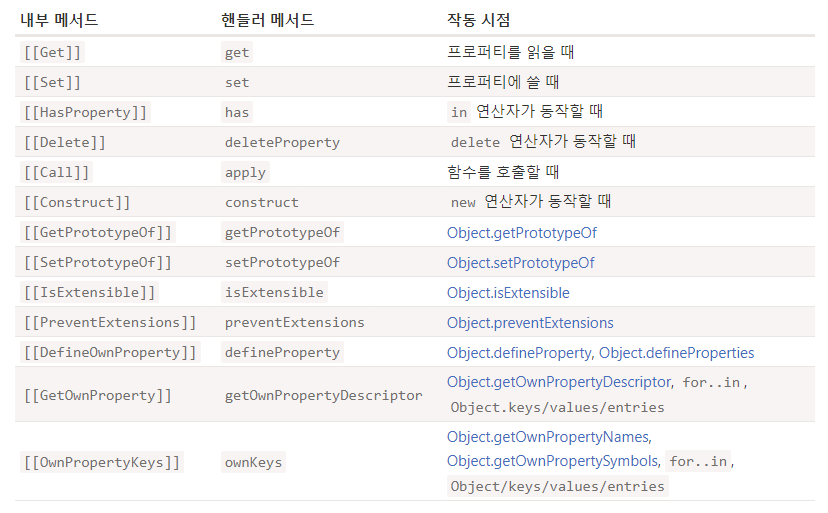
그리고 이때 handler에 사용할 수 있는 메서드는 아래와 같습니다.

https://ko.javascript.info/proxy#ref-1033


아래는 javainfo에서 보여준 get메서드를 활용한 proxy 사용 예시입니다. 

let numbers = [0, 1, 2];

numbers = new Proxy(numbers, {
  get(target, prop) {
    if (prop in target) {
      return target[prop];
    } else {
      return 0; 
    }
  }
});

console.log( numbers[1] ); // 1
console.log( numbers[123] ); // 0

이와 같이 객체를 가공하여 추가적인 기능을 삽입할 때 사용할 수 있는 툭수한 객체라고 생각하면 됩니다.


이제 Valtio에 대해서 알아보고  Valtio에서는 Proxy를 어떻게 사용하는지 알아보려고 합니다.

Valtio란?

리액트 훅을 활용한 마이크로 상태관리의 저자이자 Valtio를 만든 다이시 카토는 아래와 같이 Valtio를 설명합니다.

갱신 모델의 상태 관리 라이브러리이자 상태 사용 추적 기법 기반으로 렌더링 최적화를 하는 라이브러리


proxy는 상태를 감지하는 변경가능한 상태를 만들고, snapshot을 통해서 변경 불가능한 객체(Object.freeze 기반)를 만든다.

import { proxy, useSnapshot } from 'valtio';

const state = proxy({
  count1: 0,
  count2: 0,
});

const Counter1 = () => {
  const snap = useSnapshot(state);
  const inc = () => ++state.count1;
  return (
    <>
      {snap.count1} <button onClick={inc}>+1</button>
    </>
  );
};

const Counter2 = () => {
  const snap = useSnapshot(state);
  const inc = () => ++state.count2;
  return (
    <>
      {snap.count2} <button onClick={inc}>+1</button>
    </>
  );
};

const ValtioCounter = () => (
  <>
    <div>
      <Counter1 />
    </div>
    <div>
      <Counter2 />
    </div>
  </>
);

export default ValtioCounter;


Counter 1 2는 각각 상태 count 12 를 사용하고 있다. zustand나 redux처럼 별도의 selector를 사용하지 않기에, 리렌더링 최적화가 안될거 같지만 앞서 언급한 상태 사용 추적기법에 의해서 리렌더링이 최적화가 되어있다.

1을 눌렀을 때 2가 리렌더링 되지 않음


useSnapshot 훅에서  나온  스냅샷을 컴퍼넌트가 사용하게 되면 해당 컴퍼넌트가 특정 상태를 사용하는 것을 기억한다. 이후 상태가 변경하였으면 proxy에서 특정 상태의 변경을 알리고 이를 통해  useSnapshot훅이 컴퍼넌트가 사용하기 있는 객체가 변경 되었으면 리렌더링을 하는 것이다.


Valtio내부 코드 확인

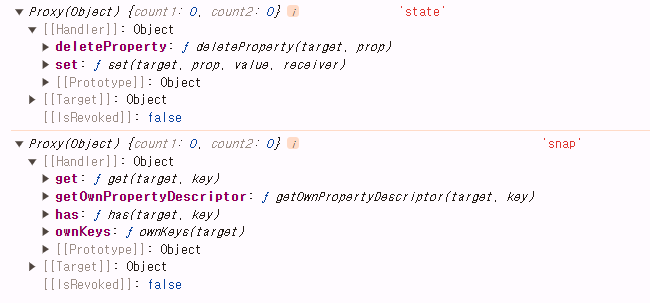
state (proxy함수 리턴값) 와 snap을 각각 콘솔로 찍어보면 Proxy 객체임을 확인할 수 있습니다. 그리고  각각의 Handler를 보면 state에는 deleteProperty와 set이 존재하고  snap에는 get, getOwnPropertyDescription ,has , ownKeys 프로퍼티가 존재하는 것을 확인할 수 있습니다.


이제 각각의 코드를 확인하려고 합니다. 분량이 많아서 전체코드는 다루지 않겠습니다.

각각의 코드를 확인하기전에 proxy, useSnapshot 모두 Proxy를 다룰 때,  proxy-compare 라이브러리에 의존하고 있고, 해당 부분은 관심사의 밖이기에 간단하게 어떤 역할을 하는지만 언급하려고 합니다. 자세한 내용은 상단 링크의 레포에서 확인할 수 있습니다.


proxy

proxy의 경우에는  레포지토리의 src\vanilla.ts 경로에 존재합니다.  

vanilla.ts 에서는 크게 3부분으로 나누어져 있습니다. 모든 코드를 보여드리기엔 많기에 간단한 예시 정도만 보여드리려고 하고,  어떻게 상태 사용 추적이 되는지에 포커스를 두려고 합니다.


1. 타입선언 부분 및 기본 상수값으로 쓰는 함수들

예시)

type Primitive = string | number | boolean | null | undefined | symbol | bigint
type Op =
  | [op: 'set', path: Path, value: unknown, prevValue: unknown]
  | [op: 'delete', path: Path, prevValue: unknown]
type Listener = (op: Op, nextVersion: number) => void

const canProxyDefault = (x: unknown): boolean =>
  isObject(x) &&
  !refSet.has(x) &&
  (Array.isArray(x) || !(Symbol.iterator in x)) &&
  !(x instanceof WeakMap) &&
  !(x instanceof WeakSet) &&
  !(x instanceof Error) &&
  !(x instanceof Number) &&
  !(x instanceof Date) &&
  !(x instanceof String) &&
  !(x instanceof RegExp) &&
  !(x instanceof ArrayBuffer) &&
  !(x instanceof Promise)


2. 내부 함수 및 내부 변수
예시) 

// internal states
const proxyStateMap: WeakMap<ProxyObject, ProxyState> = new WeakMap()
const refSet: WeakSet<object> = new WeakSet()
const snapCache: WeakMap<object, [version: number, snap: unknown]> =
  new WeakMap()
const versionHolder = [1, 1] as [number, number]
const proxyCache: WeakMap<object, ProxyObject> = new WeakMap()

// internal functions
let objectIs: (a: unknown, b: unknown) => boolean = Object.is
let newProxy = <T extends object>(target: T, handler: ProxyHandler<T>): T =>
  new Proxy(target, handler)
let canProxy: typeof canProxyDefault = canProxyDefault
let createSnapshot: typeof createSnapshotDefault = createSnapshotDefault
let createHandler: typeof createHandlerDefault = createHandlerDefault

3. 모듈 외부로 export할 함수들

예시) proxy, snapshot 


이제 다시 proxy에 조금 더 집중해보려고 합니다. proxy 함수의 전체 코드는 아래와 같습니다.

export function proxy<T extends object>(baseObject: T = {} as T): T {
  if (!isObject(baseObject)) {
    throw new Error('object required')
  }
  const found = proxyCache.get(baseObject) as T | undefined
  if (found) {
    return found
  }
  let version = versionHolder[0]
  const listeners = new Set<Listener>()
  const notifyUpdate = (op: Op, nextVersion = ++versionHolder[0]) => {
    if (version !== nextVersion) {
      version = nextVersion
      listeners.forEach((listener) => listener(op, nextVersion))
    }
  }
  let checkVersion = versionHolder[1]
  const ensureVersion = (nextCheckVersion = ++versionHolder[1]) => {
    if (checkVersion !== nextCheckVersion && !listeners.size) {
      checkVersion = nextCheckVersion
      propProxyStates.forEach(([propProxyState]) => {
        const propVersion = propProxyState[1](nextCheckVersion)
        if (propVersion > version) {
          version = propVersion
        }
      })
    }
    return version
  }
  const createPropListener =
    (prop: string | symbol): Listener =>
    (op, nextVersion) => {
      const newOp: Op = [...op]
      newOp[1] = [prop, ...(newOp[1] as Path)]
      notifyUpdate(newOp, nextVersion)
    }
  const propProxyStates = new Map<
    string | symbol,
    readonly [ProxyState, RemoveListener?]
  >()
  const addPropListener = (prop: string | symbol, propValue: unknown) => {
    const propProxyState =
      !refSet.has(propValue as object) && proxyStateMap.get(propValue as object)
    if (propProxyState) {
      if (import.meta.env?.MODE !== 'production' && propProxyStates.has(prop)) {
        throw new Error('prop listener already exists')
      }
      if (listeners.size) {
        const remove = propProxyState[2](createPropListener(prop))
        propProxyStates.set(prop, [propProxyState, remove])
      } else {
        propProxyStates.set(prop, [propProxyState])
      }
    }
  }
  const removePropListener = (prop: string | symbol) => {
    const entry = propProxyStates.get(prop)
    if (entry) {
      propProxyStates.delete(prop)
      entry[1]?.()
    }
  }
  const addListener = (listener: Listener) => {
    listeners.add(listener)
    if (listeners.size === 1) {
      propProxyStates.forEach(([propProxyState, prevRemove], prop) => {
        if (import.meta.env?.MODE !== 'production' && prevRemove) {
          throw new Error('remove already exists')
        }
        const remove = propProxyState[2](createPropListener(prop))
        propProxyStates.set(prop, [propProxyState, remove])
      })
    }
    const removeListener = () => {
      listeners.delete(listener)
      if (listeners.size === 0) {
        propProxyStates.forEach(([propProxyState, remove], prop) => {
          if (remove) {
            remove()
            propProxyStates.set(prop, [propProxyState])
          }
        })
      }
    }
    return removeListener
  }
  let initializing = true
  const handler = createHandler<T>(
    () => initializing,
    addPropListener,
    removePropListener,
    notifyUpdate,
  )
  const proxyObject = newProxy(baseObject, handler)
  proxyCache.set(baseObject, proxyObject)
  const proxyState: ProxyState = [baseObject, ensureVersion, addListener]
  proxyStateMap.set(proxyObject, proxyState)
  Reflect.ownKeys(baseObject).forEach((key) => {
    const desc = Object.getOwnPropertyDescriptor(
      baseObject,
      key,
    ) as PropertyDescriptor
    if ('value' in desc && desc.writable) {
      proxyObject[key as keyof T] = baseObject[key as keyof T]
    }
  })
  initializing = false
  return proxyObject
}


1. 유효성 검사 및 캐시 여부 확인

proxy의 시작부분에서 우선 proxy의 매개변수로 들어오는 값이 객체인줄 확인하고, 캐쉬 여부를 합니다. 동일한 객체에 대해서 캐시를 한 경우에는   캐시 된 값을 얼리리턴합니다.

  if (!isObject(baseObject)) {
    throw new Error('object required')
  }
  const found = proxyCache.get(baseObject) as T | undefined
  if (found) {
    return found
  }


2. 버전 관리 및 리스너 등록을 위한 변수 선언

  let version = versionHolder[0]
  const listeners = new Set<Listener>()
  let checkVersion = versionHolder[1]

version은 객체의 현재 버전을 저장하는 변수로, 상태가 업데이트 될 경우 버전이 증가합니다. 이후 checkversion 변수를 활용하여 상태 변경 여부를 확인하고 필요한 경우에만 동기화합니다.


listeners는 해당 상태 업데이트시 등록된 리스너에게 알리기 위해서 사용하는 변수입니다.


3. 프록시 생성 

let initializing = true
  const handler = createHandler<T>(
    () => initializing,
    addPropListener,
    removePropListener,
    notifyUpdate,
  )
  const proxyObject = newProxy(baseObject, handler)
  proxyCache.set(baseObject, proxyObject)
  const proxyState: ProxyState = [baseObject, ensureVersion, addListener]
  proxyStateMap.set(proxyObject, proxyState)
  Reflect.ownKeys(baseObject).forEach((key) => {
    const desc = Object.getOwnPropertyDescriptor(
      baseObject,
      key,
    ) as PropertyDescriptor
    if ('value' in desc && desc.writable) {
      proxyObject[key as keyof T] = baseObject[key as keyof T]
    }
  })
  initializing = false
  return proxyObject
}


이후 새 프록시 객체를  생성하고,  캐쉬 및 상태관리를 합니다. proxy내부 하위 객체에 대해서도 Reflect객체를 활용하여 proxy로 만들고  최종적으로는 프록시 객체를 반환합니다.


결국 프록시를 생성하는 것은 알겠고, 캐시를 통해 효율적 상태관리를 하고, 하위 객체에 대한 등록도 하는 것은 알겠는데

proxy를 만들면서 어떤식으로 객체를 핸들링하는지 파악하려면, handler에 사용된 함수들에 대해서 알 필요가 있습니다.


4. creatHandler함수

아래는 creatHandler 에 등록 creatHandlerDefault 함수입니다.

const createHandlerDefault = <T extends object>(
  isInitializing: () => boolean,
  addPropListener: (prop: string | symbol, propValue: unknown) => void,
  removePropListener: (prop: string | symbol) => void,
  notifyUpdate: (op: Op) => void,
): ProxyHandler<T> => ({
  deleteProperty(target: T, prop: string | symbol) {
    const prevValue = Reflect.get(target, prop)
    removePropListener(prop)
    const deleted = Reflect.deleteProperty(target, prop)
    if (deleted) {
      notifyUpdate(['delete', [prop], prevValue])
    }
    return deleted
  },
  set(target: T, prop: string | symbol, value: any, receiver: object) {
    const hasPrevValue = !isInitializing() && Reflect.has(target, prop)
    const prevValue = Reflect.get(target, prop, receiver)
    if (
      hasPrevValue &&
      (objectIs(prevValue, value) ||
        (proxyCache.has(value) && objectIs(prevValue, proxyCache.get(value))))
    ) {
      return true
    }
    removePropListener(prop)
    if (isObject(value)) {
      value = getUntracked(value) || value
    }
    const nextValue =
      !proxyStateMap.has(value) && canProxy(value) ? proxy(value) : value
    addPropListener(prop, nextValue)
    Reflect.set(target, prop, nextValue, receiver)
    notifyUpdate(['set', [prop], value, prevValue])
    return true
  },
})

매개변수로는 4가지를 받습니다


  • isInitializing
    객체가 초기화 상태인지 확인하는 함수
  • addPropListener
    특정 속성에 리스너를 추가하는 함수입니다.속성의 변경을 감지하고, 구독자에게 알림을 보내기 위해 사용
  • removePropListener
    속성에 연결된 리스너를 제거하는 함수
  • notifyUpdate
    속성 값이 변경되었을 때 변경 사항을 알리는 함수로 변경된 속성의 이름과 값, 이전 값 등을 구독자에게 전달함


또한 앞서 console.log에서 확인했듯이 creatHandler는  set 와 deleteProperty  두가지 핸들러 메서드를 반환하는 것을 확인할 수 있습니다.

이제 각각의 핸들러 메서드에서 어떤 작업이 진행되는지 알아봅시다.

  • deleteProperty
    1. 삭제하려는 속성의 기존 값을 Reflect.get으로 가져옴
    2. 그 다음, 해당 속성에 연결된 리스너를 제거함
    3. Reflect.deleteProperty를 통해 속성을 삭제
    4. 속성이 성공적으로 삭제되면, notifyUpdate를 호출하여 삭제 작업을 listener에게 알림
    5.삭제가 여부를 반환합니다.
  •  set
    1. 속성의 이전 값이 존재하는지 확인하고 초기화 중이 아니라면, Reflect.has로 해당 속성이 이미 있는지 확인하고, 이전 값을 가져옵니다.
    2.만약 이전 값과 새 값이 동일하거나, 새 값이 이미 캐시된 프록시 값과 동일하다면 true를 반환하고 설정 작업을 종료
    3. 새로운 값이 설정될 속성에 대해 기존 리스너를 제거함
    4.  새 값이 객체일 경우, getUntracked를 호출해 프록시되지 않은 원본 객체를 가져오거나, 새 값이 프록시 가능한 경       우 proxy()를 사용해 새로운 프록시로 변환.
    5. addPropListener를 통해 새 값에 대한 리스너를 추가
    6. Reflect.set을 호출하여 속성에 새로운 값을 설정
    7.  notifyUpdate를 호출해 속성 값이 변경되었음을 알림

결국 proxy는 캐시를 활용한 최적화에 대한 작업과 쓰기 등록 시 구독자에게 알려준다는 사실을 알았습니다. 하지만 

컴퍼넌트가 해당 객체의 어떤 속성을 사용하는지 어떻게 알고 리렌더링 시키는지에 대해서 알기 위해선 useSnapshot훅을 분석할 필요성이 있습니다.


useSnapshot

import {
  useCallback,
  useDebugValue,
  useEffect,
  useLayoutEffect,
  useMemo,
  useRef,
  useSyncExternalStore,
} from 'react'
import {
  affectedToPathList,
  createProxy as createProxyToCompare,
  isChanged,
} from 'proxy-compare'
import { snapshot, subscribe } from './vanilla.ts'
import type { Snapshot } from './vanilla.ts'


export function useSnapshot<T extends object>(
  proxyObject: T,
  options?: Options,
): Snapshot<T> {
  const notifyInSync = options?.sync
  // per-proxy & per-hook affected, it's not ideal but memo compatible
  const affected = useMemo(
    () => proxyObject && new WeakMap<object, unknown>(),
    [proxyObject],
  )
  const lastSnapshot = useRef<Snapshot<T>>()
  let inRender = true
  const currSnapshot = useSyncExternalStore(
    useCallback(
      (callback) => {
        const unsub = subscribe(proxyObject, callback, notifyInSync)
        callback() // Note: do we really need this?
        return unsub
      },
      [proxyObject, notifyInSync],
    ),
    () => {
      const nextSnapshot = snapshot(proxyObject)
      try {
        if (
          !inRender &&
          lastSnapshot.current &&
          !isChanged(
            lastSnapshot.current,
            nextSnapshot,
            affected,
            new WeakMap(),
          )
        ) {
          // not changed
          return lastSnapshot.current
        }
      } catch {
        // ignore if a promise or something is thrown
      }
      return nextSnapshot
    },
    () => snapshot(proxyObject),
  )
  inRender = false
  useLayoutEffect(() => {
    lastSnapshot.current = currSnapshot
  })
  if (import.meta.env?.MODE !== 'production') {
    condUseAffectedDebugValue(currSnapshot as object, affected)
  }
  const proxyCache = useMemo(() => new WeakMap(), []) // per-hook proxyCache
  return createProxyToCompare(currSnapshot, affected, proxyCache, targetCache)
}


proxy를 캐시하는 내용과 유효성 검사등의 내용에 대해서는 생략하겠습니다.

내부에서 어떻게 proxy의 변경을 감지하고 useSnapshot 훅의 리턴값을 사용만 하면 특정 상태에 대한 구독이 되는지에 대해서 알아보려고 합니다.

우선 proxy의 핸들러 메서드를 통해서 쓰기 및 삭제 시 listener들에게 알림이 간다는 사실을 확인했습니다.

이때 리스너가 알림을 받았을 때, 리렌더링을 하게 하는 훅이 useSyncExternalStore 훅입니다. 


useSysncstore의 훅은 3가지의 매개변수를 받을 수 있습니다.

const snapshot = useSyncExternalStore(subscribe, getSnapshot, getServerSnapshot?)
  • subscribe: 하나의 callback 인수를 받아 store에 구독하는 함수입니다. store가 변경될 때, 제공된 callback이 호출되어 React가 getSnapshot을 다시 호출하고 (필요한 경우) 컴포넌트를 다시 렌더링하도록 해야 합니다. subscribe 함수는 구독을 정리하는 함수를 반환해야 합니다.
  • getSnapshot: 컴포넌트에 필요한 store 데이터의 스냅샷을 반환하는 함수입니다. store가 변경되지 않은 상태에서 getSnapshot을 반복적으로 호출하면 동일한 값을 반환해야 합니다. 저장소가 변경되어 반환된 값이 다르면 (Object.is와 비교하여) React는 컴포넌트를 리렌더링합니다.
  • optional getServerSnapshot: store에 있는 데이터의 초기 스냅샷을 반환하는 함수입니다. 서버 렌더링 도중과 클라이언트에서 서버 렌더링 된 콘텐츠의 하이드레이션 중에만 사용됩니다. 서버 스냅샷은 클라이언트와 서버 간에 동일해야 하며 일반적으로 직렬화되어 서버에서 클라이언트로 전달됩니다. 이 함수가 제공되지 않으면 서버에서 컴포넌트를 렌더링할 때 오류가 발생합니다.

이제 다시 useSnapshot 훅을 보면 1. useCallback으로 감싸진 subscribe부분, 2. 화살표 함수로된 getSnapshot, 
3. ()=>snapshot(proxyObject)인 getServerSnapshot 을 확인할 수 있습니다.

 const currSnapshot = useSyncExternalStore(
    useCallback(
      (callback) => {
        const unsub = subscribe(proxyObject, callback, notifyInSync)
        callback() // Note: do we really need this?
        return unsub
      },
      [proxyObject, notifyInSync],
    ),
    () => {
      const nextSnapshot = snapshot(proxyObject)
      try {
        if (
          !inRender &&
          lastSnapshot.current &&
          !isChanged(
            lastSnapshot.current,
            nextSnapshot,
            affected,
            new WeakMap(),
          )
        ) {
          // not changed
          return lastSnapshot.current
        }
      } catch {
        // ignore if a promise or something is thrown
      }
      return nextSnapshot
    },
    () => snapshot(proxyObject),
  )


1. subscribe 함수에서 전달된 callback에서는 proxyObject의 상태 변화를 감지하고 상태가 변경될 때마다 이 callback이 호출되어 새로운 스냅샷을 가져오고 컴포넌트를 리렌더링합니다.
2. getSnapshot 함수에 전달된 화살표 함수 내부에 있는 isChanged 함수는 상태가 변경되었는지 확인하는 역할을 합니다. 만약 상태가 변하지 않았으면 리렌더링을 방지합니다.


이제 proxy 객체가 변화가 되었을 때, 왜 컴퍼넌트가 리렌더링하는지는 알게 되었습니다. 하지만 아직 어떻게 특정 컴퍼넌트가 객체를 사용하고 있는지에 대해서는 언급이 없었습니다.


해당 내용은 createProxyToCompare 이란 별칭으로 사용된  proxy-compare 라이브러리의 createProxy 함수에 있습니다.

공식 문서에서 createProxy 함수에 대한 설명은 아래와 같습니다.

createProxy  함수는 최상위에서 프록시를 생성하고, 접근할 때 중첩된 객체들도 프록시로 만들어, get/has 프록시 핸들러를 통해 어떤 프로퍼티가 접근되었는지를 추적합니다.


해당 함수에 관한 내용은 방대하기에 소스코드 링크만 남겨두고,  어떻게 proxy 핸들러에서 접근을 감지하는지에 대한 부분만 간단하게 추츨하는지 알아보기 위해  proxy의 핸들러의 내용만 추출하면 아래와 같습니다.


 const handler: ProxyHandler<T> = {
    get(target, key) {
      if (key === GET_ORIGINAL_SYMBOL) {
        return origObj;
      }
      recordUsage(KEYS_PROPERTY, key);
      return createProxy(
        Reflect.get(target, key),
        state[AFFECTED_PROPERTY] as Affected,
        state[PROXY_CACHE_PROPERTY],
        state[TARGET_CACHE_PROPERTY],
      );
    },
    has(target, key) {
      if (key === TRACK_MEMO_SYMBOL) {
        recordObjectAsUsed();
        return true;
      }
      recordUsage(HAS_KEY_PROPERTY, key);
      return Reflect.has(target, key);
    },
    getOwnPropertyDescriptor(target, key) {
      recordUsage(HAS_OWN_KEY_PROPERTY, key);
      return Reflect.getOwnPropertyDescriptor(target, key);
    },
    ownKeys(target) {
      recordUsage(ALL_OWN_KEYS_PROPERTY);
      return Reflect.ownKeys(target);
    },
  };
  if (isTargetCopied) {
    handler.set = handler.deleteProperty = () => false;
  }
  return [handler, state] as const;
};


이떄 get이 proxy를 읽을 때 핸들링하는 내용입니다.  key에 접근할 때, recordUsage를 호출해 KEYS_PROPERTY와 함께 사용 기록을 남기고, 다시 createProxy를 호출하여 그 값을 프록시로 감쌉니다. 따라서 우리가 컴퍼넌트에서 useSnapshot훅의 반환 proxy를 사용하게 되면 get 핸들러 메서드에 의해 기록되어서 추후  상태가 변경되었을 때  관련 상태를 사용한 컴퍼넌트만 리렌더링이 되게 됩니다.


요약

리액트 훅을 활용한 마이크로 상태관리훅을 통해서 proxy와 Valtio의 상태 사용 추적이 어떻게 일어나는지에 대해서 알아봤습니다.

proxy를 통해서 원본 객체에 핸들링 메서드를 적용할 수 있는데, Valtio에서는 이를 통해서 proxy의 상태 변화를 감지하고 이를 기반으로 불변의 snapshot을 찍습니다. 이때 상태관리하는 프록시에서는 proxy의 핸들러 메서드 중 set과 deleteProperty를 통해 변경을 listener들에게 알립니다.


그리고 리엑트 컴퍼넌트에서는  useSnapshot 훅 내부의 useSyncExternalStore와 createProxy를 통해서 2차 가공된 proxy 객체를 얻습니다. 해당 객체는 원본 proxy가 상태 변화를 할 때마다 새로운 proxy가 형성되는 불변 객체이며 컴퍼넌트에서 가공된 proxy객체(추후 스냅샷이라 부름)를 사용할 경우  createProxy훅 내부에 있는 get 메서드에 의해서 사용이 감지되고 등록이 됩니다. 이후 proxy객체가 변경이되면 useSyncExternalStore훅에 의해서 이전 상태와 차이점이 있는지를 비교하고 있을 경우 리렌더링이 됩니다.


참고문헌 및 출처

리액트 훅을 활용한 마이크로 상태관리 (다이시 카토 지음)

https://github.com/pmndrs/valtio


GitHub - pmndrs/valtio: 🧙 Valtio makes proxy-state simple for React and Vanilla

🧙 Valtio makes proxy-state simple for React and Vanilla - pmndrs/valtio

github.com


https://ko.javascript.info/proxy#ref-1036


Proxy와 Reflect


ko.javascript.info

https://developer.mozilla.org/ko/docs/Web/JavaScript/Reference/Global_Objects/Reflect


Reflect - JavaScript | MDN

Reflect 는 중간에서 가로챌 수 있는 JavaScript 작업에 대한 메서드를 제공하는 내장 객체입니다. 메서드의 종류는 프록시 처리기와 동일합니다. Reflect는 함수 객체가 아니므로 생성자로 사용할 수

developer.mozilla.org

https://developer.mozilla.org/ko/docs/Web/JavaScript/Reference/Global_Objects/Proxy


Proxy - JavaScript | MDN

Proxy 객체를 사용하면 한 객체에 대한 기본 작업을 가로채고 재정의하는 프록시를 만들 수 있습니다.

developer.mozilla.org

https://www.npmjs.com/package/proxy-compare


proxy-compare

Compare two objects using accessed properties with Proxy. Latest version: 3.0.0, last published: 5 months ago. Start using proxy-compare in your project by running `npm i proxy-compare`. There are 39 other projects in the npm registry using proxy-compare.

www.npmjs.com

https://ko.react.dev/reference/react/useSyncExternalStore


useSyncExternalStore – React

The library for web and native user interfaces

ko.react.dev


728x90

다이시 카토가 만든 전역 상태 관리 라이브러리 중 하나인 Jotai에서는 WeakMap을 통해서 atom을 관리합니다. 이에 WeakMap이 무엇이고 왜 사용했는지에 대해 알아보려고 합니다.


우선 조타이 라이브러리의 공식 docs에서 언급한 왜 WeakMap을 사용했는지 입니다.

Let's start with an easy example. An atom is just a function that will return a configuration object. We are using WeakMap to map atom with their state.
WeakMap doesn't keep its keys in memory, so if an atom is garbage collected, its state will be garbage collected too. This helps avoid memory leaks.


요약하면 아래와 같습니다.

1. 조타이에서는 atom으로 상태관리를 하는데 atom은 함수이다.

2. WeakMap은 키를 메모리에 유지하지 않기 때문에 가비지 콜렉터가 atom을 수집하면 상태도 제거해준다.


즉, 손쉽게 메모리 누수를 방지하기 위해서 조타이에서는 WeakMap을 사용합니다. 그렇다면 왜 WeakMap은 무엇일까요?


WeakMap에 대해서

WeakMap은 이름부터 JS의 Map과 관계가 있어보입니다. 따라서 우선 Map에 대해서 알아보려고 합니다.


MDN문서에 설명하는 Map은 아래와 같습니다.

ECMAScript 6에서 값들을 매핑하기 위한 새로운 데이터 구조를 소개 하고 있다. 그중 하나인 Map객체는 간단한 키와 값을 서로 연결(매핑)시켜 저장하며 저장된 순서대로 각 요소들을 반복적으로 접근할 수 있도록 한다.


Object와 Map 비교
1. Object의 키는 Strings이며, Map의 키는 모든 값을 가질 수 있다.
2. Object는 크기를 수동으로 추적해야하지만, Map은 크기를 쉽게 얻을 수 있다.
3. Map은 삽입된 순서대로 반복된다.
4. 객체(Object)에는 prototype이 있어 Map에 기본 키들이 있다. (이것은 map = Object.create(null) 를 사용하여 우회할 수 있다. )


자바스크립트에서는 key,value가 쌍으로 이루어진 자료구조에는 Object, Map, WeakMap 3가지가 중요합니다.

앞서 말했듯이 조타이는 atom이라는 함수를 키로 상태를 관리합니다. 그리고 함수는 객체이기에, Map이나 WeakMap이 적합합니다. 


그렇다면  WeakMap은 어떤 차이점이 있을까요?

Mdn에서 말하는 WeakMap의 장점은 아래와 같습니다.

  • 가비지 컬렉션을 방지하지 않으므로 키 객체에 대한 참조가 결국 사라집니다.
  • 키 객체가 WeakMap 밖의 다른 곳에서 참조되지 않으면 그 값의 가비지 컬렉션도 허용합니다.

그리고 자바스크립트 엔진의 가비지 컬렉터의 특징을 아래 예시를 통해 확인해보고자 합니다.

자바스크립트 엔진은 도달 가능한 (그리고 추후 사용될 가능성이 있는) 값을 메모리에 유지합니다.
출처 : https://ko.javascript.info/garbage-collection
let object = { name: 'Garbage' };

let collector = [object];

object = null; // 참조를 null로 덮어씀

console.log(JSON.stringify(collector[0])); // {"name":"Garbage"}

let obj2 = { name: 'Trash' };

let weakMap = new WeakMap();

weakMap.set(obj2, 'die');

obj2 = null; // 참조를 덮어씀

console.log(typeof weakMap.get(obj2)); //undefined

따라서 아래의 예시를 통해서 값을 확인해보면, 첫 번째 예시의 object의 경우 collector에 의해 참조되고 있기 때문에 도달할 수 있다고 평가되어 지고 값이 유지되어 있음을 볼 수 있습니다. 하지만 weakMap의 키로 사용된 obj2의 경우에는 참조로 덮어씌워 졌을 때, 가비지 컬렉터에 의해 수거됩니다. 그리고 WeakMap에서 키가 수거된 경우에는 자연스럽게 값도 같이 가비지 컬렉터에 의해 수거됐음을 확인할 수 있습니다.


 Jotai에서 WeakMap

다이시 카토에 의하면 Jotai도 구독 모델 기반의 라이브러리입니다.

아래는  Jotai의 createStore입니다. WeakMap을 사용하는 것을 확인할 수 있네요.

export const createStore = (): Store => {
  const atomStateMap = new WeakMap()
  const getAtomState = <Value>(atom: Atom<Value>) => {
    let atomState = atomStateMap.get(atom) as AtomState<Value> | undefined
    if (!atomState) {
      atomState = { d: new Map(), p: new Set(), n: 0 }
      atomStateMap.set(atom, atomState)
    }
    return atomState
  }
  return buildStore(getAtomState)
}


이 소스코드에서 알 수 있듯이 WeakMap을 통해서 아톰의 상태를 저장하고, 이미 존재하는 값이라면 해동 값을 가져옵니다.


이를 통해서 만약 React에서 Jotai를 통해 상태관리를 할 경우에, 해당 컴퍼넌트가 unmount되어 더 이상 atom이 참조되고 있지 않다면, 가비지 컬렉터에 의해 atom이 수거되어 메모리 누수를 방지하는 장점을 얻습니다.


참고 문헌 및 출처

리액트 훅을 활용한 마이크로 상태 관리 - 다이시 카토 지음


https://ko.javascript.info/weakmap-weakset


위크맵과 위크셋


ko.javascript.info


https://ko.javascript.info/garbage-collection


가비지 컬렉션


ko.javascript.info


https://developer.mozilla.org/ko/docs/Web/JavaScript/Guide/Keyed_collections


키 기반 컬렉션 - JavaScript | MDN

이번 장에서는 입력된 키값을 기준으로 정렬되는 데이터의 집합(자료 구조)에 대해 소개 할 것이다. Map과 Set은 입력된 순서대로 반복적으로 접근 가능한 요소들을 포함하고 있다.

developer.mozilla.org


728x90

Zustand는 상태를 유지하는 store를 만드는데 사용되는 라이브러리입니다. 

import { create } from 'zustand';

type StoreState = {
  count: number;
  text: string;
  inc1: () => void;
};

export const useEx1Store = create<StoreState>((set) => ({
  count: 0,
  text: 'hello',
  inc1: () => set((prev) => ({ count: prev.count + 1 })),
}));


이때 위의 예시에서 반환되는 값 useEx1Store의 타입은 아래와 같습니다.

export interface StoreApi<T> {
    setState: SetStateInternal<T>;
    getState: () => T;
    getInitialState: () => T;
    subscribe: (listener: (state: T, prevState: T) => void) => () => void;
}


setState는 불변성을 활용하여 값을 설정하거나 이전 값을 활용하여 갱신이 가능합니다.  setState의 경우에는 내부적으로 Object.assign으로 구현되어 있으며 , 그렇기에 store에서 이전 상태와 새 상태를 병합하여 새 객체를 반환합니다.

getState와 getInitialstate로 상태 및 초기 상태를 얻을 수 있습니다.

마지막으로 subscribe를 통해서 구독을 하여, 상태가 변경되었을 때 콜백함수가 실행되게 할 수 있습니다. 이러한 구독을 활용하여, 리엑트에서 상태를 공유하는 다른 컴퍼넌트들이 리렌더링하도록 할 수 있습니다.


선택자함수를 사용하여 수동 렌더링 최적화 하기

import { create } from 'zustand'

const useStore = create((set) => ({
  count: 1,
  inc: () => set((state) => ({ count: state.count + 1 })),
}))

function Counter() {
  const { count, inc } = useStore()
  return (
    <div>
      <span>{count}</span>
      <button onClick={inc}>one up</button>
    </div>
  )
}


아래 코드는 zustand의 공식페이지에 나와 있는 예시 입니다. 보통 이 예시를 보고 zustand의 간단한 사용법에 혹해서 도입하는 경우가 많다고 생각합니다. 하지만 지금은 상태가 단 하나뿐이라서 큰 문제가 없지만,  만약에 처음에 보였던 예시처럼 count와 text 두 가지 상태를 공유하고 count만 변경하는 경우에 문제가 발생합니다. 이를 확인하기 위해서 아래와 같은 예시를 만들었습니다.


각각의 컴퍼넌트를 렌더링하는 앱

import './App.css';
import { CountChanger, ZustandEx1, ZustandEx2 } from './test/chp7/ZustandEx1';

function App() {
  return (
    <>
      <ZustandEx1 />
      <ZustandEx2 />
      <CountChanger />
    </>
  );
}

export default App;


선택자 사용 유무 리렌더링을 비교하기 위해서 분리함

import { useEx1Store } from './count';

export const ZustandEx1 = () => {
  const { text } = useEx1Store();
  console.log('리랜더링 체크 1');
  return (
    <>
      <div>{text}</div>
    </>
  );
};

export const ZustandEx2 = () => {
  const text = useEx1Store((state) => state.text);
  console.log('리랜더링 체크 2');
  return (
    <>
      <div>{text}</div>
    </>
  );
};

export const CountChanger = () => {
  const inc1 = useEx1Store((state) => state.inc1);
  console.log('리렌더링함?');
  return <button onClick={inc1}>Zustand Count 증가</button>;
};


count.ts ( zustand 코드)

import { create } from 'zustand';

type StoreState = {
  count: number;
  text: string;
  inc1: () => void;
};

export const useEx1Store = create<StoreState>((set) => ({
  count: 0,
  text: 'hello',
  inc1: () => set((prev) => ({ count: prev.count + 1 })),
}));


예시 페이지


count 값을 증가하는 함수가 존재하고, 전역 store에는 count와 text가 존재합니다.

이때 CountChanger는 단순히 count 값을 증가시키는 store 내부의 함수이고, ZustandEx1에서는 선택자 없이 text를 사용 Ex2에서는 선택자를 활용하여 상태 증가를 시키고 있습니다.

그리고 버튼을 누르게 되면 콘솔을 통해서 리렌더링 횟수를 확인할 수 있습니다.


초기에 렌더링 될 때 3가지의 콘솔이 모두 찍히고, 이후 버튼 클릭시에 count 와 전혀 무관한 것 같은 ZustandEx1이 리렌더링 됨을 확인할 수 있습니다. 이는 store를 구독하고 있기 때문에, store 상태가 변경될 때마다 리렌더링 되기 때문입니다.


이를 해결하기 위한 방법이 선택자 함수 입니다.

  const text = useEx1Store((state) => state.text);

store 내부에 있는 상태 중에서 사용하고 싶은 상태를 선택하게 되면 해당 값을 제외한 상태 변경에는 store를 구독했어도 리렌더링 되지 않습니다.

이러한 것을 리액트 훅을 사용한 마이크로 상태 관리 책에서는 수동 렌더링 최적화 라고 부릅니다.


이를 활용하면 파생 상태에 대한 리렌더링도 최적화 할 수 있습니다. 만약 count 값 2개를 합친 값의 최적화를 하는 경우에는 1 + 2 는 3입니다. 하지만 만약 값이 변경되어 0 + 3 이 되어도 파생 값은 변경되지 않았기에 리렌더링할 필요가 없습니다. 이때 아래와 같이 선택자에서 파생 값(지금은 count 와 count2의 합)을 선택하면 리렌더링이 최적화 됩니다.

  const text = useEx1Store((state) => state.count + state.count2);


교재에서는 Zustand의 장점으로는 리액트와 동일한 모델을 사용해 라이브러리의 단순성과 번들 크기가 작다는 점을 꼽고 있고, 단점으로는 선택자를 이용한 수동 렌더링 최적화로 꼽고 있습니다. 객체 참조 동등성을 이해해야 하며, 선택자 코드를 위해 보일러플레이트 코드를 많이 작성해야 한다고 합니다. 


참고문헌

https://zustand-demo.pmnd.rs/


Zustand


zustand-demo.pmnd.rs

공식 소스 코드


리액트 훅을 활용한 마이크로 상태 관리 (다이시 카토 지음)


728x90

들어가며

Next.js의 next/image 컴퍼넌트는 굉장히 많은 역할을 해줍니다.  보통  Image를 사용할 떄는 아래와 같이 width, height을지정해주고 사용합니다. 이후 화면이나 외부 컨테이너가 작아짐에 따라서 이미지의 크기가 줄어듭니다.

import Image from 'next/image'
 
export default function Page() {
  return (
    <Image
      src="/profile.png"
      width={500}
      height={500}
      alt="Picture of the author"
    />
  )
}


하지만 이번 프로젝트에서는 이미지의 크기가 외부 영역에 영향을 받게 되었습니다. 

이때 사용할 수 있는 속성이 fill입니다.


Next/Image Fill속성 사용하기

정확하게 크기를 정의할 수는 없지만, 외부 영역 기준으로 가득차게 할 때는 fill을 사용할 수 있습니다.

공식문서  Responsive Image with Fill  

import Image from 'next/image'
 
export default function Page({ photoUrl }) {
  return (
    <div style={{ position: 'relative', width: '300px', height: '500px' }}>
      <Image
        src={photoUrl}
        alt="Picture of the author"
        sizes="300px"
        fill
        style={{
          objectFit: 'contain',
        }}
      />
    </div>
  )
}


예시를 봤을 때, fill를 사용할때는  3가지를 고려해야 합니다.

1. fill을 사용하면 Image컴퍼넌트가 absolute 포지션이기에 외부가 absolute, fiexd, relative중 하나여야 한다.

// 공식문서 내부의 : packages\next\src\client\image-component.tsx

	if (img.parentElement) {
          const { position } = window.getComputedStyle(img.parentElement)
          const valid = ['absolute', 'fixed', 'relative']
          if (!valid.includes(position)) {
            warnOnce(
              `Image with src "${origSrc}" has "fill" and parent element with invalid "position". Provided "${position}" should be one of ${valid
                .map(String)
                .join(',')}.`
            )
          }
        }


2. sizes를 사용하여 최적화를 해야한다.

(사용하지 않으면 아래의 경고 문구가 나옵니다.) 

                `Image with src "${origSrc}" has "fill" but is missing "sizes" prop. Please add it to improve page performance. Read more: https://nextjs.org/docs/api-reference/next/image#sizes`


이전 포스트를 통해서 next.js의 image 가 html의 img태그를 사용하고 있음을 알 수 있었고, srcset과 preload를 사용하여 최적화를 시도하고 있음을 확인했습니다.

mdn 에서 img태그의 sizes를 확인해보면 뷰포인트 크기를 활용하여 반응형으로 소스크기를 적용할 수 있습니다.

width가 정해지지 않은 경우에는 sizes옵션을 주어서 viewport에 따라서 소스의 크기를 결정할 수 있고, 최적화가 가능합니다. 


저는 화면이 1000px보다 작은 경우에는 400px, 클 경우 200px로 설정하였습니다.

	 <Image
          src={src}
          alt={alt}
          fill
          sizes="(max-width: 1000px) 400px, 200px"
  	  />


3. style에서 objectFit 속성 사용

fill을 사용하더라도 이미지의 비율이 유지되기를 생각할 것입니다. 이떄 사용할 수 있는 것이 objectFit이고 이는 12버전까지 next/image에 포함되어  있는 기능이었습니다.


하지만 현재에는 deprecated 됐으며 공식문서 예시와 같이 css에서 관리해야 합니다.


https://nextjs.org/docs/pages/api-reference/components/image-legacy#comparison


next.js에서  style이나 className등을 사용한 css의 영역을 지지하여  관심사가 분리되었기 때문입니다.


참고 문헌

공식 문서 Image 컴퍼넌트 : https://nextjs.org/docs/app/api-reference/components/image


Components: <Image> | Next.js

Optimize Images in your Next.js Application using the built-in `next/image` Component.

nextjs.org


mdn img태그 

https://developer.mozilla.org/ko/docs/Web/HTML/Element/img


<img>: 이미지 삽입 요소 - HTML: Hypertext Markup Language | MDN

HTML <img> 요소는 문서에 이미지를 넣습니다.

developer.mozilla.org

https://nextjs.org/docs/pages/api-reference/components/image-legacy


Components: <Image> (Legacy) | Next.js

Backwards compatible Image Optimization with the Legacy Image component.

nextjs.org


728x90

들어가며

Next.js에서 Image를 제공하는데, 이를 통해서 이미지에 대한 최적화 작업을 간단히 할 수 있습니다. 

 Next.js 공식문서에서는  크기 최적화, 시각 안정성, 빠른 페이지 리로드, 자산의 유연성 4가지 측면에서 장점을 제시합니다. 

  • Size Optimization: Automatically serve correctly sized images for each device, using modern image formats like WebP and AVIF.
  • Visual Stability: Prevent layout shift automatically when images are loading.
  • Faster Page Loads: Images are only loaded when they enter the viewport using native browser lazy loading, with optional blur-up placeholders.
  • Asset Flexibility: On-demand image resizing, even for images stored on remote servers

하지만 개발에서 은탄환은 없다고 많이 말합니다. 따라서 어떤 기능을 어떻게 제공하는지에 대해서 알 필요성을 느꼈고, 이를 위해서 소스코드를 분석을 하게 되었습니다.


소스코드 위치 추적

 리액트 기반의 UI 라이브러리나 react/drei 등 코드를 본적이 종종 있었는데,  개인적으로 파일이 너무 많고 복잡해서 파악하는데 조금 더 어려웠습니다. VS-CODE의 도움을 받고자 클론을 받고 파일을 경로를 추적했습니다.


우리가 사용하고 있는 next/image는 image-external에서 가져오는 군요

import type { ImageConfigComplete, ImageLoaderProps } from './image-config'
import type { ImageProps, ImageLoader, StaticImageData } from './get-img-props'

import { getImgProps } from './get-img-props'
import { Image } from '../../client/image-component'

// @ts-ignore - This is replaced by webpack alias
import defaultLoader from 'next/dist/shared/lib/image-loader'

/**
 * For more advanced use cases, you can call `getImageProps()`
 * to get the props that would be passed to the underlying `<img>` element,
 * and instead pass to them to another component, style, canvas, etc.
 *
 * Read more: [Next.js docs: `getImageProps`](https://nextjs.org/docs/app/api-reference/components/image#getimageprops)
 */
export function getImageProps(imgProps: ImageProps) {
  const { props } = getImgProps(imgProps, {
    defaultLoader,
    // This is replaced by webpack define plugin
    imgConf: process.env.__NEXT_IMAGE_OPTS as any as ImageConfigComplete,
  })
  // Normally we don't care about undefined props because we pass to JSX,
  // but this exported function could be used by the end user for anything
  // so we delete undefined props to clean it up a little.
  for (const [key, value] of Object.entries(props)) {
    if (value === undefined) {
      delete props[key as keyof typeof props]
    }
  }
  return { props }
}

export default Image

export type { ImageProps, ImageLoaderProps, ImageLoader, StaticImageData }

우리가 사용하고 있는 next/image는 image-external에서 가져오는 군요

Image 이외에도 getImageProps와  ImageLoader등 몇 가지를 추가적으로 export하고 있네요.


사실 Image에 대해서 처음 관심을 갖게 된것은 wanted에서 멘토님이 defaultLoader와 관련된 설명을 해주시면서 분석해야겠다는 생각을 하게 되었습니다. Next.js에서는 defaultLoader를 사용하여 서버에서 캐싱을 해주는데, 이와 관련된 작업이 서버에 부담이 크다는 discussion을 보여주면서 설명했던 내용입니다.

next.js image


이때 defaultLoader의 props 타입을 보면 next.js에서가 어떤식으로 srcset을 관리하는지 유추할 수 있었습니다.

흔히 next.js에서는 webp로 관리한다고 하고 경로가 /_next/image~~ 와 같이 나오는 이유도 유추가 가능하네요.

function defaultLoader({
  config,
  src,
  width,
  quality,
}: ImageLoaderPropsWithConfig): string {
	// ..생략
}

export type ImageLoaderPropsWithConfig = ImageLoaderProps & {
  config: Readonly<ImageConfig>
}

export const imageConfigDefault: ImageConfigComplete = {
  deviceSizes: [640, 750, 828, 1080, 1200, 1920, 2048, 3840],
  imageSizes: [16, 32, 48, 64, 96, 128, 256, 384],
  path: '/_next/image',
  loader: 'default',
  loaderFile: '',
  domains: [],
  disableStaticImages: false,
  minimumCacheTTL: 60,
  formats: ['image/webp'],
  dangerouslyAllowSVG: false,
  contentSecurityPolicy: `script-src 'none'; frame-src 'none'; sandbox;`,
  contentDispositionType: 'attachment',
  remotePatterns: [],
  unoptimized: false,
}


소스코드 분석

이제 이미지 컴퍼넌트에 대해서 좀 더 집중해보려고 합니다. 경로는 packages/next/src/client/image-component.tsx 입니다

파일 자체는 타입이나 export하는 과정만 50줄에 이르고  코드만 430줄이 넘더군요.. 이를 topdown 방식으로 분석해보려고 합니다.

 Image 

export const Image = forwardRef<HTMLImageElement | null, ImageProps>(
  (props, forwardedRef) => {
    const pagesRouter = useContext(RouterContext)
    // We're in the app directory if there is no pages router.
    const isAppRouter = !pagesRouter

    const configContext = useContext(ImageConfigContext)
    const config = useMemo(() => {
      const c = configEnv || configContext || imageConfigDefault
      const allSizes = [...c.deviceSizes, ...c.imageSizes].sort((a, b) => a - b)
      const deviceSizes = c.deviceSizes.sort((a, b) => a - b)
      return { ...c, allSizes, deviceSizes }
    }, [configContext])

    const { onLoad, onLoadingComplete } = props
    const onLoadRef = useRef(onLoad)

    useEffect(() => {
      onLoadRef.current = onLoad
    }, [onLoad])

    const onLoadingCompleteRef = useRef(onLoadingComplete)

    useEffect(() => {
      onLoadingCompleteRef.current = onLoadingComplete
    }, [onLoadingComplete])

    const [blurComplete, setBlurComplete] = useState(false)
    const [showAltText, setShowAltText] = useState(false)

    const { props: imgAttributes, meta: imgMeta } = getImgProps(props, {
      defaultLoader,
      imgConf: config,
      blurComplete,
      showAltText,
    })

    return (
      <>
        {
          <ImageElement
            {...imgAttributes}
            unoptimized={imgMeta.unoptimized}
            placeholder={imgMeta.placeholder}
            fill={imgMeta.fill}
            onLoadRef={onLoadRef}
            onLoadingCompleteRef={onLoadingCompleteRef}
            setBlurComplete={setBlurComplete}
            setShowAltText={setShowAltText}
            sizesInput={props.sizes}
            ref={forwardedRef}
          />
        }
        {imgMeta.priority ? (
          <ImagePreload
            isAppRouter={isAppRouter}
            imgAttributes={imgAttributes}
          />
        ) : null}
      </>
    )
  }
)


우선 useContext를 통해서 페이지 라우터여부, imageConfig 설정을 받아옵니다.

이후 환경변수 ,context, 기본설정 순으로 존재 여부 확인 후 적용할 config를 결정합니다.

그리고 props중에 유저가 설정한 onLoaded와 onLoadedComplete를 구조분해할당합니다.


이후 아래와 같이 getImgProps 함수에 할당해 줍니다.  ( getImageProps 에도 사용되는 공용함수)

    const { props: imgAttributes, meta: imgMeta } = getImgProps(props, {
      defaultLoader,
      imgConf: config,
      blurComplete,
      showAltText,
    })


네이밍에서도 알 수 있듯이 이미지 등록에 필요한 과정들과 이를 바탕으로 next.js의 이미지 컴퍼넌트에 사용할 props를 반환해 줍니다.


이후  이미지 요소와 preLoad요소를 반환된 설정에 맞춰서  보여줍니다.

따라서 어떤 요소를 반환하는 함수인지에 대해서 먼저 확인해보려고 합니다.


getImgProps

400줄에 달하는 코드라서 한번에 다 보여주기 보다는 부분 부분 잘라서 설명할려고 합니다.( 내부에 사용하는 함수까지 합치면 600줄 )
코드 전문은 아래에서 확인해보실 수 있습니다.

https://github.com/vercel/next.js/blob/canary/packages/next/src/shared/lib/get-img-props.ts


next.js/packages/next/src/shared/lib/get-img-props.ts at canary · vercel/next.js

The React Framework. Contribute to vercel/next.js development by creating an account on GitHub.

github.com


우선 매개변수와 반환값의 타입부터 확인하겠습니다

  const { props: imgAttributes, meta: imgMeta } = getImgProps(props, {
      defaultLoader,
      imgConf: config,
      blurComplete,
      showAltText,
    })

Image 컴퍼넌트에서는 위와 같이 getImgProps 함수를 사용했었습니다. img 태그에 사용할 설정과 image를 어떻게 상태관리할지에 대해서 2가지가 나옵니다. 그리고 반환값으로 

이중  onLoadingComplete, layout,  objectFit,  objectPosition, lazyBoundary,  lazyRoot는 더 이상 사용하지 않아서 봤더니 deprecated됐다고 하네요.

  {
    src,
    sizes,
    unoptimized = false,
    priority = false,
    loading,
    className,
    quality,
    width,
    height,
    fill = false,
    style,
    overrideSrc,
    onLoad,
    onLoadingComplete,
    placeholder = 'empty',
    blurDataURL,
    fetchPriority,
    layout,
    objectFit,
    objectPosition,
    lazyBoundary,
    lazyRoot,
    ...rest
  }: ImageProps,
  _state: {
    defaultLoader: ImageLoaderWithConfig
    imgConf: ImageConfigComplete
    showAltText?: boolean
    blurComplete?: boolean
  }
): {
  props: ImgProps
  meta: {
    unoptimized: boolean
    priority: boolean
    placeholder: NonNullable<ImageProps['placeholder']>
    fill: boolean
  }
} {


이후 img태그에 직접사용할 요소는 props로 그리고 meta데이터를 반환해줍니다.

다양한 조건문을 통한 에러검증이 내부에 존재하는데, 예외처리 및 props를 활용하여 img의 크기 등이 결정되면은

generateImgAttrs함수가 실행됩니다.

  const imgAttributes = generateImgAttrs({
    config,
    src,
    unoptimized,
    width: widthInt,
    quality: qualityInt,
    sizes,
    loader,
  })


function generateImgAttrs({
  config,
  src,
  unoptimized,
  width,
  quality,
  sizes,
  loader,
}: GenImgAttrsData): GenImgAttrsResult {
  if (unoptimized) {
    return { src, srcSet: undefined, sizes: undefined }
  }

  const { widths, kind } = getWidths(config, width, sizes)
  const last = widths.length - 1

  return {
    sizes: !sizes && kind === 'w' ? '100vw' : sizes,
    srcSet: widths
      .map(
        (w, i) =>
          `${loader({ config, src, quality, width: w })} ${
            kind === 'w' ? w : i + 1
          }${kind}`
      )
      .join(', '),

    // It's intended to keep `src` the last attribute because React updates
    // attributes in order. If we keep `src` the first one, Safari will
    // immediately start to fetch `src`, before `sizes` and `srcSet` are even
    // updated by React. That causes multiple unnecessary requests if `srcSet`
    // and `sizes` are defined.
    // This bug cannot be reproduced in Chrome or Firefox.
    src: loader({ config, src, quality, width: widths[last] }),
  }
}

해당 함수를 통해서 sizes와 srcSet, src가 결정됩니다.

srcSet 코드를 보면 loader를 활용하여 반환된 이름이 나오고 아래와 같이 이름이 나온 이유가 유추가능합니다.

next.js image


마지막으로 반환되는 내용들은 아래와 같습니다. imgAttributes에서 sizes, srcSet, src를 반환해줬는데 해당 값을 props에 다시 할당해줬네요. 

  const props: ImgProps = {
    ...rest,
    loading: isLazy ? 'lazy' : loading,
    fetchPriority,
    width: widthInt,
    height: heightInt,
    decoding: 'async',
    className,
    style: { ...imgStyle, ...placeholderStyle },
    sizes: imgAttributes.sizes,
    srcSet: imgAttributes.srcSet,
    src: overrideSrc || imgAttributes.src,
  }
  const meta = { unoptimized, priority, placeholder, fill }
  return { props, meta }
}


const ImageElement = forwardRef<HTMLImageElement | null, ImageElementProps>(
  (
    {
      src,
      srcSet,
      sizes,
      height,
      width,
      decoding,
      className,
      style,
      fetchPriority,
      placeholder,
      loading,
      unoptimized,
      fill,
      onLoadRef,
      onLoadingCompleteRef,
      setBlurComplete,
      setShowAltText,
      sizesInput,
      onLoad,
      onError,
      ...rest
    },
    forwardedRef
  ) => {
    return (
      <img
        {...rest}
        {...getDynamicProps(fetchPriority)}
        // It's intended to keep `loading` before `src` because React updates
        // props in order which causes Safari/Firefox to not lazy load properly.
        // See https://github.com/facebook/react/issues/25883
        loading={loading}
        width={width}
        height={height}
        decoding={decoding}
        data-nimg={fill ? 'fill' : '1'}
        className={className}
        style={style}
        // It's intended to keep `src` the last attribute because React updates
        // attributes in order. If we keep `src` the first one, Safari will
        // immediately start to fetch `src`, before `sizes` and `srcSet` are even
        // updated by React. That causes multiple unnecessary requests if `srcSet`
        // and `sizes` are defined.
        // This bug cannot be reproduced in Chrome or Firefox.
        sizes={sizes}
        srcSet={srcSet}
        src={src}
        ref={useCallback(
          (img: ImgElementWithDataProp | null) => {
            if (forwardedRef) {
              if (typeof forwardedRef === 'function') forwardedRef(img)
              else if (typeof forwardedRef === 'object') {
                // @ts-ignore - .current is read only it's usually assigned by react internally
                forwardedRef.current = img
              }
            }
            if (!img) {
              return
            }
            if (onError) {
              // If the image has an error before react hydrates, then the error is lost.
              // The workaround is to wait until the image is mounted which is after hydration,
              // then we set the src again to trigger the error handler (if there was an error).
              // eslint-disable-next-line no-self-assign
              img.src = img.src
            }
            if (process.env.NODE_ENV !== 'production') {
              if (!src) {
                console.error(`Image is missing required "src" property:`, img)
              }
              if (img.getAttribute('alt') === null) {
                console.error(
                  `Image is missing required "alt" property. Please add Alternative Text to describe the image for screen readers and search engines.`
                )
              }
            }
            if (img.complete) {
              handleLoading(
                img,
                placeholder,
                onLoadRef,
                onLoadingCompleteRef,
                setBlurComplete,
                unoptimized,
                sizesInput
              )
            }
          },
          [
            src,
            placeholder,
            onLoadRef,
            onLoadingCompleteRef,
            setBlurComplete,
            onError,
            unoptimized,
            sizesInput,
            forwardedRef,
          ]
        )}
        onLoad={(event) => {
          const img = event.currentTarget as ImgElementWithDataProp
          handleLoading(
            img,
            placeholder,
            onLoadRef,
            onLoadingCompleteRef,
            setBlurComplete,
            unoptimized,
            sizesInput
          )
        }}
        onError={(event) => {
          // if the real image fails to load, this will ensure "alt" is visible
          setShowAltText(true)
          if (placeholder !== 'empty') {
            // If the real image fails to load, this will still remove the placeholder.
            setBlurComplete(true)
          }
          if (onError) {
            onError(event)
          }
        }}
      />
    )
  }
)


defaultLoader의 코드를 자세히 분석하진 않을거지만 로더에 사용되는 Config값을 확인하면  Next.js  Size Optimization에 대해서 유추가능합니다. 왜 /_next/image라는 경로가 나오고, 디바이스 사이즈들은 어떤걸 다루는 지, 이미지 포멧 등등..) 

export const imageConfigDefault: ImageConfigComplete = {
  deviceSizes: [640, 750, 828, 1080, 1200, 1920, 2048, 3840],
  imageSizes: [16, 32, 48, 64, 96, 128, 256, 384],
  path: '/_next/image',
  loader: 'default',
  loaderFile: '',
  domains: [],
  disableStaticImages: false,
  minimumCacheTTL: 60,
  formats: ['image/webp'],
  dangerouslyAllowSVG: false,
  contentSecurityPolicy: `script-src 'none'; frame-src 'none'; sandbox;`,
  contentDispositionType: 'attachment',
  remotePatterns: [],
  unoptimized: false,
}


Image의 JSX요소인 ImageElement와 ImagePreload

return (
      <>
        {
          <ImageElement
            {...imgAttributes}
            unoptimized={imgMeta.unoptimized}
            placeholder={imgMeta.placeholder}
            fill={imgMeta.fill}
            onLoadRef={onLoadRef}
            onLoadingCompleteRef={onLoadingCompleteRef}
            setBlurComplete={setBlurComplete}
            setShowAltText={setShowAltText}
            sizesInput={props.sizes}
            ref={forwardedRef}
          />
        }
        {imgMeta.priority ? (
          <ImagePreload
            isAppRouter={isAppRouter}
            imgAttributes={imgAttributes}
          />
        ) : null}
      </>
    )
  }


ImagePreload

앞서 meta의 반환값으로 getImgProps함수가 meta를 반환하고 있고, 이를 Image 컴퍼넌트에서는 imgMeta에 할당하여 상용합니다. 이중에서 priority가 체크된 이미지의 경우 Preload가 일어납니다. 이때 Approuter에서는 일어나고, ReactDom의 preload함수를 사용하고 pageRouter에서는 Head와 link태그를 활용해서 preload를 합니다.

function ImagePreload({
  isAppRouter,
  imgAttributes,
}: {
  isAppRouter: boolean
  imgAttributes: ImgProps
}) {
  const opts = {
    as: 'image',
    imageSrcSet: imgAttributes.srcSet,
    imageSizes: imgAttributes.sizes,
    crossOrigin: imgAttributes.crossOrigin,
    referrerPolicy: imgAttributes.referrerPolicy,
    ...getDynamicProps(imgAttributes.fetchPriority),
  }

  if (isAppRouter && ReactDOM.preload) {
    // See https://github.com/facebook/react/pull/26940
    ReactDOM.preload(
      imgAttributes.src,
      // @ts-expect-error TODO: upgrade to `@types/react-dom@18.3.x`
      opts
    )
    return null
  }

  return (
    <Head>
      <link
        key={
          '__nimg-' +
          imgAttributes.src +
          imgAttributes.srcSet +
          imgAttributes.sizes
        }
        rel="preload"
        // Note how we omit the `href` attribute, as it would only be relevant
        // for browsers that do not support `imagesrcset`, and in those cases
        // it would cause the incorrect image to be preloaded.
        //
        // https://html.spec.whatwg.org/multipage/semantics.html#attr-link-imagesrcset
        href={imgAttributes.srcSet ? undefined : imgAttributes.src}
        {...opts}
      />
    </Head>
  )
}


ImageElement


const ImageElement = forwardRef<HTMLImageElement | null, ImageElementProps>(
  (
    {
      src,
      srcSet,
      sizes,
      height,
      width,
      decoding,
      className,
      style,
      fetchPriority,
      placeholder,
      loading,
      unoptimized,
      fill,
      onLoadRef,
      onLoadingCompleteRef,
      setBlurComplete,
      setShowAltText,
      sizesInput,
      onLoad,
      onError,
      ...rest
    },
    forwardedRef
  ) => {
    return (
      <img
        {...rest}
        {...getDynamicProps(fetchPriority)}
        // It's intended to keep `loading` before `src` because React updates
        // props in order which causes Safari/Firefox to not lazy load properly.
        // See https://github.com/facebook/react/issues/25883
        loading={loading}
        width={width}
        height={height}
        decoding={decoding}
        data-nimg={fill ? 'fill' : '1'}
        className={className}
        style={style}
        // It's intended to keep `src` the last attribute because React updates
        // attributes in order. If we keep `src` the first one, Safari will
        // immediately start to fetch `src`, before `sizes` and `srcSet` are even
        // updated by React. That causes multiple unnecessary requests if `srcSet`
        // and `sizes` are defined.
        // This bug cannot be reproduced in Chrome or Firefox.
        sizes={sizes}
        srcSet={srcSet}
        src={src}
        ref={useCallback(
          (img: ImgElementWithDataProp | null) => {
            if (forwardedRef) {
              if (typeof forwardedRef === 'function') forwardedRef(img)
              else if (typeof forwardedRef === 'object') {
                // @ts-ignore - .current is read only it's usually assigned by react internally
                forwardedRef.current = img
              }
            }
            if (!img) {
              return
            }
            if (onError) {
              // If the image has an error before react hydrates, then the error is lost.
              // The workaround is to wait until the image is mounted which is after hydration,
              // then we set the src again to trigger the error handler (if there was an error).
              // eslint-disable-next-line no-self-assign
              img.src = img.src
            }
            if (process.env.NODE_ENV !== 'production') {
              if (!src) {
                console.error(`Image is missing required "src" property:`, img)
              }
              if (img.getAttribute('alt') === null) {
                console.error(
                  `Image is missing required "alt" property. Please add Alternative Text to describe the image for screen readers and search engines.`
                )
              }
            }
            if (img.complete) {
              handleLoading(
                img,
                placeholder,
                onLoadRef,
                onLoadingCompleteRef,
                setBlurComplete,
                unoptimized,
                sizesInput
              )
            }
          },
          [
            src,
            placeholder,
            onLoadRef,
            onLoadingCompleteRef,
            setBlurComplete,
            onError,
            unoptimized,
            sizesInput,
            forwardedRef,
          ]
        )}
        onLoad={(event) => {
          const img = event.currentTarget as ImgElementWithDataProp
          handleLoading(
            img,
            placeholder,
            onLoadRef,
            onLoadingCompleteRef,
            setBlurComplete,
            unoptimized,
            sizesInput
          )
        }}
        onError={(event) => {
          // if the real image fails to load, this will ensure "alt" is visible
          setShowAltText(true)
          if (placeholder !== 'empty') {
            // If the real image fails to load, this will still remove the placeholder.
            setBlurComplete(true)
          }
          if (onError) {
            onError(event)
          }
        }}
      />
    )
  }
)

그리고 ref에서 loading을 통해 이미지 로드 완료시 블러처리 이벤트 전파 관리등의 추가작업을 실행하고 있습니다.

이때 getImgProps함수를 통해 반환했던 width값등이 지정되기 때문에 layoutShift가 방지가 됩니다.

https://web.dev/articles/optimize-cls?hl=ko


레이아웃 변경 누적 최적화  |  Articles  |  web.dev

레이아웃 변경 횟수 (CLS)는 사용자가 페이지 콘텐츠의 갑작스러운 변화를 경험하는 빈도를 정량화하는 측정항목입니다. 이 가이드에서는 크기 또는 동적 콘텐츠가 없는 이미지 및 iframe과 같이 C

web.dev


Asset Flexibility에 대해서는 찾아보지 못했지만, Next.js에서 어떻게 Size Optimization, Visual Stability, Faster Page Loads 를 하려고 했는지는 직접 확인할 수 있었습니다.


느낀점

1. 다양한 이슈를 확인하고 에러처리를 볼 수 있어서 좋았다.

대표적인게 getDynamicProps함수인데, next.js의 19버전과 이전 버전에서 옵션의 네이밍 컨벤션이 달라진걸 처리하는 함수이다.

function getDynamicProps(
  fetchPriority?: string
): Record<string, string | undefined> {
  if (Boolean(use)) {
    // In React 19.0.0 or newer, we must use camelCase
    // prop to avoid "Warning: Invalid DOM property".
    // See https://github.com/facebook/react/pull/25927
    return { fetchPriority }
  }
  // In React 18.2.0 or older, we must use lowercase prop
  // to avoid "Warning: Invalid DOM property".
  return { fetchpriority: fetchPriority }
}


2. Image컴퍼넌트와 img태그에 대한 학습

img.complete등 생각보다 모르는 내용들이 있었고, Image컴퍼넌트에 대해서도 몰라서 사용하지 않았던 내용들이 있었느데, 소스 코드를 보면서 알 수 있어서 좋았습니다.  개발 실력을 기르려면 오픈소스 코드를 많이 참고하라는 이유를 느낄 수 있었습니다.


3. 컴퍼넌트 분리 기준에 대한 호기심

 구성된 코드가 제 생각보다 굉장히 복잡했습니다. 그런데 생각보다 컴퍼넌트가 간략하게 분리되어있어서 놀랐습니다.

error처리가 함수로 분리된게 아닌 직접 적혀있었는데, 이게 라이브러리라서 이런건지 어떤 기준으로 분리를 한건지 개인적으로 호기심이 생겼습니다.


4. 네이밍이 좋아서 코드가 잘 읽힌다.

네이밍이 굉장히 좋다는 생각이 드는 부분도 있었고 getImageProps와 getImgProps처럼 애매한 네이밍도 보였다고 생각했느데, 나름의 합리성이 느껴지고 덕분에 코드가 읽기 더 수월했습니다. 좋은 변수명이 항상 어려운데 이런걸 보다 보면 늘지 않을까 라는 생각이 들었습니다.


5. 정리하기엔 너무 방대한 코드

연계되어있는 기능들이 너무 많아서 한 블로그 포스팅에 정리하기엔 너무 많았습니다. 간략하게 다루면서 생략된 내용들이 조금 아쉬운 거 같습니다.


참고한 링크

https://developer.mozilla.org/ko/docs/Web/HTML/Element/img


<img>: 이미지 삽입 요소 - HTML: Hypertext Markup Language | MDN

HTML <img> 요소는 문서에 이미지를 넣습니다.

developer.mozilla.org


https://github.com/vercel/next.js/tree/canary


GitHub - vercel/next.js: The React Framework

The React Framework. Contribute to vercel/next.js development by creating an account on GitHub.

github.com

https://nextjs.org/docs/app/api-reference/components/image


Components: <Image> | Next.js

Optimize Images in your Next.js Application using the built-in `next/image` Component.

nextjs.org

https://web.dev/articles/optimize-cls?hl=ko


레이아웃 변경 누적 최적화  |  Articles  |  web.dev

레이아웃 변경 횟수 (CLS)는 사용자가 페이지 콘텐츠의 갑작스러운 변화를 경험하는 빈도를 정량화하는 측정항목입니다. 이 가이드에서는 크기 또는 동적 콘텐츠가 없는 이미지 및 iframe과 같이 C

web.dev


728x90

문제 인식 과정

최근에 R3F를 활용한 3d 기반 웹앱을 제작하고 있었습니다. 이때  R3F의 Canvas 내부에서는 Html 요소를 사용할 수가 없습니다. 하지만  저는 3d 모델과 함께 html을 작성할 필요가 있었고, 그러기 위해서 R3F에서 UI작업을 도와주는 drei 라이브러리의 HTML 컴퍼넌트를 사용하게 되었습니다.


그 당시에 컴퍼넌트를 관심사에 따라 분리하였고, HTML의 children으로 존재하는 내부 컴퍼넌트에서 useSession 훅을 사용하였더니 에러가 발생하였습니다. '디버깅 하는 도중에 HTML 컴퍼넌트와 Next.js의 모듈간의 충돌이지 않을까?'라는 감성적이고 잘못된 결론을 내렸었습니다.  (Next.js App router 버그가 많다고 많이 하니깐,,이라는 이유로 얕은 디버깅을 했었습니다)


하지만 최근에 ContextApi를 사용하는 Modal을 여는 버튼을 분리하려고 하였는데, 동일한 에러가 또 발생하였습니다.


'use client';

import { Html } from '@react-three/drei';
import style from '@/app/(enforcement)/enforcement.module.css';

import RecordList from './RecordList';
import React from 'react';

import RecordModalBtn from './RecordModalBtn';
import { useValidInput } from '../hooks/useValidInput';
import { useEnforce } from '../hooks/useEnforce';
import { useModalContext } from '@/shared/components/portal/ModalContext';

export default function EnforceHtml() {
  const [percent, setValidInput] = useValidInput();
  const { result, onEnforce } = useEnforce(Number(percent));

  // 컴퍼넌트 분리시 인지 못함 RecordModalBtn
  const { open } = useModalContext();
  const openRecords = () => {
    open({ type: 'enforce' });
  };

  return (
    <Html fullscreen zIndexRange={[300, 0]}>
      <div className={style.wrapper}>
        <div className={style.row}>
          <span>강화 확률(%) :</span>
          <input
            type="text"
            className={style.input}
            value={percent}
            onChange={(e) => setValidInput(e.target.value)}
            placeholder="0.00~100.00"
            min="0.00"
            max="100.00"
          />
          <button className={style.button} onClick={onEnforce}>
            클릭
          </button>
        </div>
        <div className={style.row}>
          <div>{result}</div>
          <RecordModalBtn openRecords={openRecords} />
        </div>
        <RecordList />
      </div>
    </Html>
  );
}
import style from '@/app/(enforcement)/enforcement.module.css';

export default function RecordModalBtn({
  openRecords,
}: {
  openRecords: () => void;
}) {
  //TODO : 분리시 modalContext를 인지하지 못함

  // const { open } = useModalContext();
  // const openRecords = () => {
  //   open({ type: 'enforce' });
  // };
  return (
    <button className={`${style.button} ${style.mobile}`} onClick={openRecords}>
      데이터 보기
    </button>
  );
}


이때 든 생각이 useSession훅도 분명 ContextApi 기반이지 않을까? 라고 생각하였고 소스코드를 확인해보니 역시 contextApi 기반이더군요


아 그러면 왜  drei의 HTML 태그와 contextApi가 문제가 생기는지 확인해봐야겠다 라는 생각에 HTML 소스코드를 분석하게 되었습니다.


HTML소스코드 분석과 에러 원인

Html의 소스코드는 https://github.com/pmndrs/drei/blob/master/src/web/Html.tsx 에 있었습니다.

출처 : drei 라이브러리 공식문서


각각의 props가 어떤 역할을 하는지 공식문서에서 확인할 수 있는데, 해당 로직을 어떻게 구현했는지가 나와있습니다.

하지만 지금 당장 제 관심사는 아닙니다.

제 에러에 관련있는 코드만 모아서 보면 아래와 같습니다.

export const Html: ForwardRefComponent<HtmlProps, HTMLDivElement> = /* @__PURE__ */ React.forwardRef(
  (
   //... props들
  ) => {
  
  // ... 생략
	const root = React.useRef<ReactDOM.Root>()

// ... 생략
    React.useLayoutEffect(() => {
      isMeshSizeSet.current = false

      if (transform) {
        root.current?.render(
          <div ref={transformOuterRef} style={styles}>
            <div ref={transformInnerRef} style={transformInnerStyles}>
              <div ref={ref} className={className} style={style} children={children} />
            </div>
          </div>
        )
      } else {
      root.current?.render(<div ref={ref} style={styles} className={className} children={children} />)
      }
    })

//.. 생략

 return (
      <group {...props} ref={group}>
        {occlude && !isRayCastOcclusion && (
          <mesh castShadow={castShadow} receiveShadow={receiveShadow} ref={occlusionMeshRef}>
            {geometry || <planeGeometry />}
            {material || (
              <shaderMaterial
                side={DoubleSide}
                vertexShader={shaders.vertexShader}
                fragmentShader={shaders.fragmentShader}
              />
            )}
          </mesh>
        )}
      </group>
    )
  }
)


HTML 태그는 children을 render 함수를 통해서 root의 하위 노드로 렌더링하는 방식을 사용하고 있습니다.

따라서 개발자도구에서 확인해보면  다른 div에서 랜더링 되고 있음을 확인할 수 있습니다.


따라서 컴퍼넌트를 분리하게 되면 Provider가 있는 노드가 아닌 다른 노드에서 Provider를 찾게 되고 useContext훅을 결과값이 null혹은 undefined가 나오게 됩니다.


그렇다면 왜 분리하지 않으면 제대로 작동될까? 분리해서 매개변수로 넘겨주면 제대로 작동될까?


openRecords 함수는 EnforceHtml 컴포넌트가 렌더링될 때 정의되며, 해당 함수는 useModalContext 훅을 사용하여 컨텍스트에서 가져온 open 메서드를 호출합니다. 이 때 open 메서드는 클로저에 의해 openRecords 함수 내부에서 저장되어 있습니다.


문제 해결


따라서 해결방법은 2가지가 있습니다.

1. 위에 방법처럼 매개변수로 쓴다 (관심사 분리는 힘듬)

2. Provider를 Html의 하위 노드로 생성한다.


하지만 관심사의 분리 측면에서 봤을때, open함수 RecordModalBtn 내부에서 선언되는게 맞다고 생각합니다. 따라서 

2번째 방법을 채택하였습니다.


   <Html fullscreen zIndexRange={[300, 0]}>
      <ModalContextProvider>
        <div className={style.wrapper}>
          <div className={style.row}>
            <span>강화 확률(%) :</span>
            <input
              type="text"
              className={style.input}
              value={percent}
              onChange={(e) => setValidInput(e.target.value)}
              placeholder="0.00~100.00"
              min="0.00"
              max="100.00"
            />
            <button className={style.button} onClick={onEnforce}>
              클릭
            </button>
          </div>
          <div className={style.row}>
            <div>{result}</div>
            <RecordModalBtn />
          </div>
          <RecordList />
        </div>
      </ModalContextProvider>
    </Html>
import style from '@/app/(enforcement)/enforcement.module.css';
import { useModalContext } from '@/shared/components/portal/ModalContext';

export default function RecordModalBtn() {
  const { open } = useModalContext();
  const openRecords = () => {
    open({ type: 'enforce' });
  };
  return (
    <button className={`${style.button} ${style.mobile}`} onClick={openRecords}>
      데이터 보기
    </button>
  );
}


느낀점

1. 처음 useSession훅에서 에러가 발생했을 때는 모듈간의 결합에 의해 생긴 에러로 생각했었고, 문제를 추상화하지 못했었습니다.  html 과 useSession 훅 사이에서 문제가 생긴건 맞는데 어떤 부분에 문제가 되었는지 추상화 하기가 어려웠습니다..  프로젝트가 완성되고 디버깅하자고 미뤘던 것도 있지만, 고민이 엄청 깊지는 못했었다고 생각이 드네요..하지만 막연했던 문제도 조금씩 구체화하다 보니 해결되어서 기분이 좋았습니다.


2. 클로저를 공부하면서 체감할 기회가 많지 않았습니다.. 그런데 이번 기회에 클로저를 체감할 수 있어서 재밌었습니다.


728x90

도입 배경 및 폰트 준비


2D로 택스트를 작성해서 넣었습니다.. 물론 단지 2D라서 그런건 아니지만 입체감이 있으면 좀 더 잘 보이고 이쁠 거 같아서 3d텍스트를 도입하기로 했습니다.


https://github.com/pmndrs/drei?tab=readme-ov-file#text3d


GitHub - pmndrs/drei: 🥉 useful helpers for react-three-fiber

🥉 useful helpers for react-three-fiber. Contribute to pmndrs/drei development by creating an account on GitHub.

github.com

이떄 사용할 것은 drei의 text3d입니다.

스토리북으로 실습도 할 수 있는데, 해당 컴퍼넌트를 사용하려면 json형식의 font가 필요하다고 하네요.

이는 drei의 text3d는 three.js의 textGeometry기반으로 만들어졌기 때문입니다.


따라서  폰트를 다운받고, (시바와 어울리는 동글동글한 글씨체를 찾았습니다)


폰트를 json파일로 변환 (링크)


하지만 wasd space 이정도의 글자만 사용할려고 하는데,, 용량이 좀 크네요...


우선 폰트 먼저 적용해보려고 합니다


폰트 적용

우선 폰트 먼저 적용해보려고 합니다

import { Center, Text, Text3D } from '@react-three/drei';

export default function Manual() {
  const fontUrl = '/font/ONE_Mobile_POP_Regular.json';

  const fontStyle = {
    font: fontUrl,
    size: 0.2,
    letterSpacing: 0.01,
    height: 0.02,
    fontSize: 2,
  };
  return (
    <group>
      <group>
        <Text3D position={[-0.12, 0.57, 0]} {...fontStyle}>
          이동
          <meshBasicMaterial color={'#654321'} />
        </Text3D>
        <Text3D position={[0, 0.27, 0]} {...fontStyle}>
          W
        </Text3D>
        <Text3D position={[-0.26, 0, 0]} {...fontStyle}>
          A S D
        </Text3D>
      </group>
      <group position={[0, 2, 0]}>
        <Text3D position={[0, 0.35, 0]} {...fontStyle}>
          비행
          <meshBasicMaterial color={'#654321'} />
        </Text3D>
        <Text3D position={[-0.26, 0, 0]} {...fontStyle}>
          SPACE
        </Text3D>
      </group>
    </group>
  );
}


위치는 조정해야겠지만 글자 생김새는 마음에 드네요.. 색을 사실 잘 못정하겠네요 ㅠㅠ 색이 같으면 너무 안 보일거 같고,,너무 독특하면 튈거같아서 국방색 느낌으로 조합했습니다..


폰트 파일 최적화

json형식의 웹폰트는 글리프( 하나 이상의 문자를 시각적으로 표현하기 위해 타이포그래피에서 사용되는 용어)로 구성되어있습니다. 이 중에서 사용하는 글리프만 추출하여 json파일의 크기를 줄여볼려고합니다


import fontjson from './ONE_Mobile_POP_Regular.json';
export default function Manual() {

  // 사용하는 font 최적화
  useEffect(() => {
    const fontData = fontjson;
    const targetText = '이동WASDPCE비행카메라 제어마우스 활용';
    const modifiedGlyphs = {};

    for (const char of targetText) {
      const charKey = fontData.glyphs[char]
        ? char
        : fontData.glyphs[char.toUpperCase()]
        ? char.toUpperCase()
        : null;
      if (charKey) {
        modifiedGlyphs[charKey] = fontData.glyphs[charKey];
      }
    }

    const modifiedFontData = {
      ...fontData,
      glyphs: modifiedGlyphs,
    };
    console.log(JSON.stringify(modifiedFontData));
  }, []);

콘솔에 사용하는 글리프들을 확인하고 이를 json파일로 덮어씌웁니다.


그  결과  900배 정도 크기가 감소했네요..


최종 위치는 아래와 같이 벽에 배치했습니다. 색깔도 베이지 색으로,,

728x90

Next.js에서는 auth.js ( 구 Next.auth)를 통해서 유저 인증(authentication )및 권한 부여(authorization)를 손쉽게 구현 할 수 있습니다.


Oauth를 활용하여 유저 인증을 하는 방법은 앞선 게시글에서 다루었고, 권한 설정에 대해서 다루어 볼려고 합니다.

https://ungumungum.tistory.com/110


Auth.js로 Oauth 구현하기 (예시 : google)

NextAuth가  다양한 프레임워크를 지원하기 위해서 확장되면서 Auth.js로 바꼈습니다.그러면서 사용법도 살짝 바꼈고 공식문서를 보고 학습한 부분을 포스팅합니다. 설치방법1. Auth.js설치npm install

ungumungum.tistory.com


방법 1. session을 통해서 다루기

우선 auth.ts 파일에서 유저 정보를 얻을 수 있는 auth함수를 반환하고 있습니다.

//auth.ts
import NextAuth, { NextAuthConfig } from 'next-auth';
import Google from 'next-auth/providers/google';

export const authConfig = {
  theme: { logo: 'https://authjs.dev/img/logo-sm.png' },
  providers: [Google],
} satisfies NextAuthConfig;

export const { handlers, signIn, signOut, auth } = NextAuth(authConfig);


이를 활용하여 sesion 정보의 유무를 확인할 수 있고, 만약 로그인 되어있지 않다면 원하는 주소로 redirect 시킬 수 있습니다. 

import { auth } from '@/auth';
import { redirect } from 'next/navigation';

export default async function Mypage() {
  const session = await auth();
  if (!session) return redirect('/');
  return <main>로그인해야 볼 수 있는 페이지</main>;
}


다만 이렇게 할 경우 모든 페이지에 대해서 동일한 코드가 반복되어야 합니다. 또한 관심사가 분리되지 않아서, 어떤 페이지가 권한이 필요한지 한눈에 파악하기가 힘듭니다.


방법 2.  config에서 callback 설정하기

Next.js의 공식문서 tutorial에서는 아래와 같은 코드를 통해  접근권한을 관리합니다.

import type { NextAuthConfig } from 'next-auth';

export const authConfig = {
// authorized에서 false가 반환될 때 이동할 로그인 페이지(signIn)
  pages: {
    signIn: '/login',
  },
  callbacks: {
    authorized({ auth, request: { nextUrl } }) {
    // user가 있으면 로그인 없으면 로그인 되지 않은 상태
      const isLoggedIn = !!auth?.user;
      // url의 경로가 /dashboard로 시작하는지
      const isOnDashboard = nextUrl.pathname.startsWith('/dashboard');
      
      // dashboard에서는 권한이 필요하므로, 비로그인시 login페이지로 이동
      if (isOnDashboard) {
        if (isLoggedIn) return true;
        return false; // Redirect unauthenticated users to login page
      } else if (isLoggedIn) {
      // 만약 로그인 된 유저라면 홈에서 origin과 더해서 /dashboard로 이동
        return Response.redirect(new URL('/dashboard', nextUrl));
      }
      return true;
    },
  },
  providers: [], // Add providers with an empty array for now
} satisfies NextAuthConfig;

config설정의 callbacks를 통하여서 권한 확인할 수 있는데,  이중 authorized는 next.js의 middleware와 함께 사용해서 

true를 반환하면, 권한 인증, false를 반환하면 권한이 없다는 것이다.


저는 위 코드를 기반으로 mypage에 접속햇는데 비로그인시 /로 이동하도록 하였습니다.

export const authConfig = {
  pages: {
    signIn: '/',
  },
  theme: { logo: 'https://authjs.dev/img/logo-sm.png' },
  callbacks: {
     authorized({ auth, request: { nextUrl } }) {
       const isLoggedIn = !!auth?.user;
       const protectedPath = ['/mypage'];
       const isProtected = protectedPath.includes(nextUrl.pathname);
       if (isProtected) {
         if (isLoggedIn) return true;
         return Response.redirect(new URL('/', nextUrl));
       }
       return true;
     },
   },
  providers: [Google],
} satisfies NextAuthConfig;


이제 위 코드를 적용하기 위해서는 middleware에 등록해야 합니다.

https://authjs.dev/reference/nextjs#authorized


미들웨어 등록

//middleware.ts
import NextAuth from 'next-auth';
import { authConfig } from './auth';

export default NextAuth(authConfig).auth;

export const config = {
  matcher: ['/((?!api|_next/static|_next/image|.*\\.png$).*)'],
};


next.js에서는 middleware 파일에서 미들웨어등록을 할 수 있습니다.

이때 config에 matcher를 통해서 언제 미들웨어를 사용할 지 결정할 수 있는데,

정규식의 부정형 전방 탐색을 활용하여


  1. api
  2. _next/static
  3. _next/image
  4. .png로 끝나는 문자열

을 포함한 경우에는 middleware가 실행되지 않도록 하였습니다.
( next.js에서는  불필요한 요청을 줄이기 위해서 cache가 진행되는데, _next/static , _next/image는 각각 cache된 파일들의 경로입니다.)

Middleware allows you to run code before a request is completed. Then, based on the incoming request, you can modify the response by rewriting, redirecting, modifying the request or response headers, or responding directly.
// https://nextjs.org/docs/pages/building-your-application/routing/middleware


이렇게 미들웨어를 사용하는 경우에는 특정페이지 요청전에 미들웨어가 실행되어 불필요한 요청을 막을 수 있습니다.


next.js에서 파일의 실행순서는 아래와 같습니다.

  1. headers from next.config.js
  2. redirects from next.config.js
  3. Middleware (rewrites, redirects, etc.)
  4. beforeFiles (rewrites) from next.config.js
  5. Filesystem routes (public/, _next/static/, pages/, app/, etc.)
  6. afterFiles (rewrites) from next.config.js
  7. Dynamic Routes (/blog/[slug])
  8. fallback (rewrites) from next.config.js


참고 문헌

https://nextjs.org/docs/pages/building-your-application/routing/middleware


Routing: Middleware | Next.js

Learn how to use Middleware to run code before a request is completed.

nextjs.org


https://authjs.dev/reference/nextjs#callbacks


Auth.js | Nextjs

Authentication for the Web

authjs.dev

https://authjs.dev/reference/nextjs#authorized


Auth.js | Nextjs

Authentication for the Web

authjs.dev


728x90

웹 접근성이란  장애인, 고령자 등이 웹 사이트에서 제공하는 정보에 비장애인과 동등하게 접근하고 이해할 수 있도록 보장하는 것입니다.


이를 향상시키기 위해서 시멘틱한 코드를 작성할 필요가 있는데, 단순히 alt를 적고 aria 태그를 이용하고 시멘틱 태그를 사용한다고 해서 과연 적절하게 작성했는지에 대해서는 확신할 수 없습니다.


따라서 저는 NVDA의 Screen Reader를 통해서 시각 장애인이 실제 내 사이트에 접근했을 때 어떻게 읽을지에 대해서 확인해 보았습니다.


사이트는 간단하게 학원 주소 이미지, 학원 이름, 오시는 길, 연락처등이 있는 페이지입니다.

(상호가 일점육수학과학전문학원이라서 검색에 불편함을 겪는 학부모님들을 위한 사이트)


사이트 기능이 단순한 만큼 Screen Reader로 읽었을 때 큰 문제가 없을거라 생각했는데,  2가지 불편함을 확인하여 이를 개선하였습니다.


#1. --> 으로 인한 불편함

오시는 길 옆에 화살표는 마우스를 호버했을 때 버튼이라는 시각적 효과를 주기 위해서 삽입하였습니다.

하지만 이를 스크린리더가 읽게 되면

오시는 길 언더바 언더바 그레이터댄 이라고 읽습니

따라서 불필요한 내용에 대해서 Screen Reader가 읽지 않도록 설정할 필요성이 있습니다.

이때 사용하는 것이 aria-hidden 속성입니다.

   <span
        className="inline-block transition-transform group-hover:translate-x-1 motion-reduce:transform-none"
        aria-hidden="true"
      >


이후 위의 연락처 -> 052-261- 5515를 Screen Reader에 읽게 하면

연락처 052 언더바 261 언더바 5515 버튼 이라고 읽게 됩니다.


(Children Presentational이라고 자식요소를 한꺼번에 읽은 후 자신의 역할을 설명하는 요소들이 있습니다.

이때 버튼도 해당 요소중 하나라서 위와 같이 읽습니다.)

https://www.w3.org/TR/wai-aria-1.2/#tree_exclusion


#2. 연락처 버튼을 클릭시 번호가 클립보드에 저장되는 이를 시각장애자 입장에서 알기 힘들다 

function CardClipWrapper({ text, children }: CardClip) {
  const copylink = () => {
    navigator.clipboard.writeText(text);
    alert(text + '가 클립보드에 복사되었습니다');
  };
  return (
    <button
      onClick={copylink}
      className="flex flex-col items-start lg:text-left group rounded-lg border h-full px-5 py-4 transition-color border-gray-300 hover:bg-gray-100 hover:dark:border-neutral-700 hover:dark:bg-neutral-800/30 w-full max-w-96"
    >
      <span className="sr-only">클릭시 번호가 클립보드에 저장됩니다</span>
      {children}
    </button>
  );
}

이를 위해 sr-only class를 활용하여 스크린 리더만 읽는 text를 추가하였습니다.


참고문헌

추가적인 학습을 하고 싶다면 FE 컴프 영상을 참고하거나, 

https://www.youtube.com/watch?v=tKj3xsXy9KM


http://www.websoul.co.kr/accessibility/WA_guide22.asp


웹 접근성 지침 2.2 | Web Soul Lab

웹 접근성 지침 2.2 한국형 웹 콘텐츠 접근성 지침 2.2은 4가지 원칙과 각 원칙을 준수하기 위한 14개 지침 및 해당 지침의 준수여부를 확인하기 위해 33개의 검사항목으로 구성되어 있습니다. ※ 20

www.websoul.co.kr

에서 내용을 확인해도 좋다고 생각합니다.

728x90

평소에 Redux와 같은 전역상태관리 라이브러리를 사용하면서 해당 라이브러리가 어떻게 전역상태관리를 하는지에 대해서 깊게 생각해 본적이 없습니다. 이번 wanted 프리온보딩에서 관련 로직을 설명듣고, 이를 정리하기 위해서 
redux의 createStore의 코드를 다시 한번 분석해 보았습니다.


https://github.com/deminoth/redux/blob/master/src/createStore.ts


redux/src/createStore.ts at master · deminoth/redux

자바스크립트 앱을 위한 예측 가능한 상태 컨테이너. Contribute to deminoth/redux development by creating an account on GitHub.

github.com

 리덕스는 클로저를 통해서 전역 변수처럼 상태관리를 합니다.


자바스크립트를 공부하면 자주 접하게 되는 내용입니다.

1. 클로저란 함수와 해당 함수가 선언된 렉시컬 환경의 조합이다. 

2. 클로저는 정보 은닉을 위해서 사용된다.


redux에서 상태관리를 위한 store를 만들 때 createStore를 사용합니다.  관련 코드는 상위 url의 ( 42~384번째 줄까지)


우선 createStore의 매개변수와 타입들이 나오고

export function createStore<
  S,
  A extends Action,
  Ext extends {} = {},
  StateExt extends {} = {}
>(
  reducer: Reducer<S, A>,
  preloadedState?: PreloadedState<S> | StoreEnhancer<Ext, StateExt>,
  enhancer?: StoreEnhancer<Ext, StateExt>
): Store<S, A, StateExt> & Ext {


135줄에  let으로 선언된 변수들이 나옵니다.

 let currentReducer = reducer
  let currentState = preloadedState as S
  let currentListeners: Map<number, ListenerCallback> | null = new Map()
  let nextListeners = currentListeners
  let listenerIdCounter = 0
  let isDispatching = false


이때 createStore는 함수이고, 내부에 let으로 된 변수가 있다는 사실을 기억하면 됩니다.


createStore내부에서는 메서드를 통해서 해당 변수들을 이용 및 수정합니다.

 function dispatch(action: A) {
    if (!isPlainObject(action)) {
      throw new Error(
        `Actions must be plain objects. Instead, the actual type was: '${kindOf(
          action
        )}'. You may need to add middleware to your store setup to handle dispatching other values, such as 'redux-thunk' to handle dispatching functions. See https://redux.js.org/tutorials/fundamentals/part-4-store#middleware and https://redux.js.org/tutorials/fundamentals/part-6-async-logic#using-the-redux-thunk-middleware for examples.`
      )
    }

    if (typeof action.type === 'undefined') {
      throw new Error(
        'Actions may not have an undefined "type" property. You may have misspelled an action type string constant.'
      )
    }

    if (isDispatching) {
      throw new Error('Reducers may not dispatch actions.')
    }

    try {
      isDispatching = true
      currentState = currentReducer(currentState, action)
    } finally {
      isDispatching = false
    }

    const listeners = (currentListeners = nextListeners)
    listeners.forEach(listener => {
      listener()
    })
    return action
  }


이때 클로저에 의해서 비록 createStore의 실행이 끝났지만, 우리는 렉시컬 환경에 남아있는 변수들에 접근할 수 있습니다.


일반적인 전역변수를 사용할 경우 해당 변수가 오염될 수 있지만, 우리는  은닉화된 createStore의 렉시컬 환경속의 변수들을 관련 메서드를 통해 사용하기 때문에 좀 더 안전하게 사용할 수 있습니다.

+ Recent posts