기본적으로 FullCalendar는 리액트전용라이브러리가 아니다 보니, 정해진 기능 외의 스타일을 줄 때 어렵다.
현재 제가 구상하는 것은 이벤트 있으면 달력에 cursor : not-allowed 효과를 주려고 한다.

하지만 라이브러리 자체적으로 간간의 칸에서 이벤트 여부를 확인하는 기능이 없다. 이벤트 여부에 따른 이벤트 스타일링은 있어도 해당 날짜색을 미리 주는게 없다...
차선으로 있는 방법은 event나 date 클릭해서 직접 확인하는 방법 뿐,,https://fullcalendar.io/docs/dateClick
dateClick - Docs | FullCalendar
Triggered when the user clicks on a date or a time. function( dateClickInfo ) { } In order for this callback to fire, you must load the interaction plugin. If you are using an ES6 build system: import { Calendar } from '@fullcalendar/core'; import interact
fullcalendar.io
이를 해결하기 위해서 dom 요소에 직접적으로 접근해서 자식 노드에 이벤트가 존재한다면 스타일을 주려고 한다.
Ref에서 확인할 수 있나 싶어서 확인해봤지만 Calendar.ref에도 각각 날짜의 이벤트 여부가 기록되어 있진 않았다.
1. 우선 개발자도구를 통해서 각각의 div의 className을 확인했습니다.
그 결과 날짜별 컴퍼넌트의 className은 fc-daygrid-day-frame 이었고 calendar-unable 이라는 className을 추가해서 스타일을 주려고 합니다.
2. 이를 달력 컴퍼넌트가 렌더링 될 때, 자식에 event가 존재하면 calendar-unable 을 추가하려고 합니다
(현재는 커스텀훅으로 분리했습니다)
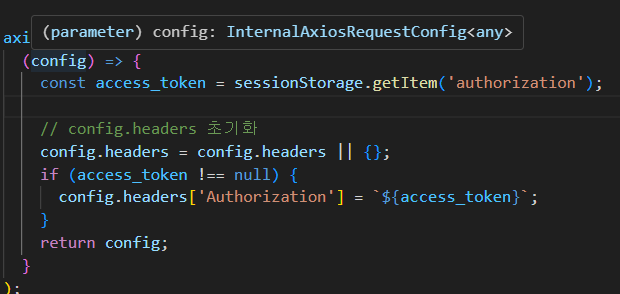
// useCalendarStyle.ts

import { useEffect } from 'react';
import { userType } from '../types';

const useCalendarStyle = (type: userType) => {
	useEffect(() => {
		if (type === 'owner') {
			const parentDiv = document.getElementsByClassName('fc-daygrid-day-frame');
			for (let i = 0; i < parentDiv.length; i++) {
				if (parentDiv[i].children[1].children.length > 1) {
					parentDiv[i].classList.add('calendar-unable');
				}
			}
		}
	}, [type]);
};

export default useCalendarStyle;
parentDiv는 동일한 className을 가진 div가 많기 때문에 배열로 들어옵니다.
이후 각각의 div를 반복문을 통해서 event가 있는지 호가인합니다.
parentDiv[i] = 날짜 객체
parentDiv[i].children ==> header 와 events, bg가 들어있습니다.
console.log(parentDiv[i]);
그리고 events 안에
만약에 이벤트가 존재한다면 아래와 같이 fc-daygrid-event-harness 가 className 인 div가 추가됩니다.
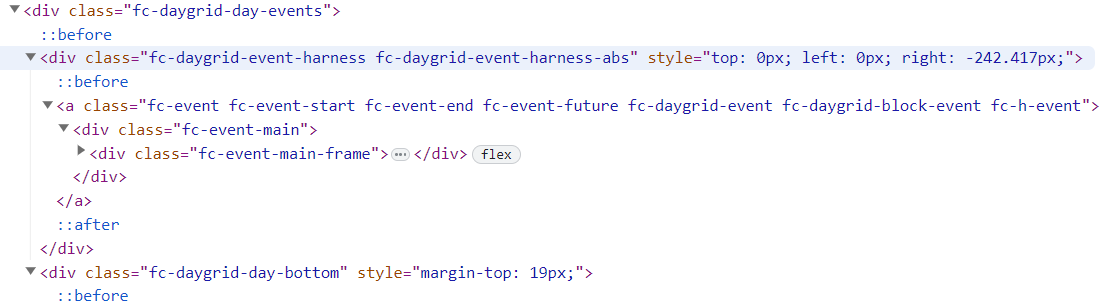
따라서 childeren의 갯수를 통해서 이벤트여부를 판단하였습니다. 그리고 length가 1보다 크면 (이벤트 존재하면 ) class를 add하여서 style을 부여했습니다.
저희 프로젝트에서는 사실 반대로 예약가능한 날짜가 아닐떄 (등록가능한 이벤트가 없을 때 ) style을 줘야하기에 여기까지 develop 했지만
위와 같이 코드를 짜면 시작일과 끝일이 다른 경우에 색이 부여되지 않는 점 유의해주세요..
서버로 부터 값을 받으면 위의 방법을 응용해서 style주고 싶은 날짜를 추상화해서 코딩을 하는 방법이 좋을 거 같아요.

'프론트엔드' 카테고리의 다른 글
| gitaction을 통한 빌드시 환경변수 적용하기 (0) | 2023.09.30 |
|---|---|
| [React]이미지 미리보기 및 인코딩 하기(react-image-file-resizer -> 커스텀 훅만들기) (0) | 2023.09.17 |
| REACT TOSS PAYMENT를 활용해서 결제 기능 구현하기(테스트) (0) | 2023.09.03 |
| react를 위한 docker파일 작성 (0) | 2023.09.03 |
| reduxToolkit에 컴퍼넌트 전역변수 저장시 생기는 에러 해결(모달-4) (0) | 2023.08.29 |