과거에 next.js의 튜토리얼을 진행하면서 얕게 streaming에 대해 학습한 적이 있습니다. 그 당시에 깊게 이해하지 못한 부분에 대해서 다시 한번 정리하고자 포스팅을 작성하게 되었습니다.
전통적인 SSR의 단점
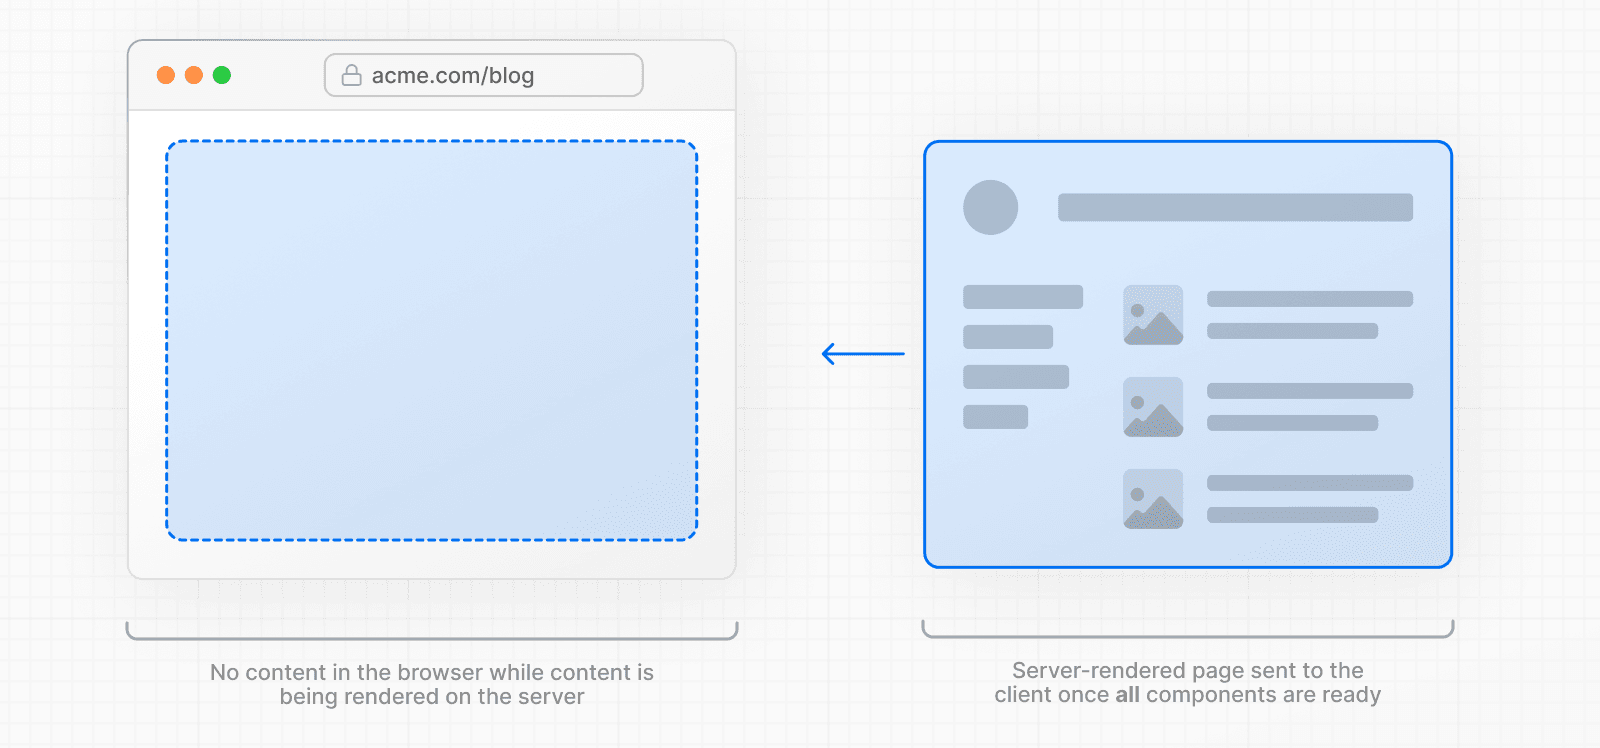
SSR은 서버에서 완성된 HTML을 클라이언트에 전송해줍니다. SSR이 진행되는 과정은 아래와 같습니다.
1. 먼저, 특정 페이지에 필요한 모든 데이터가 서버에서 가져와집니다. 2. 그런 다음, 서버에서 해당 페이지의 HTML을 렌더링합니다. 3. 이후, 페이지의 HTML, CSS, 그리고 JavaScript가 클라이언트로 전송됩니다. 4. 전송된 HTML과 CSS를 사용하여 비상호작용 UI가 화면에 표시됩니다. 5. 마지막으로, React가 UI를 하이드레이션(hydration) 하여 상호작용할 수 있도록 만듭니다.
그렇기에 한 페이지 내에서도 모든 구역이 동시에 작업이 완료되진 않습니다. 하지만 우린 완성된 HTML을 받기 때문에,하나라도 오래 걸리는 작업이 생기면 HTML을 받지 못하는 문제점을 겪게 됩니다.
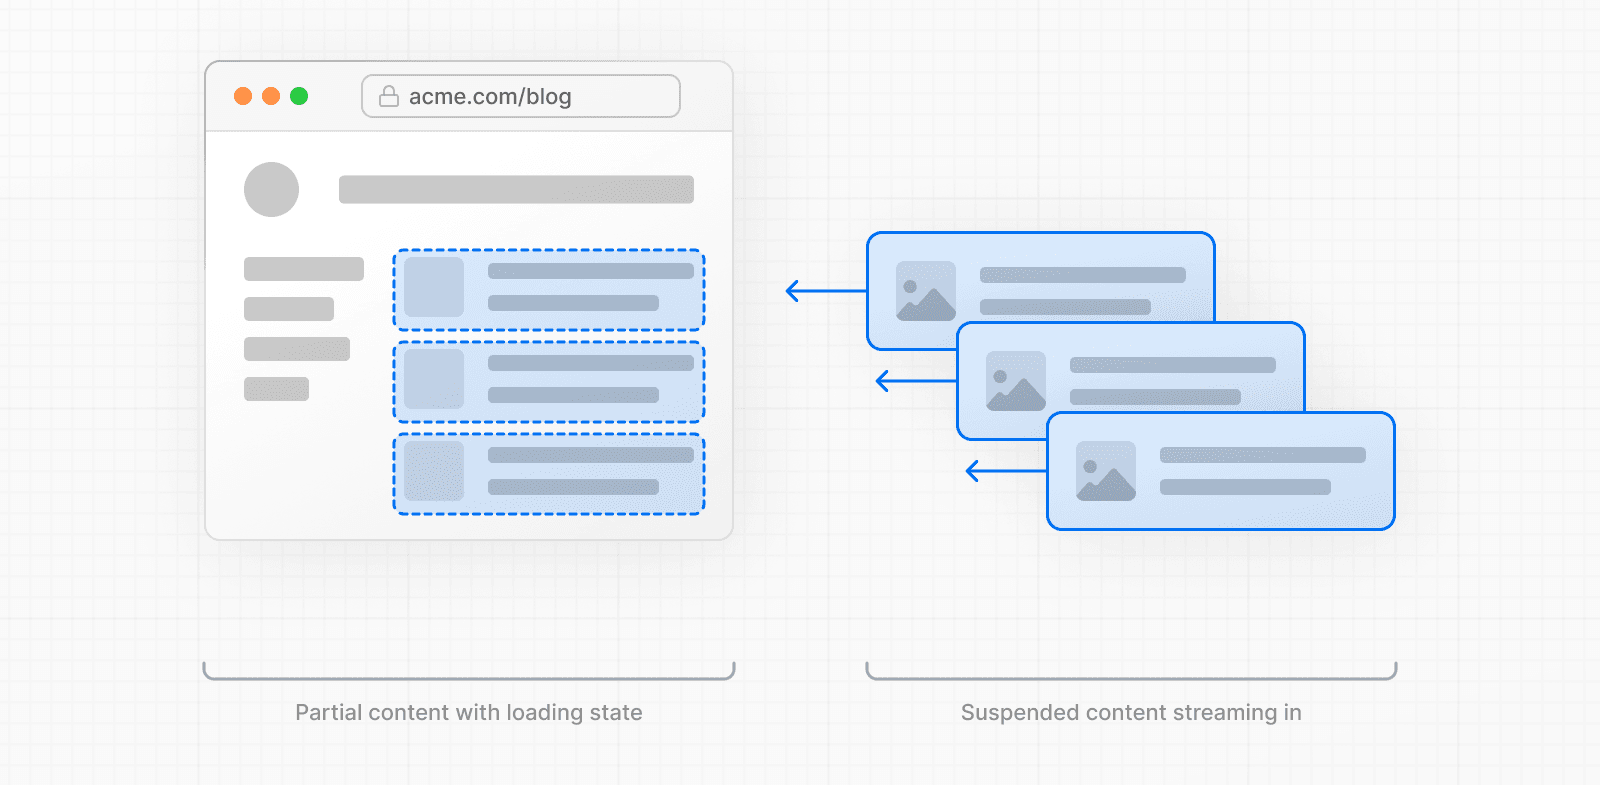
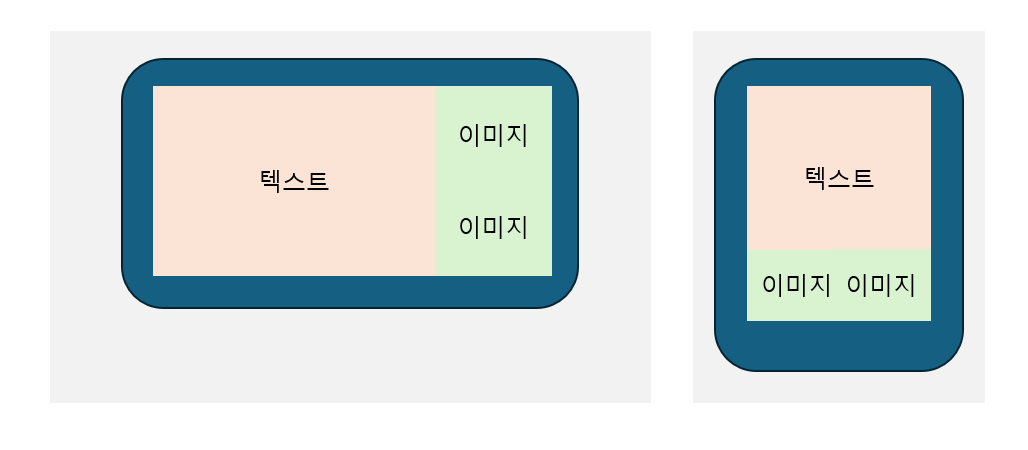
Streaming은 데이터를 전송하는 기술로, 하나의 라우트를 더 작은 "청크(chunks)"로 분할하여 서버에서 클라이언트로 준비되는 대로 점진적으로 스트리밍할 수 있도록 합니다. Streaming is a data transfer technique that allows you to break down a route into smaller "chunks" and progressively stream them from the server to the client as they become ready.
import Image from 'next/image'

export default function Page({ photoUrl }) {
  return (
    <div style={{ position: 'relative', width: '300px', height: '500px' }}>
      <Image
        src={photoUrl}
        alt="Picture of the author"
        sizes="300px"
        fill
        style={{
          objectFit: 'contain',
        }}
      />
    </div>
  )
}
예시를 봤을 때, fill를 사용할때는 3가지를 고려해야 합니다.
1. fill을 사용하면 Image컴퍼넌트가 absolute 포지션이기에 외부가 absolute, fiexd, relative중 하나여야 한다.
// 공식문서 내부의 : packages\next\src\client\image-component.tsx

	if (img.parentElement) {
          const { position } = window.getComputedStyle(img.parentElement)
          const valid = ['absolute', 'fixed', 'relative']
          if (!valid.includes(position)) {
            warnOnce(
              `Image with src "${origSrc}" has "fill" and parent element with invalid "position". Provided "${position}" should be one of ${valid
                .map(String)
                .join(',')}.`
            )
          }
        }
Next.js에서 Image를 제공하는데, 이를 통해서 이미지에 대한 최적화 작업을 간단히 할 수 있습니다.
Next.js 공식문서에서는 크기 최적화, 시각 안정성, 빠른 페이지 리로드, 자산의 유연성 4가지 측면에서 장점을 제시합니다.
Size Optimization:Automatically serve correctly sized images for each device, using modern image formats like WebP and AVIF.
Visual Stability:Preventlayout shiftautomatically when images are loading.
Faster Page Loads:Images are only loaded when they enter the viewport using native browser lazy loading, with optional blur-up placeholders.
Asset Flexibility:On-demand image resizing, even for images stored on remote servers
하지만 개발에서 은탄환은 없다고 많이 말합니다. 따라서 어떤 기능을 어떻게 제공하는지에 대해서 알 필요성을 느꼈고, 이를 위해서 소스코드를 분석을 하게 되었습니다.
소스코드 위치 추적
리액트 기반의 UI 라이브러리나 react/drei 등 코드를 본적이 종종 있었는데, 개인적으로 파일이 너무 많고 복잡해서 파악하는데 조금 더 어려웠습니다. VS-CODE의 도움을 받고자 클론을 받고 파일을 경로를 추적했습니다.
우리가 사용하고 있는 next/image는 image-external에서 가져오는 군요
import type { ImageConfigComplete, ImageLoaderProps } from './image-config'
import type { ImageProps, ImageLoader, StaticImageData } from './get-img-props'

import { getImgProps } from './get-img-props'
import { Image } from '../../client/image-component'

// @ts-ignore - This is replaced by webpack alias
import defaultLoader from 'next/dist/shared/lib/image-loader'

/**
 * For more advanced use cases, you can call `getImageProps()`
 * to get the props that would be passed to the underlying `<img>` element,
 * and instead pass to them to another component, style, canvas, etc.
 *
 * Read more: [Next.js docs: `getImageProps`](https://nextjs.org/docs/app/api-reference/components/image#getimageprops)
 */
export function getImageProps(imgProps: ImageProps) {
  const { props } = getImgProps(imgProps, {
    defaultLoader,
    // This is replaced by webpack define plugin
    imgConf: process.env.__NEXT_IMAGE_OPTS as any as ImageConfigComplete,
  })
  // Normally we don't care about undefined props because we pass to JSX,
  // but this exported function could be used by the end user for anything
  // so we delete undefined props to clean it up a little.
  for (const [key, value] of Object.entries(props)) {
    if (value === undefined) {
      delete props[key as keyof typeof props]
    }
  }
  return { props }
}

export default Image

export type { ImageProps, ImageLoaderProps, ImageLoader, StaticImageData }
우리가 사용하고 있는 next/image는 image-external에서 가져오는 군요
Image 이외에도 getImageProps와 ImageLoader등 몇 가지를 추가적으로 export하고 있네요.
사실 Image에 대해서 처음 관심을 갖게 된것은 wanted에서 멘토님이 defaultLoader와 관련된 설명을 해주시면서 분석해야겠다는 생각을 하게 되었습니다. Next.js에서는 defaultLoader를 사용하여 서버에서 캐싱을 해주는데, 이와 관련된 작업이 서버에 부담이 크다는 discussion을 보여주면서 설명했던 내용입니다.
next.js image
이때 defaultLoader의 props 타입을 보면 next.js에서가 어떤식으로 srcset을 관리하는지 유추할 수 있었습니다.
흔히 next.js에서는 webp로 관리한다고 하고 경로가 /_next/image~~ 와 같이 나오는 이유도 유추가 가능하네요.
const ImageElement = forwardRef<HTMLImageElement | null, ImageElementProps>(
  (
    {
      src,
      srcSet,
      sizes,
      height,
      width,
      decoding,
      className,
      style,
      fetchPriority,
      placeholder,
      loading,
      unoptimized,
      fill,
      onLoadRef,
      onLoadingCompleteRef,
      setBlurComplete,
      setShowAltText,
      sizesInput,
      onLoad,
      onError,
      ...rest
    },
    forwardedRef
  ) => {
    return (
      <img
        {...rest}
        {...getDynamicProps(fetchPriority)}
        // It's intended to keep `loading` before `src` because React updates
        // props in order which causes Safari/Firefox to not lazy load properly.
        // See https://github.com/facebook/react/issues/25883
        loading={loading}
        width={width}
        height={height}
        decoding={decoding}
        data-nimg={fill ? 'fill' : '1'}
        className={className}
        style={style}
        // It's intended to keep `src` the last attribute because React updates
        // attributes in order. If we keep `src` the first one, Safari will
        // immediately start to fetch `src`, before `sizes` and `srcSet` are even
        // updated by React. That causes multiple unnecessary requests if `srcSet`
        // and `sizes` are defined.
        // This bug cannot be reproduced in Chrome or Firefox.
        sizes={sizes}
        srcSet={srcSet}
        src={src}
        ref={useCallback(
          (img: ImgElementWithDataProp | null) => {
            if (forwardedRef) {
              if (typeof forwardedRef === 'function') forwardedRef(img)
              else if (typeof forwardedRef === 'object') {
                // @ts-ignore - .current is read only it's usually assigned by react internally
                forwardedRef.current = img
              }
            }
            if (!img) {
              return
            }
            if (onError) {
              // If the image has an error before react hydrates, then the error is lost.
              // The workaround is to wait until the image is mounted which is after hydration,
              // then we set the src again to trigger the error handler (if there was an error).
              // eslint-disable-next-line no-self-assign
              img.src = img.src
            }
            if (process.env.NODE_ENV !== 'production') {
              if (!src) {
                console.error(`Image is missing required "src" property:`, img)
              }
              if (img.getAttribute('alt') === null) {
                console.error(
                  `Image is missing required "alt" property. Please add Alternative Text to describe the image for screen readers and search engines.`
                )
              }
            }
            if (img.complete) {
              handleLoading(
                img,
                placeholder,
                onLoadRef,
                onLoadingCompleteRef,
                setBlurComplete,
                unoptimized,
                sizesInput
              )
            }
          },
          [
            src,
            placeholder,
            onLoadRef,
            onLoadingCompleteRef,
            setBlurComplete,
            onError,
            unoptimized,
            sizesInput,
            forwardedRef,
          ]
        )}
        onLoad={(event) => {
          const img = event.currentTarget as ImgElementWithDataProp
          handleLoading(
            img,
            placeholder,
            onLoadRef,
            onLoadingCompleteRef,
            setBlurComplete,
            unoptimized,
            sizesInput
          )
        }}
        onError={(event) => {
          // if the real image fails to load, this will ensure "alt" is visible
          setShowAltText(true)
          if (placeholder !== 'empty') {
            // If the real image fails to load, this will still remove the placeholder.
            setBlurComplete(true)
          }
          if (onError) {
            onError(event)
          }
        }}
      />
    )
  }
)
defaultLoader의 코드를 자세히 분석하진 않을거지만 로더에 사용되는 Config값을 확인하면 Next.js Size Optimization에 대해서 유추가능합니다. 왜 /_next/image라는 경로가 나오고, 디바이스 사이즈들은 어떤걸 다루는 지, 이미지 포멧 등등..)
앞서 meta의 반환값으로 getImgProps함수가 meta를 반환하고 있고, 이를 Image 컴퍼넌트에서는 imgMeta에 할당하여 상용합니다. 이중에서 priority가 체크된 이미지의 경우 Preload가 일어납니다. 이때 Approuter에서는 일어나고, ReactDom의 preload함수를 사용하고 pageRouter에서는 Head와 link태그를 활용해서 preload를 합니다.
function ImagePreload({
  isAppRouter,
  imgAttributes,
}: {
  isAppRouter: boolean
  imgAttributes: ImgProps
}) {
  const opts = {
    as: 'image',
    imageSrcSet: imgAttributes.srcSet,
    imageSizes: imgAttributes.sizes,
    crossOrigin: imgAttributes.crossOrigin,
    referrerPolicy: imgAttributes.referrerPolicy,
    ...getDynamicProps(imgAttributes.fetchPriority),
  }

  if (isAppRouter && ReactDOM.preload) {
    // See https://github.com/facebook/react/pull/26940
    ReactDOM.preload(
      imgAttributes.src,
      // @ts-expect-error TODO: upgrade to `@types/react-dom@18.3.x`
      opts
    )
    return null
  }

  return (
    <Head>
      <link
        key={
          '__nimg-' +
          imgAttributes.src +
          imgAttributes.srcSet +
          imgAttributes.sizes
        }
        rel="preload"
        // Note how we omit the `href` attribute, as it would only be relevant
        // for browsers that do not support `imagesrcset`, and in those cases
        // it would cause the incorrect image to be preloaded.
        //
        // https://html.spec.whatwg.org/multipage/semantics.html#attr-link-imagesrcset
        href={imgAttributes.srcSet ? undefined : imgAttributes.src}
        {...opts}
      />
    </Head>
  )
}
ImageElement
const ImageElement = forwardRef<HTMLImageElement | null, ImageElementProps>(
  (
    {
      src,
      srcSet,
      sizes,
      height,
      width,
      decoding,
      className,
      style,
      fetchPriority,
      placeholder,
      loading,
      unoptimized,
      fill,
      onLoadRef,
      onLoadingCompleteRef,
      setBlurComplete,
      setShowAltText,
      sizesInput,
      onLoad,
      onError,
      ...rest
    },
    forwardedRef
  ) => {
    return (
      <img
        {...rest}
        {...getDynamicProps(fetchPriority)}
        // It's intended to keep `loading` before `src` because React updates
        // props in order which causes Safari/Firefox to not lazy load properly.
        // See https://github.com/facebook/react/issues/25883
        loading={loading}
        width={width}
        height={height}
        decoding={decoding}
        data-nimg={fill ? 'fill' : '1'}
        className={className}
        style={style}
        // It's intended to keep `src` the last attribute because React updates
        // attributes in order. If we keep `src` the first one, Safari will
        // immediately start to fetch `src`, before `sizes` and `srcSet` are even
        // updated by React. That causes multiple unnecessary requests if `srcSet`
        // and `sizes` are defined.
        // This bug cannot be reproduced in Chrome or Firefox.
        sizes={sizes}
        srcSet={srcSet}
        src={src}
        ref={useCallback(
          (img: ImgElementWithDataProp | null) => {
            if (forwardedRef) {
              if (typeof forwardedRef === 'function') forwardedRef(img)
              else if (typeof forwardedRef === 'object') {
                // @ts-ignore - .current is read only it's usually assigned by react internally
                forwardedRef.current = img
              }
            }
            if (!img) {
              return
            }
            if (onError) {
              // If the image has an error before react hydrates, then the error is lost.
              // The workaround is to wait until the image is mounted which is after hydration,
              // then we set the src again to trigger the error handler (if there was an error).
              // eslint-disable-next-line no-self-assign
              img.src = img.src
            }
            if (process.env.NODE_ENV !== 'production') {
              if (!src) {
                console.error(`Image is missing required "src" property:`, img)
              }
              if (img.getAttribute('alt') === null) {
                console.error(
                  `Image is missing required "alt" property. Please add Alternative Text to describe the image for screen readers and search engines.`
                )
              }
            }
            if (img.complete) {
              handleLoading(
                img,
                placeholder,
                onLoadRef,
                onLoadingCompleteRef,
                setBlurComplete,
                unoptimized,
                sizesInput
              )
            }
          },
          [
            src,
            placeholder,
            onLoadRef,
            onLoadingCompleteRef,
            setBlurComplete,
            onError,
            unoptimized,
            sizesInput,
            forwardedRef,
          ]
        )}
        onLoad={(event) => {
          const img = event.currentTarget as ImgElementWithDataProp
          handleLoading(
            img,
            placeholder,
            onLoadRef,
            onLoadingCompleteRef,
            setBlurComplete,
            unoptimized,
            sizesInput
          )
        }}
        onError={(event) => {
          // if the real image fails to load, this will ensure "alt" is visible
          setShowAltText(true)
          if (placeholder !== 'empty') {
            // If the real image fails to load, this will still remove the placeholder.
            setBlurComplete(true)
          }
          if (onError) {
            onError(event)
          }
        }}
      />
    )
  }
)
그리고 ref에서 loading을 통해 이미지 로드 완료시 블러처리 이벤트 전파 관리등의 추가작업을 실행하고 있습니다.
이때 getImgProps함수를 통해 반환했던 width값등이 지정되기 때문에 layoutShift가 방지가 됩니다.
Asset Flexibility에 대해서는 찾아보지 못했지만, Next.js에서 어떻게Size Optimization,Visual Stability,Faster Page Loads를 하려고 했는지는 직접 확인할 수 있었습니다.
느낀점
1. 다양한 이슈를 확인하고 에러처리를 볼 수 있어서 좋았다.
대표적인게 getDynamicProps함수인데, next.js의 19버전과 이전 버전에서 옵션의 네이밍 컨벤션이 달라진걸 처리하는 함수이다.
function getDynamicProps(
  fetchPriority?: string
): Record<string, string | undefined> {
  if (Boolean(use)) {
    // In React 19.0.0 or newer, we must use camelCase
    // prop to avoid "Warning: Invalid DOM property".
    // See https://github.com/facebook/react/pull/25927
    return { fetchPriority }
  }
  // In React 18.2.0 or older, we must use lowercase prop
  // to avoid "Warning: Invalid DOM property".
  return { fetchpriority: fetchPriority }
}
2. Image컴퍼넌트와 img태그에 대한 학습
img.complete등 생각보다 모르는 내용들이 있었고, Image컴퍼넌트에 대해서도 몰라서 사용하지 않았던 내용들이 있었느데, 소스 코드를 보면서 알 수 있어서 좋았습니다. 개발 실력을 기르려면 오픈소스 코드를 많이 참고하라는 이유를 느낄 수 있었습니다.
3. 컴퍼넌트 분리 기준에 대한 호기심
구성된 코드가 제 생각보다 굉장히 복잡했습니다. 그런데 생각보다 컴퍼넌트가 간략하게 분리되어있어서 놀랐습니다.
error처리가 함수로 분리된게 아닌 직접 적혀있었는데, 이게 라이브러리라서 이런건지 어떤 기준으로 분리를 한건지 개인적으로 호기심이 생겼습니다.
4. 네이밍이 좋아서 코드가 잘 읽힌다.
네이밍이 굉장히 좋다는 생각이 드는 부분도 있었고 getImageProps와 getImgProps처럼 애매한 네이밍도 보였다고 생각했느데, 나름의 합리성이 느껴지고 덕분에 코드가 읽기 더 수월했습니다. 좋은 변수명이 항상 어려운데 이런걸 보다 보면 늘지 않을까 라는 생각이 들었습니다.
5. 정리하기엔 너무 방대한 코드
연계되어있는 기능들이 너무 많아서 한 블로그 포스팅에 정리하기엔 너무 많았습니다. 간략하게 다루면서 생략된 내용들이 조금 아쉬운 거 같습니다.
이를 활용하여 sesion 정보의 유무를 확인할 수 있고, 만약 로그인 되어있지 않다면 원하는 주소로 redirect 시킬 수 있습니다.
import { auth } from '@/auth';
import { redirect } from 'next/navigation';

export default async function Mypage() {
  const session = await auth();
  if (!session) return redirect('/');
  return <main>로그인해야 볼 수 있는 페이지</main>;
}
다만 이렇게 할 경우모든 페이지에 대해서 동일한 코드가 반복되어야 합니다. 또한 관심사가 분리되지 않아서, 어떤 페이지가 권한이 필요한지 한눈에 파악하기가 힘듭니다.
방법 2. config에서 callback 설정하기
Next.js의 공식문서 tutorial에서는 아래와 같은 코드를 통해 접근권한을 관리합니다.
import type { NextAuthConfig } from 'next-auth';

export const authConfig = {
// authorized에서 false가 반환될 때 이동할 로그인 페이지(signIn)
  pages: {
    signIn: '/login',
  },
  callbacks: {
    authorized({ auth, request: { nextUrl } }) {
    // user가 있으면 로그인 없으면 로그인 되지 않은 상태
      const isLoggedIn = !!auth?.user;
      // url의 경로가 /dashboard로 시작하는지
      const isOnDashboard = nextUrl.pathname.startsWith('/dashboard');

      // dashboard에서는 권한이 필요하므로, 비로그인시 login페이지로 이동
      if (isOnDashboard) {
        if (isLoggedIn) return true;
        return false; // Redirect unauthenticated users to login page
      } else if (isLoggedIn) {
      // 만약 로그인 된 유저라면 홈에서 origin과 더해서 /dashboard로 이동
        return Response.redirect(new URL('/dashboard', nextUrl));
      }
      return true;
    },
  },
  providers: [], // Add providers with an empty array for now
} satisfies NextAuthConfig;
config설정의 callbacks를 통하여서 권한 확인할 수 있는데, 이중 authorized는 next.js의 middleware와 함께 사용해서
을 포함한 경우에는 middleware가 실행되지 않도록 하였습니다. ( next.js에서는 불필요한 요청을 줄이기 위해서 cache가 진행되는데, _next/static , _next/image는 각각 cache된 파일들의 경로입니다.)
Middleware allows you to run code before a request is completed. Then, based on the incoming request, you can modify the response by rewriting, redirecting, modifying the request or response headers, or responding directly. // https://nextjs.org/docs/pages/building-your-application/routing/middleware
이렇게 미들웨어를 사용하는 경우에는 특정페이지 요청전에 미들웨어가 실행되어 불필요한 요청을 막을 수 있습니다.
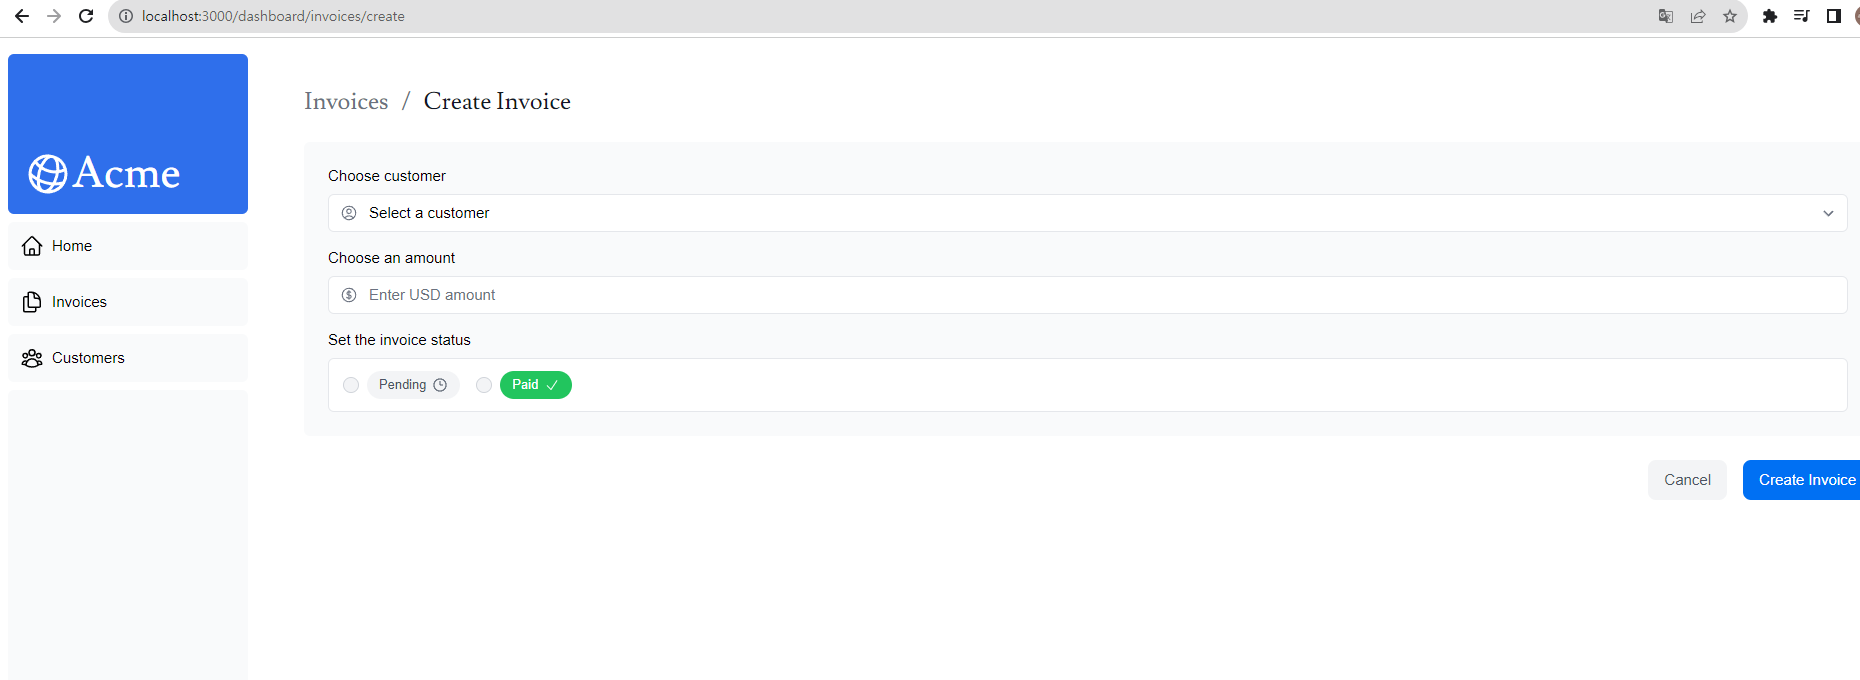
현재 예시에서는 별다른 조건 없이 폼을 제출가능하게 했는데, 그러면 에러가 발생한다. 이때 required 어트리뷰트를 통해서, 이를 예방할 수 있습니다.
없을 경우 위와 같이 에러가 뜨지만 required가 있으면 아래와 같이 브라우저에서 제출을 막아준다.
하지만 서버에서 유효성 검사를 해야지 아래 3가지 효과를 얻을 수 있다.
1. 디비에 데이터 전송전에 형식을 예측 가능함
2. 클라이언트 사이드 유효성 검사를 무시한 유저를 대비할 수 있음
3. 유효한 정보라는 하나의 신뢰성을 얻음.
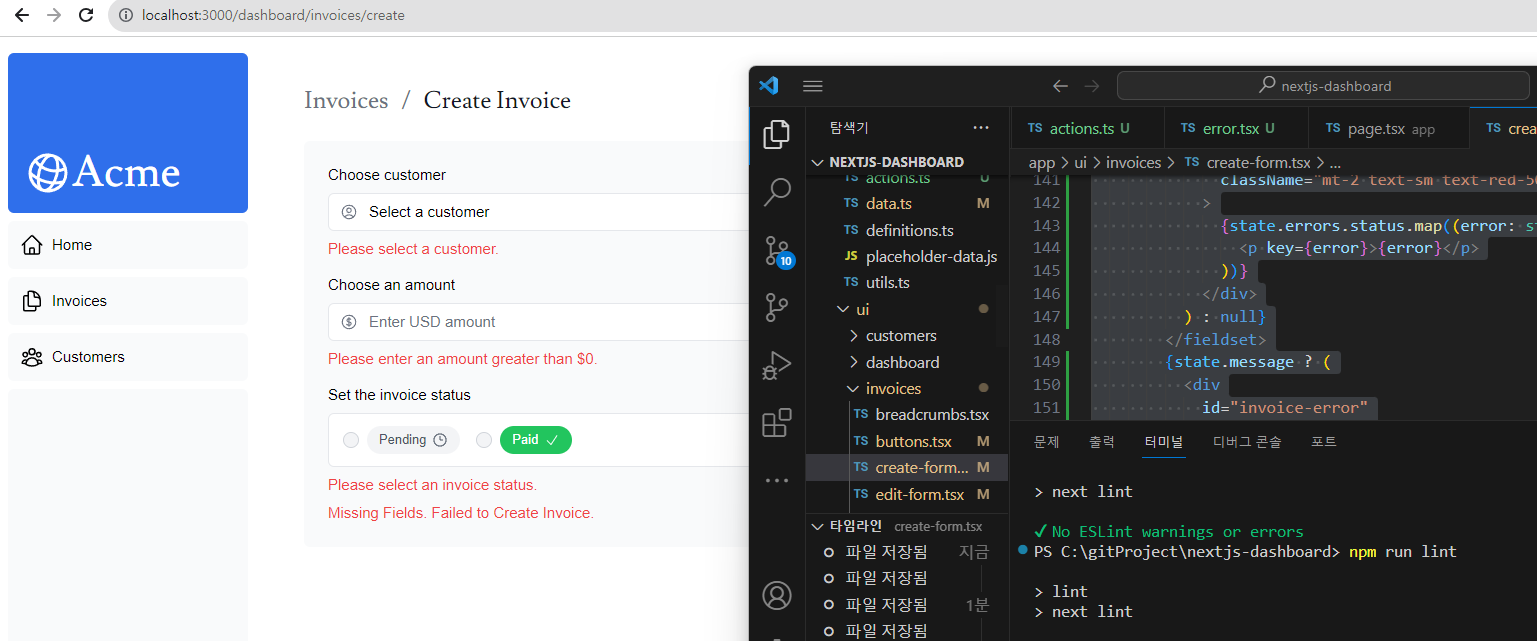
예제가 많고,, 가독성 차원에서 EXAMPLE 사진을 그대로 가져오겠습니다.. ( __ )
우선 useFormState 훅을 임포트하고, return 값으로 state,dispatch를 가져와 줍니다. (useReducer와 비슷한 모양)
이때 2번쨰 매개변수인 초기값은 할당하고 싶은 것 할당하면 됩니다.
예제에서는 에러시 뜰 메세지를 null로 errors를 빈 객체로 초기값을 할당했네요
이후 action의 InvoiceSchema에 에러시 나올 문구들을 추가해줍니다.
이후 createInvioce함수에 usesFormState 에서 전달하는 값을 받을 수 있게 매개변수 preState를 추가해줍니다.
export async function createInvoice(prevState: State, formData: FormData) {
  // Validate form using Zod
  const validatedFields = CreateInvoice.safeParse({
    customerId: formData.get('customerId'),
    amount: formData.get('amount'),
    status: formData.get('status'),
  });

  // If form validation fails, return errors early. Otherwise, continue.
  if (!validatedFields.success) {
    return {
      errors: validatedFields.error.flatten().fieldErrors,
      message: 'Missing Fields. Failed to Create Invoice.',
    };
  }

  // Prepare data for insertion into the database
  const { customerId, amount, status } = validatedFields.data;
  const amountInCents = amount * 100;
  const date = new Date().toISOString().split('T')[0];

  // Insert data into the database
  try {
    await sql`
      INSERT INTO invoices (customer_id, amount, status, date)
      VALUES (${customerId}, ${amountInCents}, ${status}, ${date})
    `;
  } catch (error) {
    // If a database error occurs, return a more specific error.
    return {
      message: 'Database Error: Failed to Create Invoice.',
    };
  }

  // Revalidate the cache for the invoices page and redirect the user.
  revalidatePath('/dashboard/invoices');
  redirect('/dashboard/invoices');
}
여기서 추가된 것은 select에 aria-describedby , 에러메시지가 뜨는 div에 id와 aria-live 입니다.
aria-describedby="customer-error": 이 어트리뷰트를 통해서 error 메세지 컨테이너와 셀렉트간의 연관성을 설립합니다. 아이디가 customer-error라고 된 컨테이너는 이 select요소를 의미합니다. 유저가 셀렉트 박스와 상호작용할 때, 에러가 발생한다면, 스크린 리더가 이 메시지를 읽습니다.
id="customer-error": 위에서 설정한 아이디입니다.
aria-live="polite": The screen reader should politely notify the user when the error is updated. When the content changes (e.g. when a user corrects an error), the screen reader will announce these changes, but only when the user is idle so as not to interrupt them.
aria-live는 적용 미적용 차이를 비시각장애인은 인지하기 힘든데, 해당 태그를 설정해야지 시각장애인들이 에러가 났따는 사실을 인지할 수 있다고 하네요.
이제 NextAuth.js 를 authConfig 객체를 활용해서 시작했고, 미들웨어에서 matcher 옵션을 사용해서 어떤 경로에서 운영되야 할 지를 구체화 했다. 이렇게 미들웨어를 사용하면루트가 미들웨어에 의해 검증되기 전에는 랜더링 조차 되지 않아서, 보안과 성능 모두 향상된다.
이제 bcrypt 로 암호화해서 보안을 향상시켜야하는데, bcrypt는 node.js API라서 next.js 의 미들웨어에서는 사용이 불가능하다. 따라서 bcrypt를 임포트할 auth.ts 파일을 만들어야 한다.
public에 있던 파일을 app으로 이동시키면 favicon과 open graph image가 등록된다. (개발자 도구로 확인할 수 있음)
Page title and descriptons
import '@/app/ui/global.css';
import { inter } from '@/app/ui/fonts';
import { Metadata } from 'next';

export const metadata: Metadata = {
  title: 'Acme Dashboard',
  description: 'The official Next.js Course Dashboard, built with App Router.',
  metadataBase: new URL('https://next-learn-dashboard.vercel.sh'),
};
마지막으로 페이지네이션까지 ( 당연히 클라이언트 컴퍼넌트다 , 따라 useSerachParams,)
'use client';

import { ArrowLeftIcon, ArrowRightIcon } from '@heroicons/react/24/outline';
import clsx from 'clsx';
import Link from 'next/link';
import { generatePagination } from '@/app/lib/utils';
import { usePathname, useSearchParams } from 'next/navigation';

export default function Pagination({ totalPages }: { totalPages: number }) {
  // NOTE: comment in this code when you get to this point in the course
  const pathname = usePathname();
  const searchParams = useSearchParams();
  const currentPage = Number(searchParams.get('page')) || 1;
  const allPages = generatePagination(currentPage, totalPages);
  const createPageURL = (pageNumber: number | string) => {
    const params = new URLSearchParams(searchParams);
    params.set('page', pageNumber.toString());
    return `${pathname}?${params.toString()}`;
  };
createPageURL에서 query문에다가 pageNumber를 더해주어서 새로운 url을 만들어준다.
이러한 요청은 보안이 중요한데, POST requests(포스트 요청), encrypted closures(암호화된 클로져), strict input checks(엄격한 입력검사), error message hashing(에러 메시지 헤싱), and host restrictions(호스트 제한) 기능을 통해서 Server Actions는 보안을 신경 쓴다.
서버 컴퍼넌트와 폼에서 어떻게 작동하는지
// Server Component
export default function Page() {
  // Action
  async function create(formData: FormData) {
    'use server';

    // Logic to mutate data...
  }

  // Invoke the action using the "action" attribute
  return <form action={create}>...</form>;
}
form에서 서버컴퍼넌트를 사용해서 formData를 만들 수 있는데, 이러면 클라이언트 자바스크립트가 꺼져 있어도 폼데이터가 생긴다.
Server Actions는 넥스트의 캐싱과 깊게 통합되어 있다. Server Action을 통해 Form이 전송되면 데이터 변경뿐만 아니라,
캐싱을 revalidatePath and revalidateTag. 을 통해서 초기화시킬 수 있다. (데이터 최신화)
이때 form을 사용하는데 전송할 URL을 설정하지 않았다. 이는 React는 일반 HTML과 다르게 특별한 props 취급되어 모든 action을 전달받을 수 있다. 따라서 별다른 url 설정을 하지 않아도, Server Action이 작동한다. (설정한다면 API Endpoint를 사용할 수 있다)
3. 폼데이터에서 데이터 추출
'use server';

export async function createInvoice(formData: FormData) {
  const rawFormData = {
    customerId: formData.get('customerId'),
    amount: formData.get('amount'),
    status: formData.get('status'),
  };
  // Test it out:
  console.log(rawFormData);
}
이후 액션을 일으키면 콘솔이 찍히는 걸 확인할 수 있다 ( 서버 컴퍼넌트라서 터미널에 나옴)
4. 데이터 유효성 검증
이후 액션을 일으키면 콘솔이 찍히는 걸 확인할 수 있다 ( 서버 컴퍼넌트라서 터미널에 나옴)
하지만 type of를 통해서 input의 amount를 확인하면 number 타입으로 입력받았지만 전송되면서 string으로 변환된 걸 확인할 수 있다. 이때 우리는 초기 설정한 타입에 맞게 확인 및 변환할 필요가 있다.
export type Invoice = {
  id: string; // Will be created on the database
  customer_id: string;
  amount: number; // Stored in cents
  status: 'pending' | 'paid';
  date: string;
};
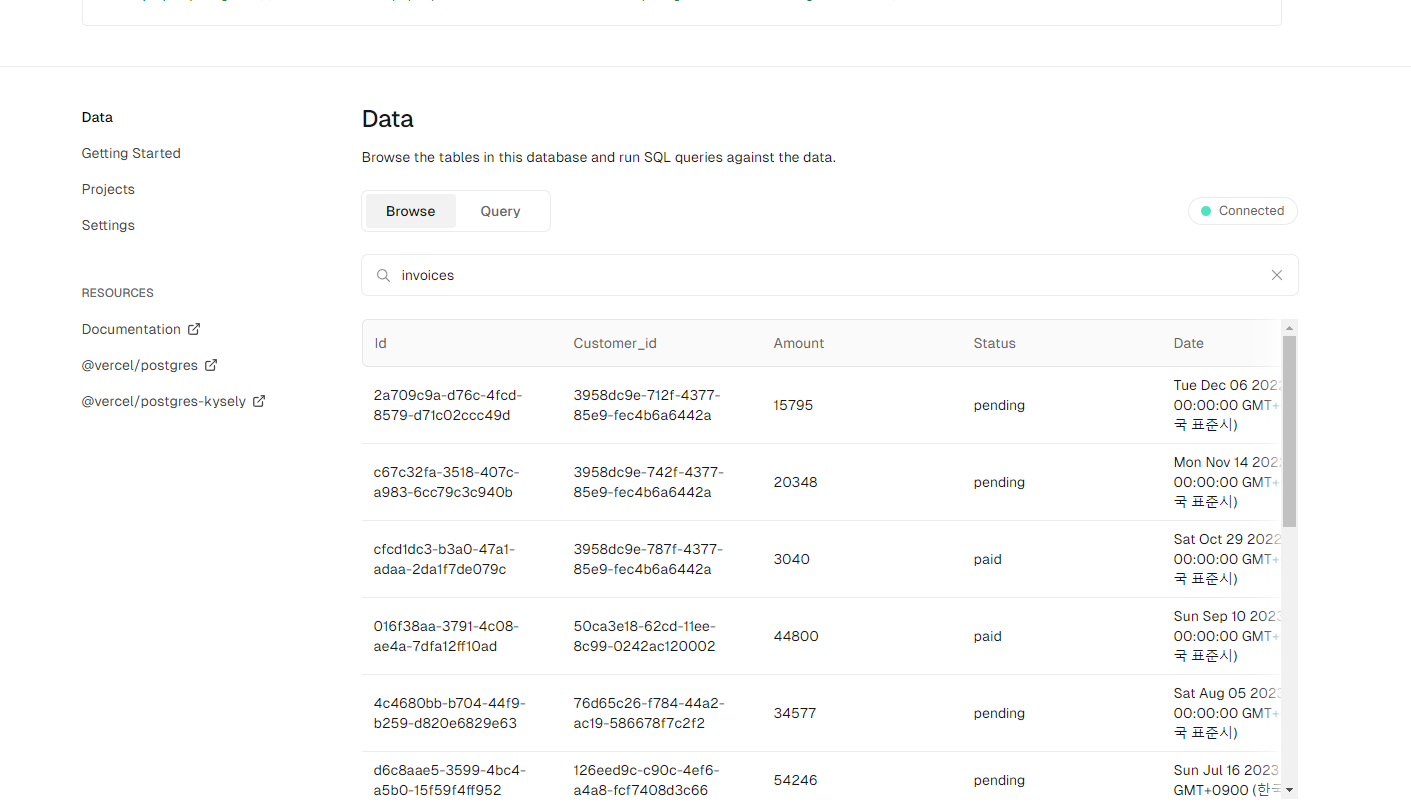
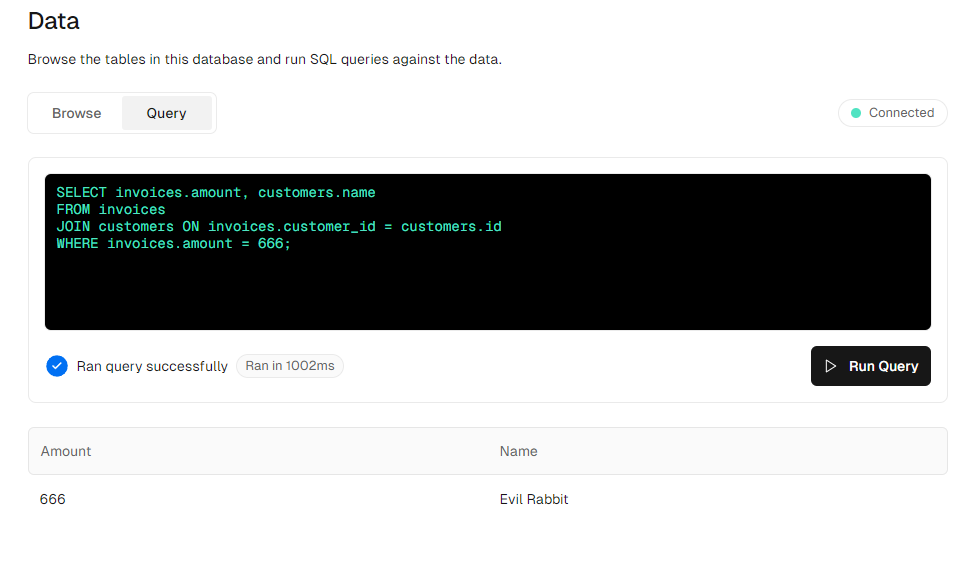
data.ts에서 sql을 임포트하고 , 아래에 각각의 함수들에서 sql문을 통해서 데이터를 가져오는 것을 확인할 수 있습니다.
//data.ts

import { sql } from '@vercel/postgres';
/*
.....
*/
// Fetch the last 5 invoices, sorted by date
const data = await sql<LatestInvoiceRaw>`
  SELECT invoices.amount, customers.name, customers.image_url, customers.email
  FROM invoices
  JOIN customers ON invoices.customer_id = customers.id
  ORDER BY invoices.date DESC
  LIMIT 5`;
2. next에서는 static generation을 하는데 이럴 경우 db가 바꿨는데 해결되지 않음(8장에서 설명)
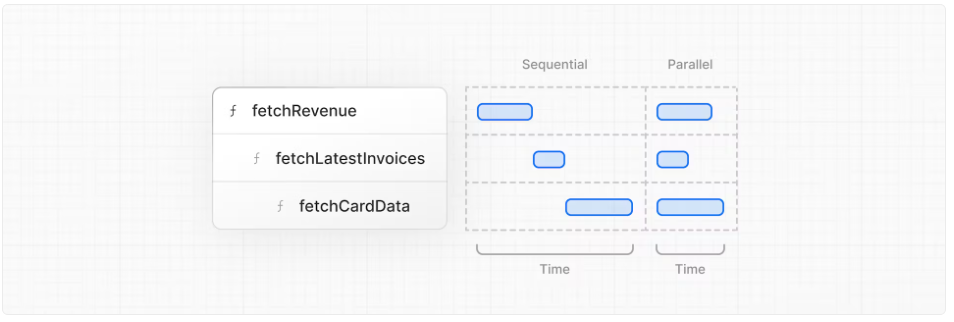
waterfall이란 무엇일까?
워터폴은 폭포수처럼 이전 요청이 완료되어야 다음 데이터를 요청하는 모양을 말한다.
이게 절대적으로 나쁜건 아닌데, 이걸 의도적으로 관리할 줄 알아야 한다.
이떄 사용하는게 Promise.all() 과 Promise.allSettled()이다
export async function fetchCardData() {
  try {
    const invoiceCountPromise = sql`SELECT COUNT(*) FROM invoices`;
    const customerCountPromise = sql`SELECT COUNT(*) FROM customers`;
    const invoiceStatusPromise = sql`SELECT
         SUM(CASE WHEN status = 'paid' THEN amount ELSE 0 END) AS "paid",
         SUM(CASE WHEN status = 'pending' THEN amount ELSE 0 END) AS "pending"
         FROM invoices`;

    const data = await Promise.all([
      invoiceCountPromise,
      customerCountPromise,
      invoiceStatusPromise,
    ]);
    // ...
  }
}
이 패턴을 사용하면
Start executing all data fetches at the same time, which can lead to performance gains.
Use a native JavaScript pattern that can be applied to any library or framework.
동시에 요청해서 성능향상 노릴 수 있고, 자바스크립트 패턴이라 어떠한 라이브러리 또는 프레임워크에도 적용이 가능하다.
단점은 특정 요청이 다른 요청에 비해서 다를 때 문제가 생길 수 있다는 점이다.
8장 Static and Dynamic Rendering
1.8장에서는 static rendering이 뭐고, 이게 어떻게 너의 앱 성능을 올리는지
2. dynamic rendering은 뭐고 언제 쓰는지
3. dashboard를 동적이게 하는 다른 방법들은 무엇이 있는지
4. 데이터 요청 시간에 대한 한계
을 배웁니다.
Static Rendering (정적 랜더링)은 데이터 요청과 리랜더링을 서버가 빌드 될 때 혹은 재유효화(revalidation)될 때 일어납니다. 그 결과물들은 CDN을 통해서 분배되거나 캐시됩니다.
정적 랜더링의 3가지 장점은
1. 빠른 랜더링 가능 (미리랜더링된 내용들이 캐쉬되어 있음)
2. 서버 부하 감소 ( 이미 만들어져 있기에 매요청시 새로 만들 필요가 없음)
3. SEO ( 미리랜더링되서 SEO가 크롤링하기 좋음)
하지만 데이터가 자주 교체가 되는 대시보드앱에선 적합하지 않음( 블로그나 홍보물 같이 데이터가 고정될 떄는 유리함)
이와 반대되는 개념이
Dynamic Rendering (동적 렌더링)
컨텐츠가 사용자가 매번 요청할 떄마다 바뀐다. 이럴 경우 여러 장점이 있는데 크게
1. 실시간 데이터
2.유저 특화된 내용
3. 요청시에만 얻을 수 있는 정보 사용 (쿠키 URL 파라미터등)
이제 우리가 만들려는 대쉬보드는 동적 렌더링에 적합함으로 NEXT.JS의 API인 unstable_noStore 을 사용할 것이다.
import { unstable_noStore as noStore } from 'next/cache';


export async function fetchRevenue() {
  // Add noStore() here prevent the response from being cached.
  // This is equivalent to in fetch(..., {cache: 'no-store'}).
  noStore();
각각의 함수에 noStore를 선언하면 된다. 이럴 경우 캐쉬를 하지 않게 하여 동적 랜더링을 하게 한다.
이후 한 요청에서 대해서 일부러 3초간의 딜레이를 부여한다.
export async function fetchRevenue() {
  // Add noStore() here prevent the response from being cached.
  // This is equivalent to in fetch(..., {cache: 'no-store'}).
  noStore();

  try {
    // Artificially delay a reponse for demo purposes.
    // Don't do this in real life :)

    console.log('Fetching revenue data...');
    await new Promise((resolve) => setTimeout(resolve, 3000));

    const data = await sql<Revenue>`SELECT * FROM revenue`;

    console.log('Data fetch complete after 3 seconds.');

    return data.rows;
  } catch (error) {
    console.error('Database Error:', error);
    throw new Error('Failed to fetch revenue data.');
  }
}
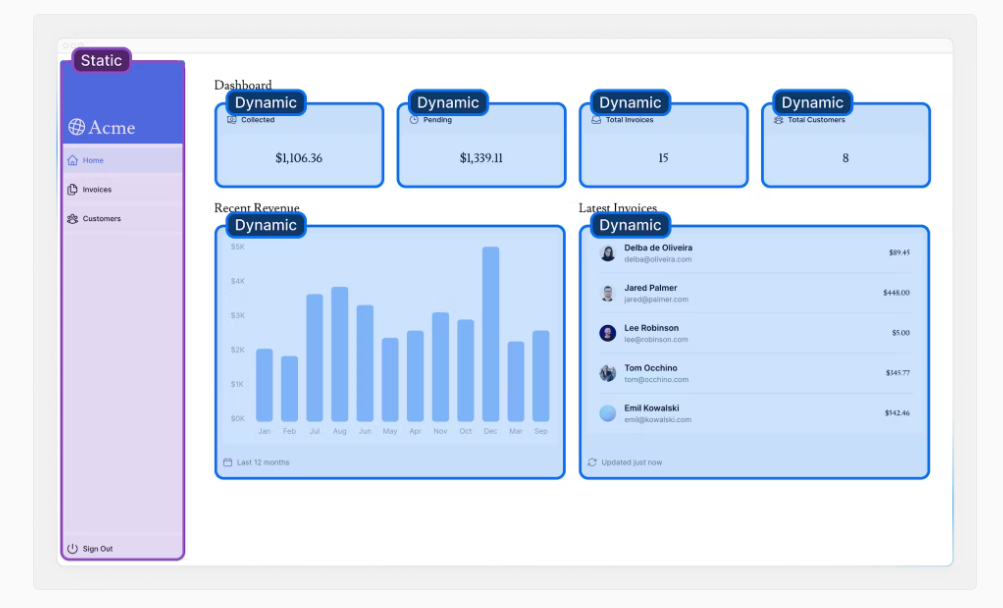
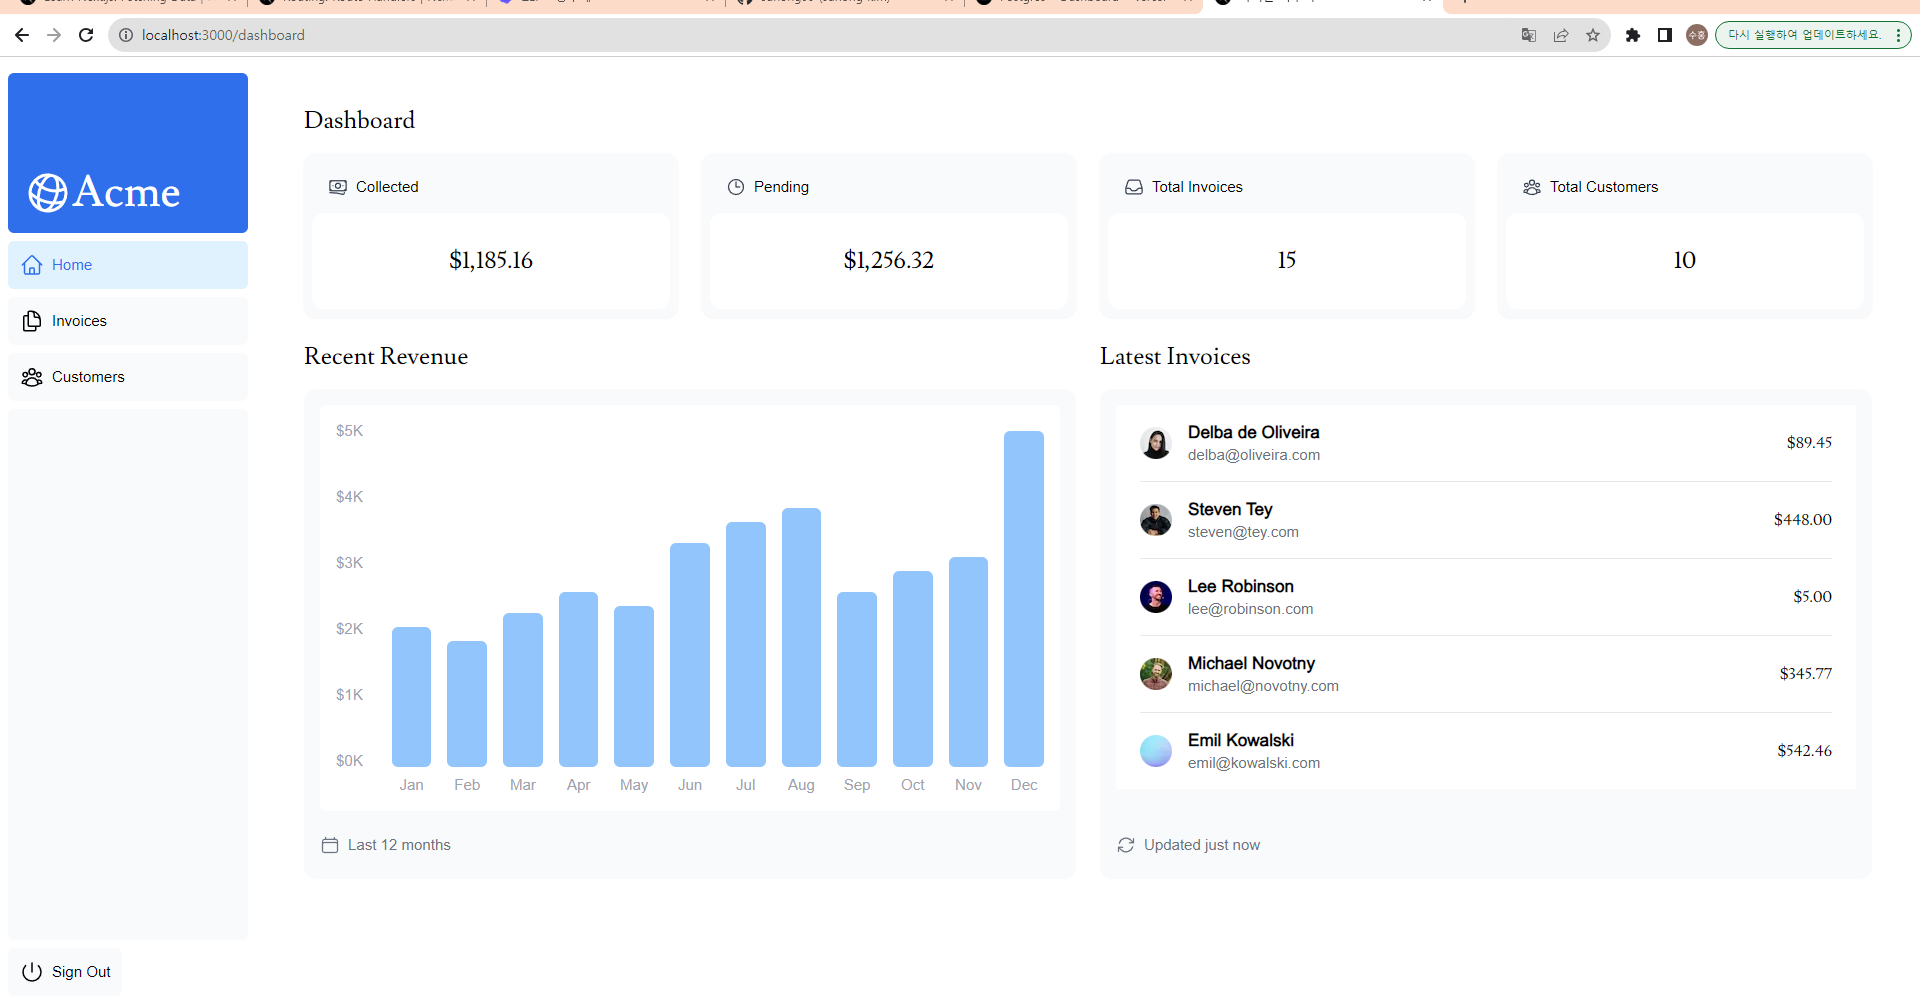
이미지 최적화도 해준다고 하네요.. 와 미쳤따~ 이래서 넥스트넥스트,,라고 하구나.. 반응형, 이미지 로딩중 레이아웃 이동막고, 반응형해주고, 레이지 로딩에, 포멧 최적화까지,,
Preventing layout shift automatically when images are loading.
Resizing images to avoid shipping large images to devices with a smaller viewport.
Lazy loading images by default (images load as they enter the viewport).
Serving images in modern formats, likeWebPandAVIF, when the browser supports it.
이걸 next/Image 모듈이 해준다고 합니다.
오호라!...
           <Image
            src="/hero-desktop.png"
            width={1000}
            height={760}
            className="hidden md:block"
            alt="Screenshots of the dashboard project showing desktop and mobile versions"
          />

          <Image
            src="/hero-mobile.png"
            width={560}
            height={620}
            className="block md:hidden"
            alt="Screenshot of the dashboard project showing mobile version"
          />
클래스 이름에 있는 block hidden을 통해서 반응형에서 어떤 이미지가 보여질 지 결정합니다. hidden md:block에서는 데스크탑 크기에서만, 아래는 반대로 모바일에서만 보입니다.
4단계
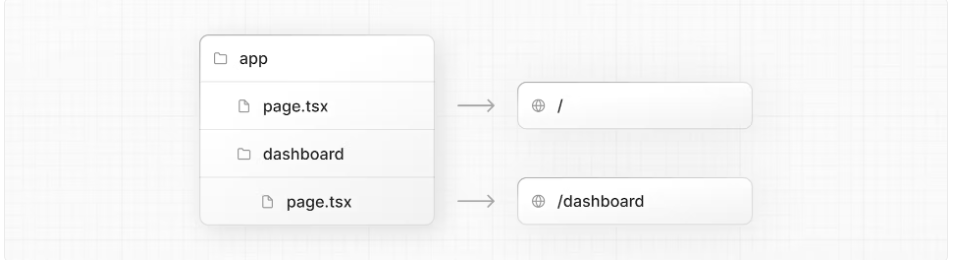
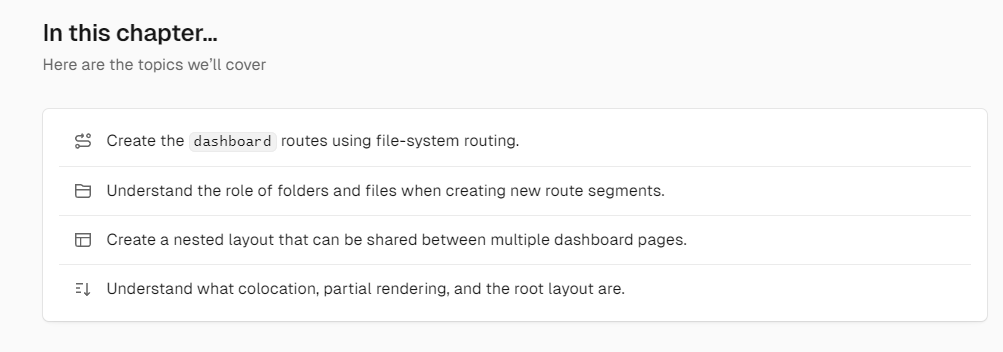
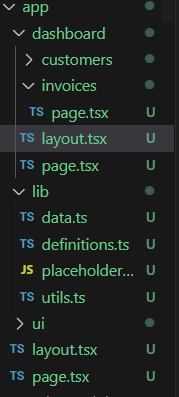
1. 파일시스템 라우팅을 써서 dashboard 루트들을 만들기
2. 루트 요소?를 만들 때, 폴더와 각 파일의 역할 이해하기
3. 여러페이지에서 공유될 nested layout (중첩 레이아웃) 만들기.
4. colocation이 뭔지, 부분적 랜더링, 그리고 루트 레이아웃이 먼지 이해하기
읽을 때, file-system routing, colocation , partial rendering , root layout 을 제가 모르겠구나 라는 생각이 들었습니다. nested layout 은 공유되는 layout이라는 뜻이라고 설명이 되어있고, 나머지는 변수명을 통해 추측은 되는데 한번 직접 확인해 봐야겠네요..
우선 nested routing(중첩 라우팅)에 대해서 설명해주네요
Next.js uses file-system routing where folders are used to create nested routes. Each folder represents aroute segmentthat maps to aURL segment.
오호 next.js에서는 각각의 폴더가 url에 나타날 루트 역할을 한다고 하네요!
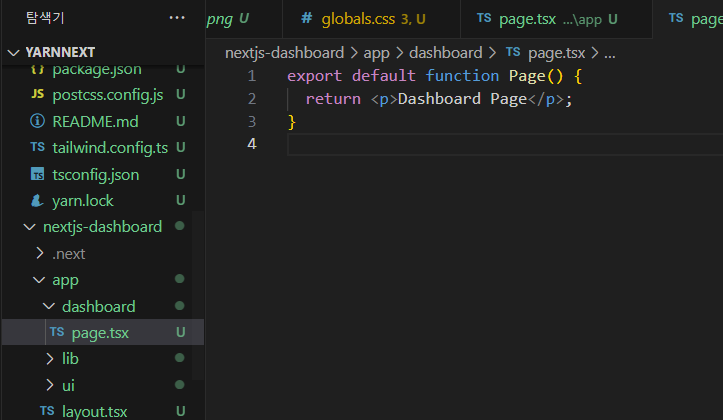
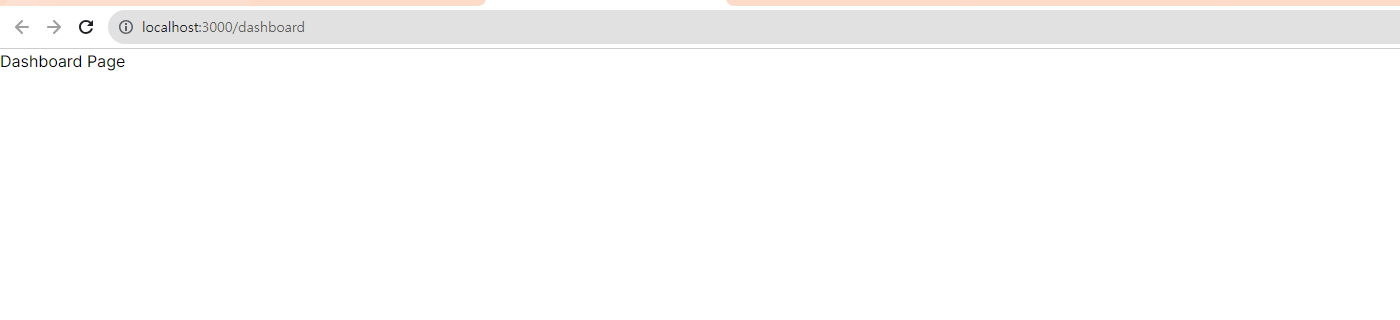
이떄 page.tsx는 리액트 컴퍼넌트를 export하는 특별한 넥스트파일입니다.
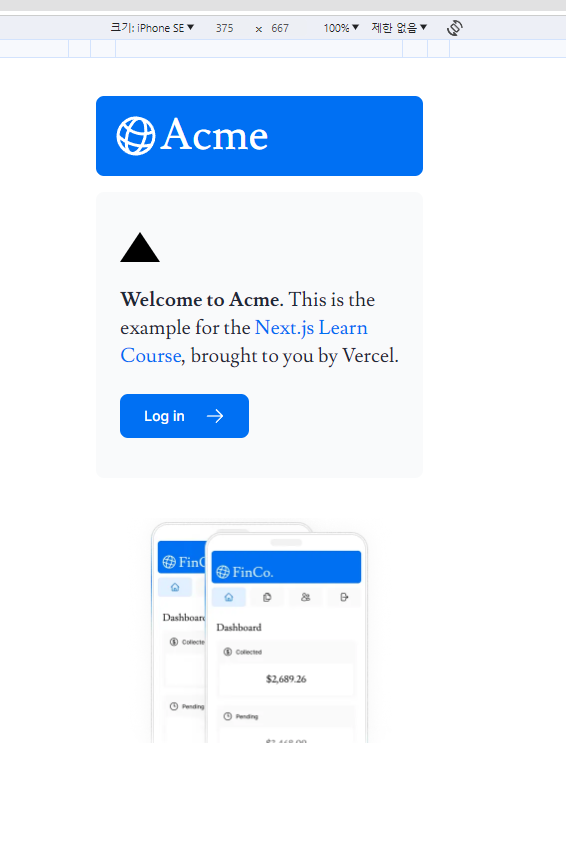
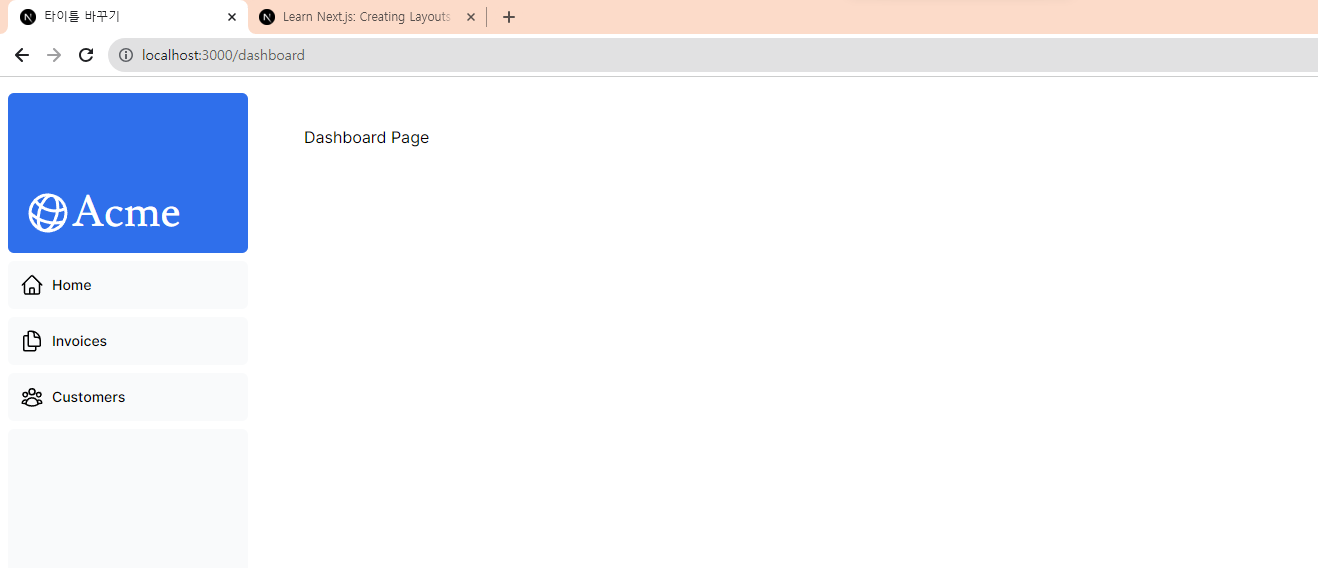
즉 /app/page.tsx 이 있기에 루트 url에서 저희가 화면을 보고 있는 거죠..! (500에러때문에 diagram이 지금 안 보이네요 ㅠㅠ)
따라서 이렇게 dashboard 폴 더만들고 page.tsx 만들면 ! 해당 페이지 접속이 됩니다.
아니? 그러면 ui 랑 lib폴더도 접속되겠네,.? 물론 page.tsx파일을 만들면 가능하지만, page라는 파일을 가지지 않은 폴더는 접속되지 않습니다. 따라서 해당 폴더들이 app폴더 안에서 colocate 가능하죠!
요약하면
next.js가 가진 특수한 파일시스템은 각각의 폴더를 url처럼 인식할 수 있는데, 이때 유저에게 보여주는 페이지(react component)는 page.tsx라는 파일이 해준다. 이런 파일이 없는 경우 유저에게 보여지지 않기 때문에, ui와 lib같은 폴더들도 app 폴더 내부에 공존 가능하다.!