1~4장을 통해서 간단하게 next에서는 UI. 이미지 . 라우팅. 폰트를 어떻게 구현 및 처리했는지를 확인했다.
5장 Navigating Between Pages
5장에서는 link, navigation 원리 , usePathname() 훅 , 에 대해서 알아볼 것이다.
링크란 무엇이고 장점
import Link from 'next/link';
import NavLinks from '@/app/ui/dashboard/nav-links';
import AcmeLogo from '@/app/ui/acme-logo';
import { PowerIcon } from '@heroicons/react/24/outline';

export default function SideNav() {
  return (
    <div className="flex h-full flex-col px-3 py-4 md:px-2">
      <Link
        className="mb-2 flex h-20 items-end justify-start rounded-md bg-blue-600 p-4 md:h-40"
        href="/"
      >
        <div className="w-32 text-white md:w-40">
          <AcmeLogo />
        </div>
      </Link>
      <div className="flex grow flex-row justify-between space-x-2 md:flex-col md:space-x-0 md:space-y-2">
        <NavLinks />
        <div className="hidden h-auto w-full grow rounded-md bg-gray-50 md:block"></div>
        <form>
          <button className="flex h-[48px] grow items-center justify-center gap-2 rounded-md bg-gray-50 p-3 text-sm font-medium hover:bg-sky-100 hover:text-blue-600 md:flex-none md:justify-start md:p-2 md:px-3">
            <PowerIcon className="w-6" />
            <div className="hidden md:block">Sign Out</div>
          </button>
        </form>
      </div>
    </div>
  );
}
import {
UserGroupIcon,
HomeIcon,
DocumentDuplicateIcon,
} from '@heroicons/react/24/outline';
// Map of links to display in the side navigation.
// Depending on the size of the application, this would be stored in a database.
const links = [
{ name: 'Home', href: '/dashboard', icon: HomeIcon },
{
name: 'Invoices',
href: '/dashboard/invoices',
icon: DocumentDuplicateIcon,
},
{ name: 'Customers', href: '/dashboard/customers', icon: UserGroupIcon },
];
export default function NavLinks() {
return (
<>
{links.map((link) => {
const LinkIcon = link.icon;
return (
<a
key={link.name}
href={link.href}
className="flex h-[48px] grow items-center justify-center gap-2 rounded-md bg-gray-50 p-3 text-sm font-medium hover:bg-sky-100 hover:text-blue-600 md:flex-none md:justify-start md:p-2 md:px-3"
>
<LinkIcon className="w-6" />
<p className="hidden md:block">{link.name}</p>
</a>
);
})}
</>
);
}
현재 사이드바에서 페이지 이동을 구현했는데, 이때 Link 내부에서 a 태그를 써서페이지 이동시마다 화면 전체가 새로고침 된다.이를 a태그 대신 Link를 쓰면 client-side-navitaion 이 가능하게 함
import {
  UserGroupIcon,
  HomeIcon,
  DocumentDuplicateIcon,
} from '@heroicons/react/24/outline';

import Link from 'next/link';

// Map of links to display in the side navigation.
// Depending on the size of the application, this would be stored in a database.
const links = [
  { name: 'Home', href: '/dashboard', icon: HomeIcon },
  {
    name: 'Invoices',
    href: '/dashboard/invoices',
    icon: DocumentDuplicateIcon,
  },
  { name: 'Customers', href: '/dashboard/customers', icon: UserGroupIcon },
];

export default function NavLinks() {
  return (
    <>
      {links.map((link) => {
        const LinkIcon = link.icon;
        return (
          <Link
            key={link.name}
            href={link.href}
            className="flex h-[48px] grow items-center justify-center gap-2 rounded-md bg-gray-50 p-3 text-sm font-medium hover:bg-sky-100 hover:text-blue-600 md:flex-none md:justify-start md:p-2 md:px-3"
          >
            <LinkIcon className="w-6" />
            <p className="hidden md:block">{link.name}</p>
          </Link>
        );
      })}
    </>
  );
}
( 페이지 상단의 새로고침을 보면 이전 a태그와 다르게 새로고침 버튼이 활성화 되지 않음을 확인할 수 있다.)
이럴 경우 부분적 리랜더링은 되도 새로고침은 없어진다.
넥스트의 페이지 이동 원리(Automatic code-splitting and prefetching)
spa와 다르게 넥스트는 루트 요소별로 페이지를 나눈다 ( spa 에서는 처음에 한번에 다 로드함) 즉 페이지가 독립되어 있다. 이후 연결된 루트들을 prefatching 한다. 따라서 페이지 이동시 즉각적으로 되도록 한다.
활성화된 루트를 usePathName 훅을 통해 보여주기
보통 네비게이션 바의 활성화 여부를 통해서 현재 페이지를 유저에게 알려준다. 이를 next.js에서는 usePathName 훅을 통해서 현재 route를 알고 이를 바탕으로 네비바 활성화를 할 수 있다. 이때 네비바는 client 컴퍼넌트 처리해준다!
'use client';

import {
  UserGroupIcon,
  HomeIcon,
  DocumentDuplicateIcon,
} from '@heroicons/react/24/outline';
import Link from 'next/link';
import { usePathname } from 'next/navigation';
import clsx from 'clsx';

// Map of links to display in the side navigation.
// Depending on the size of the application, this would be stored in a database.
const links = [
  { name: 'Home', href: '/dashboard', icon: HomeIcon },
  {
    name: 'Invoices',
    href: '/dashboard/invoices',
    icon: DocumentDuplicateIcon,
  },
  { name: 'Customers', href: '/dashboard/customers', icon: UserGroupIcon },
];

export default function NavLinks() {
  const pathname = usePathname();

  return (
    <>
      {links.map((link) => {
        const LinkIcon = link.icon;
        return (
          <Link
            key={link.name}
            href={link.href}
            className={clsx(
              'flex h-[48px] grow items-center justify-center gap-2 rounded-md bg-gray-50 p-3 text-sm font-medium hover:bg-sky-100 hover:text-blue-600 md:flex-none md:justify-start md:p-2 md:px-3',
              {
                'bg-sky-100 text-blue-600': pathname === link.href,
              }
            )}
          >
            <LinkIcon className="w-6" />
            <p className="hidden md:block">{link.name}</p>
          </Link>
        );
      })}
    </>
  );
}
상단에 'use client' 를 통해서 리엑트의 클라이언트 컴퍼넌트로 변경해 주고, clsx라이브러리를 활용해서
pathname과 link.href가 같을 떄 'bg-sky-100 text-blue-600' 이 적용되도록 하였다.
6장 Setting Up Your Database
PostgreSQL을 사용해서 DB세팅을 할 거다. 관련 내용이 필요없다면 스킵해도 된다고 하네요~
설명서보고 따라하는거라, 직접 보고 하는게 더 좋을 거 같아요
https://nextjs.org/learn/dashboard-app/setting-up-your-database
Learn Next.js: Setting Up Your Database | Next.js
Setup a database for your application and seed it with initial data.
nextjs.org
(my sql을 얕게 나마 봐서 코드 모양이 익숙하네요..)
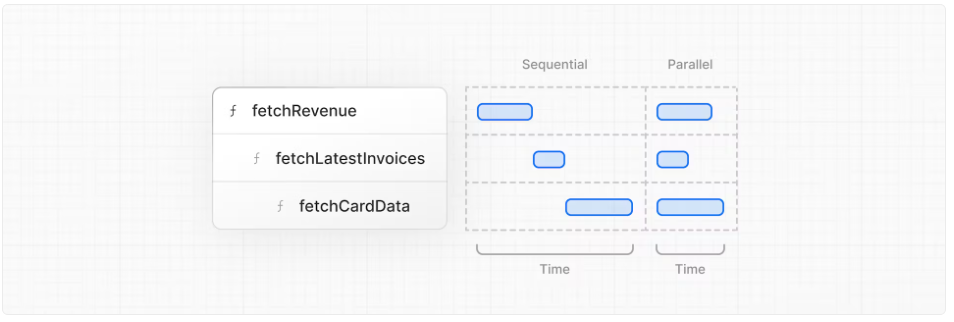
7장 Fetching Data
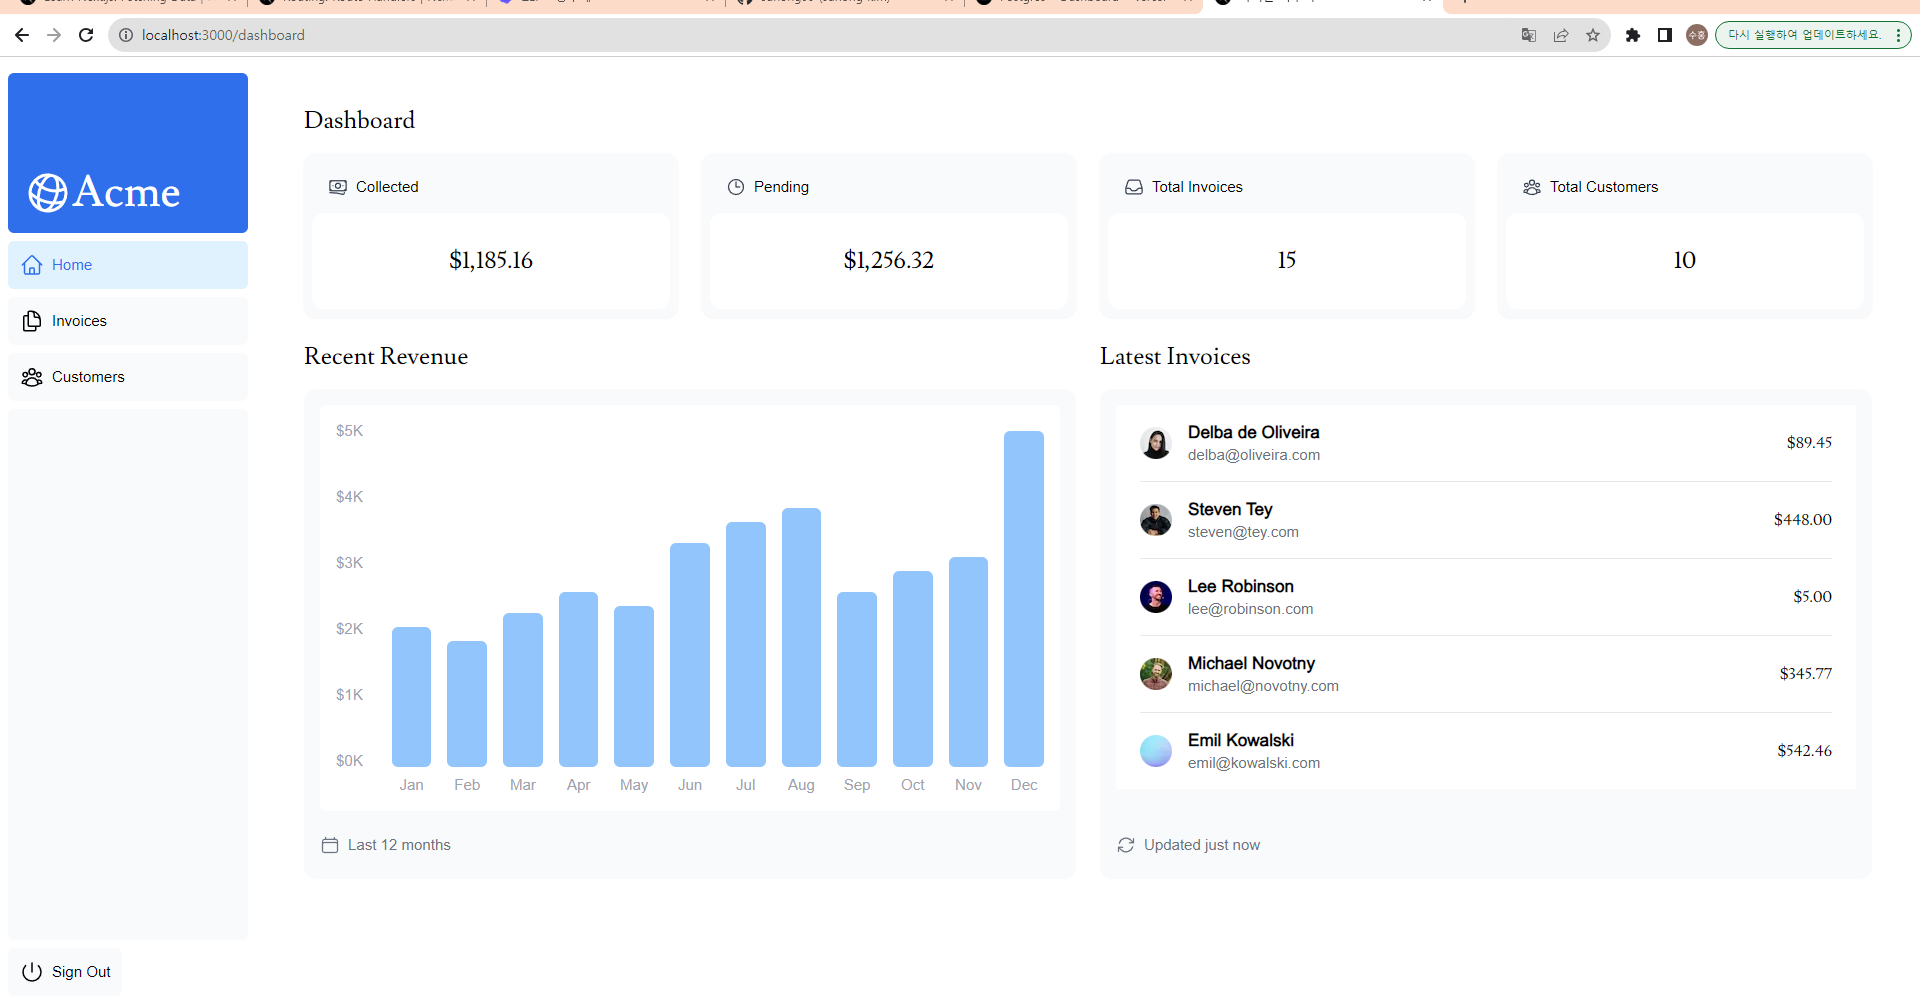
7장을 마치면 위 이미지처럼 됩니다.
7장에서는
1. 어떻게 데이터를 가져올 지
2. 서버 컴퍼넌트가 어떻게 백엔드 리소스를 안전하게 접근할 수 있도록 할 지
3. 워터 폴이 무엇인지
4. 워터폴을 해결하려면 평행하게 데이터를 요청해야하는데, 이를 자바스크립트 패턴에서 어떻게 하는지를 배웁니다.
우선 데이터를 가져오는 건 크게 2가지로 나뉘어 집니다.
1. API LAYER
API LAYER는 3rd party 서비스를 사용할 때, client에서 데이터 요청할 떄, 디비 secrets를 숨기기 위해서 사용할 수 있습니다. 낵스트에서는 API endpoints를 Route Handlers를 이용해서 만들 수 있습니다.
Route.js라는 파일을 사용하면 되는데, 이는 page.tsx와 같이 공존할 수는 없습니다. 자세한 사용법은 https://nextjs.org/docs/app/building-your-application/routing/route-handlers
Routing: Route Handlers | Next.js
Create custom request handlers for a given route using the Web's Request and Response APIs.
nextjs.org
2. Database queries
풀스텍 앱인 경 백엔드 데이터 요청해야할 텐데, 이때 관계형 디비인 Postgresql 과 같은 경 SQL문 ORM과 Prisma로 백엔드와 상호작용 할 수 있습니다.
API endpoints를 만드는데, 디비와 상호작용해야할 경우, 서버컴퍼넌트 사용하는 경우에는 API LAYER를 만들지 않고도 database secrets를 클라이언트한테 노출시키지 않을 수 있습ㄴ디ㅏ.
이외의 방법은 아래 링크에 있다고 하네요.
Using Server Components to fetch data
1. 서버 컴퍼넌트를 사용해서 패치할 경우, 비싼 데이터와 로직 서버에서 유지하고 , 클라이언트에는 결과물만 보내면 됩니다.
2. 서버 컴퍼넌트가 비동기를 지원해 데이터 요청시 비동기작업이 더 간단해 집니다.
3. 서버 컴퍼넌트에서 패칭 요청하기에, 추가적인 API LAYER가 필요없습니다.
6장에서 vercel의 postgres에 DB를 seeding하였는데, 이를 Vercel Postgres SDK 를 통해 접근할 겁니다.
data.ts에서 sql을 임포트하고 , 아래에 각각의 함수들에서 sql문을 통해서 데이터를 가져오는 것을 확인할 수 있습니다.
//data.ts

import { sql } from '@vercel/postgres';
/*
.....
*/
// Fetch the last 5 invoices, sorted by date
const data = await sql<LatestInvoiceRaw>`
  SELECT invoices.amount, customers.name, customers.image_url, customers.email
  FROM invoices
  JOIN customers ON invoices.customer_id = customers.id
  ORDER BY invoices.date DESC
  LIMIT 5`;
export default async function Page() {
  const revenue = await fetchRevenue();
  const latestInvoices = await fetchLatestInvoices();
  const {
    numberOfInvoices,
    numberOfCustomers,
    totalPaidInvoices,
    totalPendingInvoices,
  } = await fetchCardData();
마지막으로 카드 컴퍼넌트를 랜더링하면 문제점을 2가지를 확인할 수 있다.
1. waterfall 이 생김
2. next에서는 static generation을 하는데 이럴 경우 db가 바꿨는데 해결되지 않음(8장에서 설명)
waterfall이란 무엇일까?
워터폴은 폭포수처럼 이전 요청이 완료되어야 다음 데이터를 요청하는 모양을 말한다.
이게 절대적으로 나쁜건 아닌데, 이걸 의도적으로 관리할 줄 알아야 한다.
이떄 사용하는게 Promise.all() 과 Promise.allSettled()이다
export async function fetchCardData() {
  try {
    const invoiceCountPromise = sql`SELECT COUNT(*) FROM invoices`;
    const customerCountPromise = sql`SELECT COUNT(*) FROM customers`;
    const invoiceStatusPromise = sql`SELECT
         SUM(CASE WHEN status = 'paid' THEN amount ELSE 0 END) AS "paid",
         SUM(CASE WHEN status = 'pending' THEN amount ELSE 0 END) AS "pending"
         FROM invoices`;

    const data = await Promise.all([
      invoiceCountPromise,
      customerCountPromise,
      invoiceStatusPromise,
    ]);
    // ...
  }
}
이 패턴을 사용하면
- Start executing all data fetches at the same time, which can lead to performance gains.
- Use a native JavaScript pattern that can be applied to any library or framework.
동시에 요청해서 성능향상 노릴 수 있고, 자바스크립트 패턴이라 어떠한 라이브러리 또는 프레임워크에도 적용이 가능하다.
단점은 특정 요청이 다른 요청에 비해서 다를 때 문제가 생길 수 있다는 점이다.
8장 Static and Dynamic Rendering
정적 랜더링의 3가지 장점은
1. 빠른 랜더링 가능 (미리랜더링된 내용들이 캐쉬되어 있음)
2. 서버 부하 감소 ( 이미 만들어져 있기에 매요청시 새로 만들 필요가 없음)
3. SEO ( 미리랜더링되서 SEO가 크롤링하기 좋음)
하지만 데이터가 자주 교체가 되는 대시보드앱에선 적합하지 않음( 블로그나 홍보물 같이 데이터가 고정될 떄는 유리함)
이와 반대되는 개념이
Dynamic Rendering (동적 렌더링)
컨텐츠가 사용자가 매번 요청할 떄마다 바뀐다. 이럴 경우 여러 장점이 있는데 크게
1. 실시간 데이터
2.유저 특화된 내용
3. 요청시에만 얻을 수 있는 정보 사용 (쿠키 URL 파라미터등)
이제 우리가 만들려는 대쉬보드는 동적 렌더링에 적합함으로 NEXT.JS의 API인 unstable_noStore 을 사용할 것이다.
import { unstable_noStore as noStore } from 'next/cache';


export async function fetchRevenue() {
  // Add noStore() here prevent the response from being cached.
  // This is equivalent to in fetch(..., {cache: 'no-store'}).
  noStore();
각각의 함수에 noStore를 선언하면 된다. 이럴 경우 캐쉬를 하지 않게 하여 동적 랜더링을 하게 한다.
이후 한 요청에서 대해서 일부러 3초간의 딜레이를 부여한다.
export async function fetchRevenue() {
  // Add noStore() here prevent the response from being cached.
  // This is equivalent to in fetch(..., {cache: 'no-store'}).
  noStore();

  try {
    // Artificially delay a reponse for demo purposes.
    // Don't do this in real life :)

    console.log('Fetching revenue data...');
    await new Promise((resolve) => setTimeout(resolve, 3000));

    const data = await sql<Revenue>`SELECT * FROM revenue`;

    console.log('Data fetch complete after 3 seconds.');

    return data.rows;
  } catch (error) {
    console.error('Database Error:', error);
    throw new Error('Failed to fetch revenue data.');
  }
}
이럴 경우 페이지 이동이 최소 3초 이후에 된다는 사실을 알 수 있다.
이는 동적 랜더링의 경우 가장 느린 요청을 기준으로 완료가 되기 떄문이다.
Next.js-14 튜토리얼 따라가기 -3 (9장~ 12장)
Next.js-14 튜토리얼 따라가기 -3 (9장~ 12장)
Next.js-14 튜토리얼 따라가기 -2 (5~8장) Next.js-14 튜토리얼 따라가기 -2 (5~8장) 1~4장을 통해서 간단하게 next에서는 UI. 이미지 . 라우팅. 폰트를 어떻게 구현 및 처리했는지를 확인했다. 5장 Navigating Betw
ungumungum.tistory.com
'프론트엔드 > Next' 카테고리의 다른 글
| Auth.js로 Oauth 구현하기 (예시 : google) (0) | 2024.04.27 |
|---|---|
| Next.js에서 WebVitals 및 성능 측정하기 (0) | 2024.02.20 |
| Next.js-14 튜토리얼 따라가기 -4 (13장~ 16장) (0) | 2023.11.12 |
| Next.js-14 튜토리얼 따라가기 -3 (9장~ 12장) (0) | 2023.11.10 |
| Next.js-14 튜토리얼 따라가기 -1 (1~4장) (0) | 2023.11.09 |