서론 : CI, CD ,DOCKER등 막연하게 해야할 내용을 멘토님께 설명을 듣고, 좀 더 공부할 필요성을 느껴서 정리하게 되었습니다.
도커 사용 이유!
프로젝트를 진행할 때, 환경의 통일을 위해서 컨테이너를 이용해서 베포를 해야한다. 강의 내용을 듣거나, 블로그 내용을 따라하다 보면 종종 이 사람은 이렇게 했다는데 왜 나는 안되지 라는 의문이 생긴적이 많을 겁니다. 이는 운영체제, 노드 버전 등 개발 환경도 코드를 실행하는데 영향을 끼치기 때문입니다.
이런 문제를 해결하기 위해서 컨테이너 개념이 생겼습니다.
특정한 가상환경에서 개발환경을 기록하고 실행을 한다면 모두가 똑같은 환경에서 작업을 할 수 있다!
이를 도커는 도커 파일을 통해 기록하고 해당 이미지를 생성해서 실행시키는 것으로 구현합니다.
가상 환경을 만드는 방법과 이를 보완해서 컨테이너를 생성하는 방법은 기존에도 있었지만, 도커가 인기있는 이유는 유저가 사용하기 쉽고 무료이기 때문입니다.
https://mysetting.io/slides/xxj85vnvey#/38
왕초보를 위한 도커 사용법
염근철님 슬라이드
mysetting.io
혹은
https://docs.docker.com/get-started/
을 이용하시면 더 자세한 내용이 확인 가능합니다!
Overview of the get started guide
Get started with the Docker basics in this comprehensive overview, You'll learn about containers, images, and how to containerize your first application.
docs.docker.com
이제 저는 프론트엔드에 관심이 있는 개발자이기에 예시를 프론트 엔드와 관련지어서 설명하겠습니다.
예시로 사용할 프로젝트는 리덕스에서 기본으로 제공하는 프로젝트입니다.
https://github.com/reduxjs/redux-templates
GitHub - reduxjs/redux-templates: Official Redux templates for Vite, Create-React-App, and more
Official Redux templates for Vite, Create-React-App, and more - GitHub - reduxjs/redux-templates: Official Redux templates for Vite, Create-React-App, and more
github.com
일반 cra로 타입 redux 생성하기
npx create-react-app suhong --template redux-typescript
npm start하면 아래와 같은 화면이 보입니다. 이를 도커에서 실행해보겠습니다.

1.dockerfile 생성
dockerfile은 일종의 배치파일의 역할을 하는데, 이미지를 구성할 명령어를 저장해 놓은 파일입니다.
자체 DSL 언어로 이미지 생성 과정을 명시하는데, 각각의 명령어에 대한 자세한 설명은 아래 링크에서 확인할 수 있습니다. (좌측탭에 python java go 등등이 있네요)
https://docs.docker.com/language/nodejs/build-images/
Build your Node image
Learn how to build your first Docker image by writing a Dockerfile
docs.docker.com
FROM node:18-alpine
# ENV NODE_ENV=production

WORKDIR /app

COPY ["package.json", "package-lock.json*", "./"]

#RUN npm install --production
RUN npm install
COPY . .

CMD ["node", "server.js"]
예시에서는 node.js 서버까지 준비해서 실행하는 것이지만, 저는 간단하게 로컬에서 run만 확인하겠습니다.!
공식문서보고 차근차근 따라하셔도 좋을 것 같아요. .
하지만 그전에 공식문서에서 나온 코드를 하나하나 해석해볼게요.
공식 문서코드
첫 줄부터 이제 해석하면
FROM : Docker images can be inherited from other images. Therefore, instead of creating our own base image, we’ll use the official Node.js image that already has all the tools and packages that we need to run a Node.js application.
FROM으로 사용할 이미지를 선택할 수 있습니다.
그냥 저희만의 이미지 만들기보단 .node.js의 공식적인 이미지를 사용하면 쉽게 이미지 형성이 가능하다고 하네요.
NODE_ENV : The NODE_ENV environment variable specifies the environment in which an application is running (usually, development or production).
개발환경인지 배포환경인지 결정하는 환경변수 값이라고 하네요
WORKDIR :. This instructs Docker to use this path as the default location for all subsequent commands. This way we do not have to type out full file paths but can use relative paths based on the working directory.
도커 파일을 실행할 경로를 선택하면, 이후에는 상대경로를 통해서 더 쉽게 경로 지정이 가능합니다. 이를 위해서 경로를 지정하는게 WORKDIR
COPY : Before we can run npm install, we need to get our package.json and package-lock.json files into our images. We use the COPY command to do this.
저희는 보통 깃을 이용해서 프로젝트를 클론 받을 때 npm i 를 통해서 노드 모듈들을 설치합니다.
도커에서도 프로젝트에 사용할 노드 모듈을 설치하기 위해서 package.json과 lock.json을 사용하는데 이를 copy키워드로 해당 파일을 옮겨줍니다.
이때 COPY의 매개변수로를 받을 파일들, 경로 가 있습니다.(마지막 매개변수가 경로)
위에서는 package.json과 lock.json을 ./ (app)에 복사해라는 것입니다.
RUN : Once we have our files inside the image, we can use the RUN command to execute the command npm install.
런을 통해서 명령어를 실행할 수 있는데, package.json을 옮긴후 RUN을 통해서 모듈들을 가상환경에 설치
COPY : The next thing we need to do is to add our source code into the image. We’ll use the COPY command just like we did with our package.json files above.
이후 다른 소스코드들을 모두 옮겨줍니다.
CMD : Now, all we have to do is to tell Docker what command we want to run when our image is run inside of a container.
이제 이미지 생성과 관련된 명령어를 입력이 끝났으니 어떤 명령어로 생성한 이미지를 실행할 지 결정해야 합니다. 이를 CMD를 통해서 합니다.
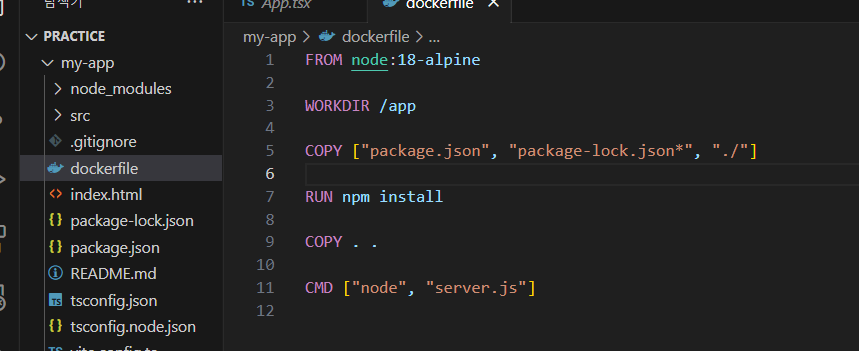
이를 바탕으로 내 dockerfile코드
FROM node:18-alpine

WORKDIR /app

COPY ["package.json", "package-lock.json*", "./"]

RUN npm install

COPY . .

CMD ["npm","run","start"]
2. 이미지 빌드
docker build --tag suhong .전 프로젝트를 제 이름으로 생성하겠습니다 ( 예제에서는 node-docker) 였어요.
생성한 파일을 통해서 이미지를 빌드하는 키워드입니다. 이떄 --tag는 빌드할 이미지의 이름을 설정하는 건데,
예제처럼 저도 node-docker라는 이름으로 이미지를 생성하겠습니다.
(이 과정에서 도커 데스크탑을 켰는지 먼저 확인해 주세요.
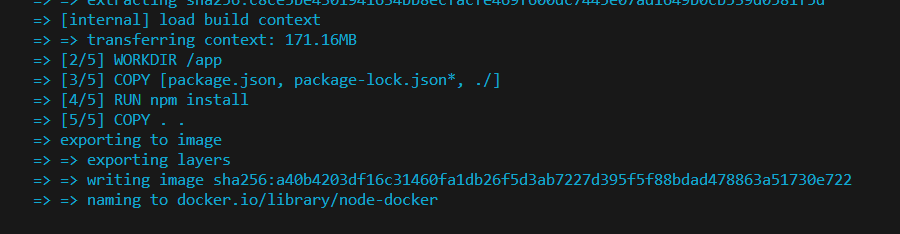
아래 명령어로 이미지가 생성됏는지 확인할 수 있습니다.
docker images
3. 실행
이미지는 설정한 태그 이름 혹은 ID로 실행가능합니다.
docker run -p 3000:3000 suhong포트맵핑을 하면 연결된 걸 볼 수 있습니다. 이떄 host : container 의 포트입니다. ( 포트가 현재 3000으로 설정되어 있습니다..)
docker run -p 8080:3000 suhong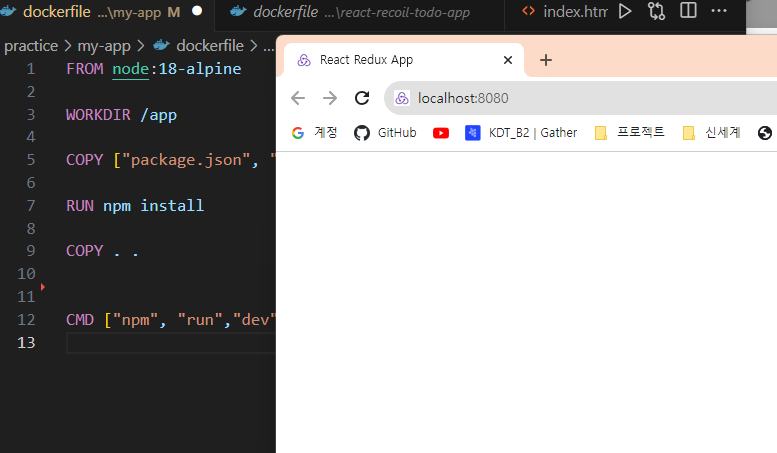
`
참고링크
https://stackoverflow.com/questions/40459280/docker-cannot-start-on-windows
Docker cannot start on Windows
Executing docker version command on Windows returns the following results: C:\Projects> docker version Client: Version: 1.13.0-dev API version: 1.25 Go version: go1.7.3 Git commit:
stackoverflow.com
https://tscofet.oopy.io/260778d6-d511-4b3a-9e6f-dfc2add821f6
[Devops Study] 05-2. 특화배포 - 개발서버 구축(Docker 파일구성)
참고
tscofet.oopy.io
https://dev.to/ysmnikhil/how-to-build-with-react-or-vue-with-vite-and-docker-1a3l
How to use React or Vue with Vite and Docker
Introduction Hello fellow developers! With this guide, we will be creating a project that...
dev.to
https://junhyunny.github.io/information/docker/docker-file-expose-instruction/
Dockerfile EXPOSE 명령어
<br /><br />
junhyunny.github.io
'DOCKER' 카테고리의 다른 글
| docker vite typscript 이미지 생성하기 (0) | 2023.09.09 |
|---|---|
| 도커 build시 에러 ERROR: error during connect: this error may indicate that the docker daemon is not running (0) | 2023.09.08 |